
Deprecated: array_key_exists(): Using array_key_exists() on objects is deprecated. Use isset() or property_exists() instead in /nas/content/live/trees4future/wp-content/plugins/ht-knowledge-base/php/ht-knowledge-base-category-ordering.php on line 58
Deprecated: array_key_exists(): Using array_key_exists() on objects is deprecated. Use isset() or property_exists() instead in /nas/content/live/trees4future/wp-content/plugins/ht-knowledge-base/php/ht-knowledge-base-category-ordering.php on line 60
Warning: Parameter 2 to qtranxf_postsFilter() expected to be a reference, value given in /nas/content/live/trees4future/wp-includes/class-wp-hook.php on line 324
Deprecated: array_key_exists(): Using array_key_exists() on objects is deprecated. Use isset() or property_exists() instead in /nas/content/live/trees4future/wp-content/plugins/ht-knowledge-base/php/ht-knowledge-base-category-ordering.php on line 58
Deprecated: array_key_exists(): Using array_key_exists() on objects is deprecated. Use isset() or property_exists() instead in /nas/content/live/trees4future/wp-content/plugins/ht-knowledge-base/php/ht-knowledge-base-category-ordering.php on line 60
Chapter 13: Permagardening
 A permagarden is a permanent bio-intensive garden that, once established, can protect and produce an abundance of diverse, healthy foods in a relatively small area from one season to the next for as long as it is properly managed. The garden is permanent in that, once established, the barriers, paths and beds will remain there to capture, direct and store water and produce food. Bio-intensive refers to the management practices, including composting, double digging, amending, companion planting, triangular sowing, etc. that are so important to the high-yielding, long-lasting productivity of the garden. Permagardens are easily accessible, normally near the home, and can be cared for by the whole family, youth, adults, and elderly alike.
Water conservation and soil health are inherent to the permagarden, and by following simple intercropping, crop rotation and observation practices, pest problems are minimal. The pathways are permanent, providing easy access and irrigation channels to the soft-soiled beds that absorb and store water during the rainy season for use by the plants during the dry season. The berms, swales and holes bordering the garden beds control water and minimize erosion while supporting a variety of herbs, flowers and other perennial plants that provide useful products as well as pest and wind protection.
Objectives of a permagarden are to:
A permagarden is a permanent bio-intensive garden that, once established, can protect and produce an abundance of diverse, healthy foods in a relatively small area from one season to the next for as long as it is properly managed. The garden is permanent in that, once established, the barriers, paths and beds will remain there to capture, direct and store water and produce food. Bio-intensive refers to the management practices, including composting, double digging, amending, companion planting, triangular sowing, etc. that are so important to the high-yielding, long-lasting productivity of the garden. Permagardens are easily accessible, normally near the home, and can be cared for by the whole family, youth, adults, and elderly alike.
Water conservation and soil health are inherent to the permagarden, and by following simple intercropping, crop rotation and observation practices, pest problems are minimal. The pathways are permanent, providing easy access and irrigation channels to the soft-soiled beds that absorb and store water during the rainy season for use by the plants during the dry season. The berms, swales and holes bordering the garden beds control water and minimize erosion while supporting a variety of herbs, flowers and other perennial plants that provide useful products as well as pest and wind protection.
Objectives of a permagarden are to:
- Diversify and increase food production
- Provide daily nutritional needs for the family
- Provide income opportunities
- Control harmful pests
- Reduce the work needed to grow substantial amounts of food
Site Selection & Planning
As with all components of the Forest Garden, it is important to think about the design of the permagarden prior to constructing it. Things to consider include:- Location – Does the site have easy access? It should be in a place near the home so that family members can easily check on and work in it regularly and so that the products can be easily harvested for meals each day.
- Water – Can rainwater be captured from the roof of the home or nearby slopes? Is there a nearby water source for watering your beds in the dry season?
- Sun – Garden vegetables need lots of sun. Is there an open area near the home that receives direct sunlight for a good part of the day?
- Soil – Vegetables need healthy soil to grow. Don’t worry about the current state of the soil too much though as it can be amended and improved through the use of compost, manure, charcoal, wood ash, etc. Just be sure that there is no bedrock near the surface.
- Protection – Is the area (or can it be) protected from wind and intruding animals? Protection can be established by living fences and borders of perennial plants
- Space – Is there enough space to move around the garden beds? Where will the compost piles be located?
Constructing a Permagarden
Water Control
Controlling the flow of rainwater in your permagarden prevents it from washing away your beds and directs it underground where it can continue to irrigate your crops even when it is not raining. To do this, look at how water moves through your permagarden site. Where will water flow? There are two answers to this. The easy answer is ‘downhill’. Water always flows downhill, until something prevents it from doing so. A more pragmatic answer should be ‘water flows where we want it to flow’. Since we know that water flows downhill and always will unless something prevents it, all we need to do is decide where we want the water to go, then direct it there. We do this by following these five water control principles: Stop, Slow, Sink, Shade and Spread. These are achieved by constructing swales, berms, pathways and holes out of soil, in the appropriate places, to slow down the water and direct it to where we want it go, then stopping it so that it can spread underneath the garden beds and sink deep into the soils (see the Earthworks section for descriptions of these water control measures). The first step in physically constructing your permagarden is to construct the outer swales, berms and holes to slow down and guide any runoff water through the garden and into the ground. A useful design for a permagarden is to construct it in a square, about 4 meters by 4 meters (see the example permagarden design below). It can be bigger, particularly if the family wants to produce vegetables for sale in addition to household consumption, but 16 square meters will produce an abundance of seasonal vegetables for a family of five. Once the footprint of the permagarden is defined, clear this area of vegetation and dig up the first few centimeters of grass and plant roots. You can keep the soil to build your beds and berms, and place the vegetation in your compost pile. The top swale and berm are then built nearly perpendicular to the flow of the water, with holes on either end to stop water and allow it to sink. There should be a very slight drop from the top end of one side of the berm to the other so that water will slowly flow down, then enter through the pathway into the garden and around (and into) the beds, slowed again by the other berms and holes so as much water as possible that enters the garden area will be trapped and filtered through the beds and deep into the soil for later use by the plants in the dry season.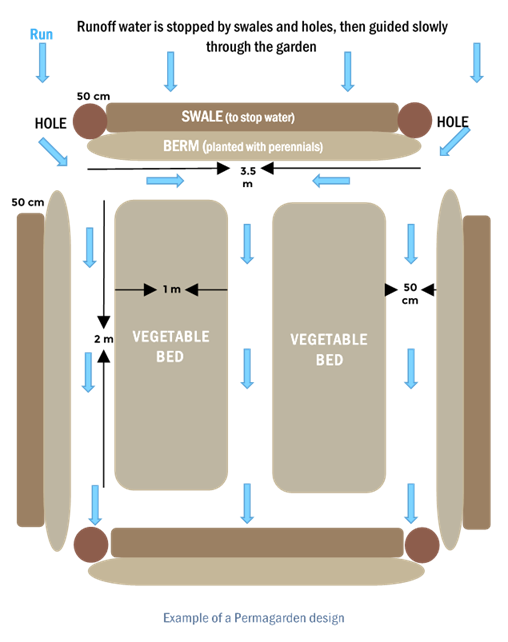
Double Digging & Amending the Bed
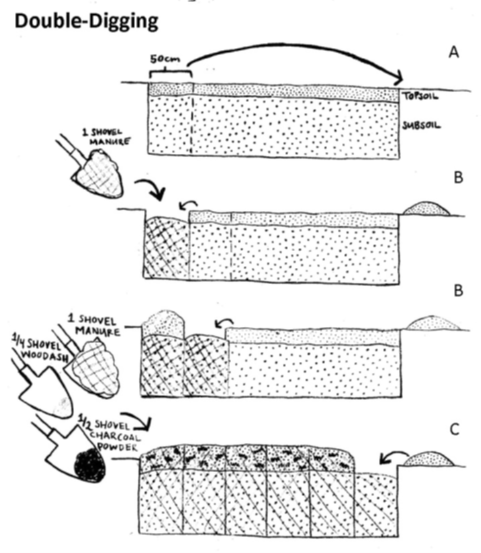
After the berms, swales and holes are dug to form the borders of the garden and direct water slowly through it and into the ground, it is time to dig the beds. Healthy vegetable crops need 4 things to thrive: sunlight, water, air, and nutrients. If sited appropriately you will have plenty of sunlight. The structures around the garden will direct water into the garden. So that leaves air and nutrients. These come from loosening up the soil deep beneath the surface of the beds to enhance aeration, then adding various amendments that will provide an abundance of organic nutrients to the soil. AG – Double Digging PeaceCorpsSenegal Begin this process by marking out the footprint of the beds. They should be about 1 meter wide, by 2 meters long, leaving about a 50 to 60 cm path around the beds. Double digging and amending steps: Double digging the beds is the most difficult part of constructing the permagarden, but it will ensure proper aeration and healthy root growth. It is best to complete this early in the morning when it is cool and you have plenty of energy. Before double digging your beds, gather the following tools and materials:- A spade and, if available, a digging tool
- 4 shovels full of Compost or Manure per square meter
- 1 shovel full of Charcoal Powder per square meter
- 1 shovel full of plastic-free Wood Ash per square meter
- Start by marking the corners where you want your nursery bed to lie. The bed should be one meter wide. The length depends on the size of your site but should be no more than 10 meters long so that you can move from one side of the bed to the other easily. Leave about 50 cm between beds so that you can walk around them. You do not ever want to step on the beds!
- Remove the cover vegetation and transfer it to an area that is out of the way (alternatively, add it to your nursery’s compost pile).
- Start at one side of the bed and mark an area about 2 shovel widths (25 cm) down the length of the bed. Using a shovel, pickaxe, or digging tool, remove the topsoil from the first section you marked off, down to the depth of the hardpan (or about 25 cm where there is little to no topsoil). Place the topsoil you dig out at the end of the bed.
- Dig the next 25 cm of subsoil below the topsoil you just removed. Do not remove this subsoil, but loosen it, breaking up the larger pieces of dirt. It makes the process much easier to have a partner with you to alternate digging out topsoil then loosening the subsoil.
- Move down to the next 50 cm section that you marked off. This time, instead of putting the soil to the side as you remove it, shovel it to the first section that you dug out and add the topsoil to fill that hole.
- While you fill, place two shovels of manure or compost, and a half shove each of wood ash and charcoal powder on top and mix it all in well to amend the soil.
- Then loosen the subsoil from the second section you just dug out. Continue this process of moving the topsoil, amending it, then loosening the subsoil along the entire length of the bed. When you reach the end of the bed and have loosened the final section of subsoil, place the topsoil that you dug out from the first section to fill in the last section, then add and mix the amendments.
- When you’ve worked the entire bed in this fashion, you’ve double dug your bed. Level off the bed with your shovel or a rake, breaking up any chunks of soil to create a smoothe, flat surface.
- Water the beds lightly to be sure they are level, and continue watering the beds every other day for a week, removing any weeds that germinate before sowing your seeds.
 Maintaining Your Double-Dug Beds
The double-digging process is a lot of work. The last thing you want to do is re-compact your soil after spending so much time and energy making it fluffy and soft. Here are a few things to keep in mind when maintaining your beds:
Maintaining Your Double-Dug Beds
The double-digging process is a lot of work. The last thing you want to do is re-compact your soil after spending so much time and energy making it fluffy and soft. Here are a few things to keep in mind when maintaining your beds:
- Always use a watering can when watering to reduce soil disturbance and erosion.
- Mulch the garden beds when the seedlings reach about 10cm in height. Without mulch, the surface will continually drying in the sun and then remoistening when it is watered, leading to surface crusting and reduced water penetration.
- Don’t step in the garden beds. Ever! This is the easiest way to compact the soil, damage existing root systems, and reduce the water-holding capacity.
Raised and Sunken Beds
In the double-digging example above, you will end up with a bed surface that is slightly above ground – a raised bed. The reason for this is because the compacted soil you dug up is now much looser, so it takes up more space, then you also added amendments. Depending on the climatic conditions when you are planting, however, it may be preferable to have a sunken bed rather than a raised bed. See below: Raised beds Raised beds are elevated above the surface of the path. Generally with permagarden beds, a height of 10 to 15cm is sufficient. However, it is also possible to raise a bed to waist height so that you do not have to stoop over to reach it. Raised beds can be created by adding enough soil amendments that the surface of the bed is heightened, or by using bricks or rocks to create and reinforce the shape of the bed and then backfilling with soil and amendments. Raised beds generally:- Stay less compacted than other types of beds
- Do not flood during the rainy season, improving the success of root crops at that time of year
- Are easier on your back as you do not have to bend over as far when planting and weeding
- Dry out more quickly than other types of beds during the dry season.
- Are ideal for areas that are hot, dry, and extremely sandy
- Retain moisture much better than raised beds
- Tend to flood in the rainy season and are not ideal for root crops
Vegetable Propagation
| The Transplant Group: |
|---|
| Cabbage |
| Basil |
| Bitter Tomato |
| Eggplant |
| Leek |
| Lettuce |
| Marigold |
| Onion |
| Sweet Pepper |
| Hot Pepper |
| Tomato |
| Winter Greens |
The Germinate and Transplant Method
With this method, you begin by sowing your vegetable seeds in a small area to germinate, and then transplanting them into the permagarden beds once they are large enough to make it on their own. See The Transplant Group box for some of the vegetables that prefer this method. While this system takes more time and labor than direct seeding, it is beneficial for several reasons: Requires less water Since you are sowing the seeds close together in the smaller germination beds, you can water them more efficiently Improved plant selection Not all seeds germinate, but most transplants survive. When your seedlings are ready for transplanting, you can pick the healthiest, and strongest of them to transplant into the permagarden bed. These strong, healthy transplants are also the best candidates for saving seeds after the plants have flowered. Provides ideal growth space Plants grow better when they are evenly spaced, and it is easier to evenly space transplants than plants that are direct seeded. When plants are bunched together, their roots compete for soil nutrients and water, and their leaves compete for space and light. Plants that are tightly bunched tend to be smaller, prone to disease and pest problems, and less productive. Increased root growth Some plants benefit from increased root growth when transplanted deeper into the soil. When Solanaceae such as tomato, pepper, eggplant, and bitter tomato are planted deeper than the root collar, they actually send out roots from the portions of the stem that are in contact with the soil, greatly increasing the depth of the lateral root system. Better use of space over time Nurseries make better use of space and time. You can have seedlings in a nursery while you still have mature crops in your garden beds. For an intensive gardening operation, you should plan to start you nursery 2-6 weeks (depending on the vegetable) before the projected harvest date of the crops in your permanent beds.Building Your Germination Bed
- Double-Dig and amend a 1×1 m space, following the instructions in the Double Digging section.
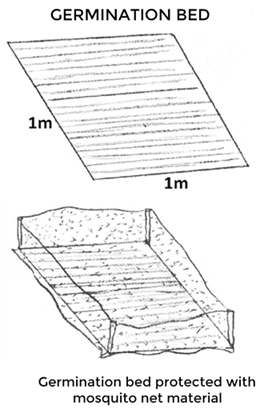
- Using your finger or a stick, make shallow trenches across the width of the bed, with rows 10 cm apart.
- Sprinkle seeds 1-2 cm apart
- Seed one species per row, and make a note of which species you sow in each row.
- Cover seeds and tamp lightly.
- Water as gently as possible.
- Place stakes in corners, about 50 cm high, and cover the bed with a mosquito net or mesh net to provide shade and protect it from insect attacks. At the very least, build a small shade structure about 50 cm from the ground to protect the germinants from direct sunlight.
- Water daily and weed weekly
Nursery Troubleshooting
Seeding a nursery is pretty straight forward, however sometimes the seeds never show. If that happens, here is a list to help you troubleshoot.- Seeds are planted too deeply – If this is the case they may germinate in the soil, but the first leaves are unable to reach the surface. A good general rule is that seeds should be planted at a depth that is equal to twice their thickness. For very small seeds, including Lettuce and Basil, it can be more successful to scatter them lightly over the surface and then gently scratch them in with your fingertips or lightly spread soil over them.
- Using old seeds – Seeds lose their viability over time and may not germinate. If you are sure that you have planted your seeds at the proper depth, it is possible that your seed is no longer viable.
- Planting in water-logged soil – Seeds and young sprouts can rot if there is too much water and not enough oxygen. If a nursery is double dug properly, this should not be a problem. If you happen to be using containers, be sure to poke small holes in the sides and bottom to allow for proper drainage.
- Using soil that has been exposed to herbicides – Herbicides can linger in soils, reducing germination rates and slowing plant growth.
- Planting in an area that is not protected from ants – If there are a lot of ants in close proximity to your nursery area, they may carry off your seeds. Surrounding the edges of your nursery with a thick line of Wood Ash and watering in the seeds immediately after seeding can help deter ants from entering.
Maintaining Your Germination Beds
When your beds are prepared and you have sown your seeds, follow the practices below to raise healthy seedlings for transplanting:- Watering – Water your germination beds as gently as possible to avoid damaging the tender seedlings.
- Weeding – Weed your germination beds weekly to ensure that your seedlings are not competing for water and nutrients
- Thinning – When your vegetable seedlings have two to three sets of true leaves (i.e. not the first two cotelydons that appear after germinating), you can start thinning. You want to have between 1 and 2cm of space between each seedling. Pull out the germinants that look small, weak, or otherwise unhealthy. When thinning, pull the undesired plants out gently so as not to disrupt the root systems of the plants you want to keep.
- Inspection – Inspect your beds daily to be sure they have enough water and that the seedlings are growing healthy. If seedlings are bent over and stuck in the soil, gently free them without pulling them out or damaging the stems.
Transplanting
When transplanting vegetables it is important to treat them gently. Stressed or damaged transplants will take longer to re-establish in garden beds and can lead to stunting and reduced yields. Follow the steps below for transplanting:- Water the germination bed thoroughly, and fill a watering can for watering the transplants;
- Dig small planting holes, spaced appropriately (see the triangular spacing section below), in the permagarden bed;
- Gently remove the transplant from the nursery, using a stick to loosen the soil around it being careful not to damage the roots. As the stems are very delicate and can be damaged easily, hold the transplant by the leaves, carefully pulling up and further loosening the soil around it if needed;
- Pinch off the lowest leaves, leaving the top-most 2 to 4 leaves;
- Transplant to the depth of the root collar, or a depth that the semi-lignified or mature portion of the stem, is at the soil surface (see transplanting depth section below). Place the transplant in the hole so that the above-ground portion of the stem is as vertical as possible;
- While holding the transplant by the leaves, carefully fill in soil over the root system. Press down gently to ensure that the root system is in contact with the soil;
- Water the transplant;
- Repeat steps 2 through 7 until all seedlings have been transplanted.
- Never handle plants by their stems – Stems are vital to a plant’s health. The stems on transplants tend to be soft and easily damaged. When transplanting try always to hold plants either by gently cupping the root ball from the bottom, or by holding them by the leaves which are no great loss to the plant if they get damaged.
- Water directly before and after transplanting – Plants need water as soon as they are transplanted. Do not leave fresh transplants in the ground for longer than 15 minutes before watering. If you see that transplants begin to wilt, water them immediately.
- Transplant in the early morning or late afternoon – The sun is hot, especially in the middle of the day. For increased transplant success, only transplant early in the morning, or late in the afternoon to give them time to establish before facing the heat.
- Transplant on time – Transplanting too early means young plants are not hardy enough to handle the stress of transplanting. Transplanting too late means young plants have started to outgrow the nursery and run the risk of having their roots damaged as they are removed from one another.
Direct Seeding
The Direct Seed Group:- Bean
- Beet
- Carrot
- Celery
- Cilantro
- Corn
- Cucumber
- Dill
- Melon
- Moringa
- Okra
- Parsley
- Radish
- Squash
- Turnip
- Watermelon
- Less initial work – All you have to do is prepare your bed, plant your seeds at the appropriate spacing, water, weed, and wait. The nursery and transplant system is more work initially.
- Less risk of damaging plant roots and stressing plants – Transplanting is traumatic even for those in the transplant group. If done improperly, transplanting can significantly reduce the yield of a given vegetable. Direct seeding avoids this potentially hazardous step.
- Increased water use during early stages of plant growth – In the germinate-and- transplant system, you are watering the same number of plants in a smaller space. In a direct-seeded bed, the whole bed needs to be watered.
- Less control over plant selection – In the nursery and transplant system you can cull out any plants that show signs of weakness, disease, or mutation before transplanting.
- Longer exposure of the soil surface to the sun – Generally, you cannot mulch a directly seeded bed until after the seeds have sprouted and grown to a height of approximately 10cm. Mulching too early can damage young seedlings as they emerge from the soil and press against the underside of the mulch, or make them vulnerable to fungal attacks due to increased humidity.
- Measure out and mark the holes or lines where you will direct seed in your bed, using the triangular spacing guidelines below.
- Make holes or lines to the appropriate depth.
- Place 2-3 seeds per hole.
- Cover the seeds with soil and press down firmly enough to ensure that soil is making contact with the seeds.
- Water the bed regularly.
- About a week or two after the seeds have sprouted, thin them by removing any weak, sick, or mutated plants. You should leave only one plant per space.
- Reseed any areas that did not sprout.
Triangular Spacing of Seeds and Transplants
Triangular spacing is a bio-intensive planting technique where seeds or transplants are planted at an angle from one another in a triangular pattern. This allows for a greater density of plants than traditional row or rectangular planting, leading to increased vegetable production. It also limits weed growth and moisture evaporation as the canopies will cover more of the soil surface when they are mature. Be sure you use correct spacing for the plants you are growing however. If plants are spaced too closely together, overcrowding occurs and they begin to compete with each other for water, light, and nutrients. When this happens, weaker plants will remain small and become increasingly vulnerable to insect attack, resulting in overall reduced yields. If plants are spaced too far apart, bed space is not being used efficiently, water and nutrient resources are wasted, and yields are not maximized. The spacing information found in the Seed Spacing Table at the end of this section provides the correct spacing for many of the vegetables you may be growing. However, proper spacing is not an exact science and often times there is a range of functional spacing. Use the suggested spacing as a guide, but don’t be afraid to make slight changes, as soil and water conditions, and desired produce size may vary with site and situation. Follow the steps below to plant seeds or seedlings using triangular spacing:- Measure and cut three sticks to the appropriate spacing length for a given plant (see the Seed Spacing Table).
- Form a triangle with the three sticks at one corner of the bed and prepare a hole – either for direct seeding or for transplants – at each corner (left, right, and top).
- Move the triangle over to where the left corner is placed next to the right corner hole you just dug.
- Dig holes at the top and right corners of the triangle.
- Repeat until the first double row of holes are dug.
- Go back to the corner and place the right corner of the triangle at the top corner of the first triangle of holes.
- Dig holes at the left and top corners.
- Move the triangle to the right and dig the top and right corners.
- Repeat until the full section of the bed is prepared for the seeds or transplants of the vegetable you are planting.
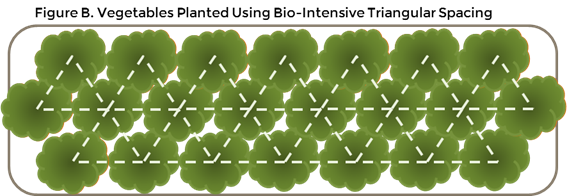
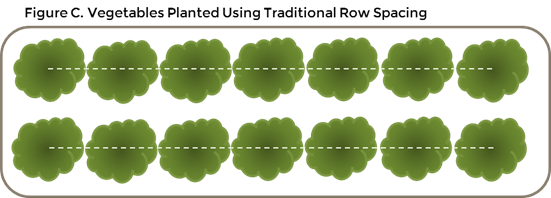
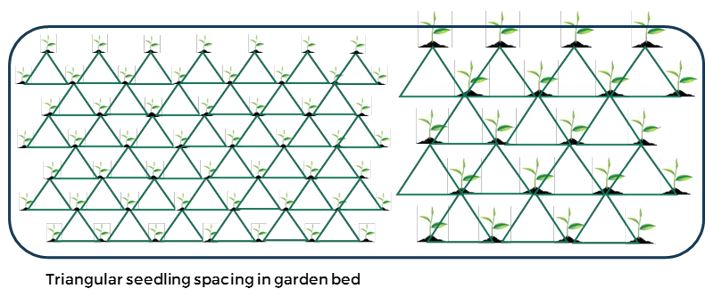 Comparing Figures B and C below, you can see how bio-intensive, triangular spacing allows more plants to grow in a bed than with traditional row spacing. By amending the permagarden beds with compost and other nutrients you will ensure all of the plants in the bed have enough nutrients to grow healthy and strong. The dense canopy in Figure A will also reduce evaporation and weed growth in the bed, reducing water and labor needs.
Convenient Spacing Tools
Correct spacing of the species you are planting is very important, in your Forest Garden as well as your permagarden. When a tape measure is not available, you can use parts of your body to accurately determine distances. When you are near a tape measure, use it to find out convenient body spacing tools. Some common examples are: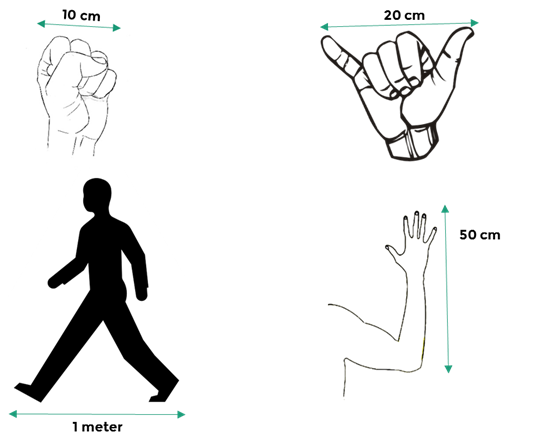
| 10cm | For most people, the width of their fist is 10cm. |
| 20cm | For most people, when their little finger and thumb is stretched as far apart as possible, the distance between the tip of the little finger and the tip of the thumb is 20cm. |
| 40cm | For most people, if the tips of the thumbs are placed together, the distance between the tips of both little fingers is 40cm. For those with smaller hands, the distance between the elbow and the tip of the little finger is 40cm. |
| 50cm | For people whose hands span 20cm as described above, the distance between the elbow and the tip of the little finger is 50cm. |
| 1 meter | Average distance of a full step by an adult is usually 1m. |
Seed Spacing Table (in centimeters)
| Crop | Spacing (in germination bed) | Spacing (in permagarden bed) |
| Spinach | BC*, thin to 6 | 12 |
| Leaf Lettuce | BC, thin to 6 | 15 |
| Kale, Swiss Chard, Collard | 5 | 15 |
| Tomato | 5 | 35 (stake up with poles) |
| Eggplant | 5 | 35 |
| Carrot | – | BC, thin to 5 |
| Radish | – | 5 |
| Turnip | – | 10 |
| Onion, Leek, Garlic | 5 | 8 |
| Celery | BC, thin to 5 | 10-15 |
| Beets | – | 12** |
| Cabbage | 5 | 30 |
| Broccoli, Cauliflower | 5 | 30 |
| Sweet Pepper, Hot Pepper | 5 | 25 |
| Squash, Zucchini, Watermelon | – | 30, plant 2 per mound*** |
| Peas | – | 15 |
| Beans | – | 15 |
| Groundnut | – | 14 |
| Pumpkin | – | 100, allow to spread within bed |
| African Yams | – | 100 |
| Cassava | – | 80-100**** |
| Irish Potato | – | 18 |
| Sweet Potato | – | 18 (from stem cuttings) |
| Maize | – | 35 (plant 2, remove 1 at 2 weeks) |
| Millet | – | 15 |
Maintaining Your Permagarden
Once planted, the permagarden can provide an abundance of healthy foods and herbs for families to eat and sell. Permagarden care does not stop with sowing seeds, however. Continuous care throughout and between each growing season and from year to year are extremely important to ensure the garden remains fertile and highly productive. To ensure a healthy and sustainably productive permagarden, follow the general maintenance guidelines below:Watering
Watering is essential, of course, for keeping crops healthy. In the rainy season watering may be needed as regularly, depending on the amount of rain. For dry season gardening, however, it is important to ensure that your garden has enough water each day. In a properly prepared permagarden, the berms, swales, and holes, in addition to the mulch and soil cover from densely planted crops, will reduce the water requirements, but you will still need to water regularly. The following guidelines provide all of the information you need to water successfully:- Water gently – Whether it is homemade or purchased from the store, always use some kind of watering can that sprinkles water on your beds. Pouring or splashing water onto garden beds compacts the soil and can quickly lead to soil erosion and plant root exposure.
- Provide adequate water – Plants require an average of 5 liters of water per square meter per day. Depending on seasonal temperature changes, you made need more or less.
- Water regularly – Plants will adjust to a given watering regiment. Increasing or decreasing daily watering abruptly can stress plants, resulting in decreased yields.
- Water uniformly – Water the bed as uniformly as possible. It is easy to forget to water the sides of the bed, and in turn decrease the yield of the vegetables planted on the edges. If you water in straight lines across the width of the bed, this can be avoided.
- Check soil moisture regularly – Even if you are adhering to a regular watering schedule it is possible for soil moisture to drop below a healthy level. As climatic conditions become more arid in the dry season, water sometimes evaporates from the soil surface before it penetrates to the subsoil. If this happens frequently, a dry pan develops. A dry pan is a shelf of bone-dry soil beneath moist soil, and it can be detrimental to plant health as a large part of the root system has no access to water. It is good practice, once a week, to find a place in a bed that will not damage plant roots and dig down 20-30cm to ensure that there is even moisture to an acceptable depth. If not, add more water.
Thinning
Nearly all vegetables are seeded with 2-3 seeds per planting hole. This safeguards against low germination rates. However, when more than one seed germinates in a hole, the plants will soon crowd and begin to compete with each other over light, water, and nutrients. Thinning refers to the practice of culling the weaker plants from a given planting space to allow for the most vigorous plant to have more space and resources to grow quickly and produce high yields. A general rule is to thin seedlings when they have 1-2 sets of true leaves. Thinning too early can damage the fragile roots of the young plants you intend to keep. If too much time passes before plants are thinned, roots will entwine with each other and you may damage the roots of the plants that you are trying to keep as you cull the others. If there are spaces where no seeds germinated, you can transplant the strongest of the culled seedlings to those spaces.Weeding
A weed is any plant that you do not want in your permagarden. Weed seeds can lay dormant in the soil for a number of seasons before conditions are right for germination. If weeds are left unchecked, they can quickly overcrowd and out-compete garden vegetables. Weed garden beds prior to planting and then thoroughly re-weed at least once every two weeks. It is easiest, as part of a daily routine, to pull out individual weeds as they sprout. It is important not to allow weeds to go to seed around the beds either, or in the beds when they are not in use, or it will add to your weeding work. If done properly each season, weeding work will become less and less over time. If even one weed is allowed to go to seed there are potentially hundreds or thousands of new weeds that will need to be pulled.Mulching
Refer to the Mulch section in the Soil types, amendments, compost & mulch article.Avoiding Soil Compaction
Plant roots need soft soil with good structure to support healthy plants. When soil becomes compacted it is difficult for roots to grow deeply and for water and oxygen to be suspended in beneficial ways. The following list provides ways to avoid soil compaction:- Water gently – As stated above, watering harshly is a sure way to compact your soil. Always use some sort of watering can when watering.
- Mulch – Mulch slows and disrupts the impact of falling water. Refer to the mulch section on how to apply mulch to your Permagarden.
- Never step on garden beds, ever! – Stepping in garden beds is the single easiest way to compact the soil. As plant roots spread laterally through the soil, stepping anywhere on a bed, even if not directly on a plant, can still damage plants. And even when you do not have plants growing, stepping on the beds will damage the soil structure you have worked so hard to improve. Be sure you leave unplanted pathways around the beds – at least 50cm wide – and be sure your children and anyone else who enters the permagarden area know to only use the paths.
Daily Observation
Daily observation of your permagarden is the best form of care. As it is close to the home, you or your family members can easily walk around the garden for a few minutes each morning just to see if everything is doing well. Are the plants wilting from lack of water? Is the soil drying out? Is there too much water? Are there any weeds that need to be pulled out? Are there any pests, or evidence of pests or diseases effecting the plants? Do they have enough nutrients? Note that extensive leaf damage, discoloration, mold, wilting, drying, etc. mean that additional nutrients or control methods may be needed. It is much easier (and better for the plants!) to address all of these issues as soon as you see them rather than waiting until they begin affecting plant growth and yields, or other plants. Visiting the permagarden every day to take a close look at your crops, if even for just a few minutes, will help to ensure your garden remains healthy and productive.Caring for your Tools
Your tools are an extension of your permagarden, and they are expensive, so take care of them! If you leave your tools out in the rain or put them away covered in dirt, they will rust. Always clean, and dry tools before putting them away. Rusty tools do not last long before breaking. If tool handles are left on the ground termites will burrow into them. Tool handles break when they are full of termite holes. A strict routine of cleaning and putting your tools away after every use can extend the life of your tools by years. Dirty tools also spread disease. If you have been using your tools in an area known to have pest or disease issues, make sure you clean them (preferably with alcohol) before using them in another part of the garden. Never clean tools in water that will then be used to water your plants.Maximizing Productivity in your Permagarden
We have already described how you can increase the productivity of your permagarden by double digging and amending your beds, and using triangular spacing to increase the number of plants per square meter. There are a number of other ways to increase the annual yields and long-term productivity of your permagarden as well. As with many of the techniques and skills that are covered in the permagarden resource section, the techniques described in this section are relevant and beneficial to apply throughout the Forest Garden, not only in the permagarden area.Intercropping
As we have mentioned before, diversification is key to Forest Gardening, and it is the same for permagardens. Planting diverse species in the same space is called intercropping. When intercropping it is important to know the characteristics of the different plants that share the same space to be sure that they will grow well together. Groups of intercropped plants that grow well together and benefit from each other are called companion plants. Perhaps the most widely known form of intercropping, a practice used hundreds of years ago by Native Americans, is known as the “The Three Sisters”. The Three Sisters refers to an intercropping system that combines maize, pole beans, and squash within the same growing space. The Three Sisters works because it combines plants that have characteristics that are mutually beneficial to each other, companion plants. The maize provides a structure for the beans to climb on. The beans provide nitrogen to the soil that the other plants need. And the spreading squash plant create a living mulch by blocking sunlight, reducing soil temperatures and minimizing moisture loss and weed growth. There are multiple strategies for intercropping any number of crop types so that you can harvest throughout the year:- Planting multiple beds in your permagarden at the same time with different crops in each, then rotating in new crops as soon as the other is harvested.
- Planting multiple types of crops at their normal recommended spacing in the same bed at the same time.
- Staggering the planting of multiple crops in each bed so that different crops can be harvested at different times.
While there is sometimes a decrease in the yield of one type of vegetable in an intercropping system, the total yield of the bed is often significantly higher than a bed grown with a single species.
While the time and energy it takes to maintain a single growing space may remain the same or increase slightly with an intercropping scheme, the total labor for the same yield decreases.
Using space more efficiently to maximize production means that all available soil space is being taken up by root systems. This means that the vast majority of water entering the soil is being used by the vegetables.
Different plants can be used to either deter pests from them, or attract beneficial, predator insects that will eat pests. Planting aromatic plants next to non-aromatic plants can confuse and deter pests from both. Insectary plants that provide pollen or nectar for beneficial insects can control pest populations as well.
As we have learned, growing only one crop increases vulnerability. If an unmanageable pest or disease comes through an area it has the potential to decimate an entire crop. If you do not have anything else planted, then you will lose your entire crop. Intercropping ensures that multiple vegetables (often unaffected by the same insect pests) are grown in the same space. If one vegetable type is destroyed by pests or disease, you and your family will still benefit from the other vegetables you grow.
By planting two vegetables with different physical characteristics next to each other, you are creating micro-climates of sun and shade. These diverse temperature margins are ideal for shade/cool loving plants, or beneficial insects flying through your garden looking for pest prey.
- Use appropriate spacing – Be sure to use correct spacing when intercropping plants. Plants should be no closer together than the smallest spacing of the vegetables being planted. For example, when intercropping eggplant at 40cm spacing with lettuce at 10cm spacing, a given head of lettuce should be no closer than 10cm from the base of the eggplant.
- Take advantage of plants’ differences – One of the largest benefits of intercropping is that plants that have different physical characteristics can be worked into the same bed like puzzle pieces.
- Place plants with low leaf cover and compact or shallow root systems next to plants with larger leaf cover and deeper root systems.
- Mix slow-growing plants with fast-growing plants so they don’t compete
- Grow plants that require lots of nutrients (heavy feeders) with those that require little (light feeders)
- Plant aromatic plants that deter pests to protect non-aromatic plants
- Plant flowering plants with pollen and nectar that attract beneficial insects to feed on pests.
- Grow plants that attract and trap pests near your other higher-value crops
- Plant crops that grow in different ways (e.g. climbers and stalks or bushes) so that one can be supported by the other.
- Work with plants from different families – In general, plants from different vegetable families are susceptible to different pests and diseases than those of other families. By diversifying vegetable families being grown in the garden, the potential for devastating insect loss is even further reduced.
- Keep transplanting and seeding issues in mind – If a bed is direct seeded it is difficult to intercrop with transplants before the seedlings sprout without disturbing seeds that are in the process of germinating. Always transplant before direct seeding OR direct seed first and then wait until the seedlings have broken the soil surface before transplanting. Your decision will rely on the growth cycles of the particular plants being intercropped.
Crop Rotation
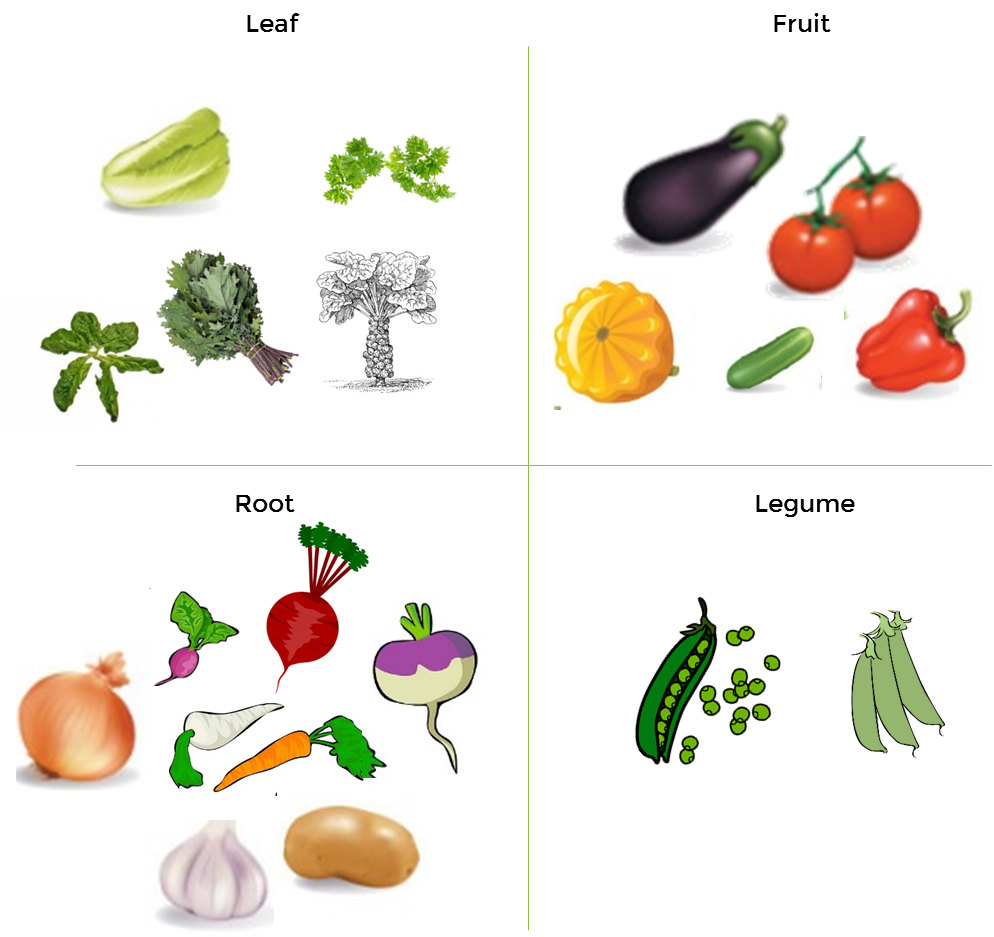
Each crop that you plant requires specific nutrients to grow. These nutrients are not always the same as those that other crops require. Some crops even fix nutrients (e.g. nitrogen) into the soil that can be used by other plants. If you plant the same crops repeatedly in the same bed without replacing the nutrients that crop needs to thrive, yields will quickly decrease. If you rotate your crops from one season to the next, however, the new crops can use the nutrients that the last crop may not have needed as much of. This practice is called crop rotation, which you can do by recording what has been planted in a given space each season and placing a different crop in that same space the following season. Crop rotation is important for maintaining soil health for field crops as well as for your permagarden beds. As pests and diseases tend to be species- or family- specific, when planting the same crop season after season in the same bed it will allow pests and disease populations that live off of that crop to multiply. If allowed to do so, they will populate to the point that they can decimate your crop. By rotating families of crops from one season to the next you can break the life cycles of the pest and disease populations that live off of that host crop, preventing them from becoming problematic. A simple rule of thumb is to plant crops in a rotational cycle based on the part of the plant you eat, from leafy greens to fruiting vegetables to root crops to legumes. As each of these families of plants generally require different types or amounts of nutrients, it allows you to reduce nutrient depletion by balancing fertility losses and gains. Good crop rotation practices and the addition of organic matter to the soil between growing seasons will ensure the soil always has the nutrient load it needs to keep plants healthy. Crop Rotation by Type: The simplest rule of thumb is to plant crops in a rotational cycle based on the part of the plant you eat, from leafy greens to fruiting vegetables to root crops to legumes. As each of these families of plants generally require different types or amounts of nutrients, it allows you to reduce nutrient depletion by balancing fertility losses and gains. Good crop rotation practices and the addition of organic matter to the soil between growing seasons will ensure the soil always has the nutrient load it needs to keep plants healthy. Types:- Leaf (needs more Nitrogen) – lettuce, spinach, kale, chard, mustard greens
- Fruit (needs less nitrogen, more phosphorous) – tomato, pepper, eggplant, okra
- Root (needs little nitrogen, more potassium, some phosphorous) – carrot, potato, beet, radish
- Legume (returns nitrogen to soil) – beans, cowpea, pigeon pea, peanut
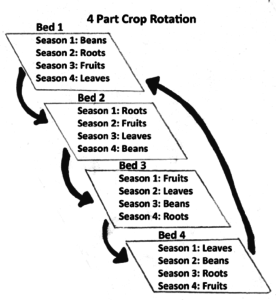
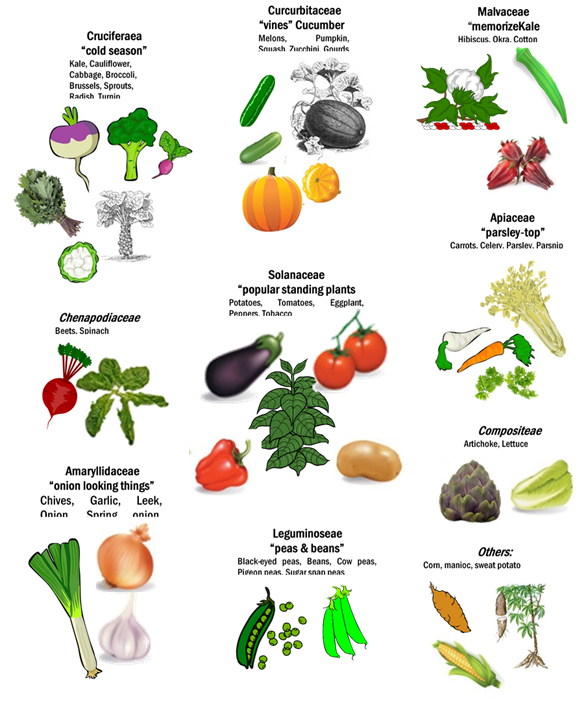
 Crop Rotation by Family:
Another option for rotating crops is by always planting a different family. There are numerous families that different vegetables belong to, with many of them seemingly very different from others in their family. Use the figure below to identify the families of some commonly planted vegetables.
Crop Rotation by Family:
Another option for rotating crops is by always planting a different family. There are numerous families that different vegetables belong to, with many of them seemingly very different from others in their family. Use the figure below to identify the families of some commonly planted vegetables.
Cover Cropping and Green Manure
Cover cropping is a system in which expendable plants are seeded with the purpose of protecting the soil from the sun after the main crop has been harvested. Any cover crop that is turned back into the soil without going through a composting process is called a green fertilizer. Plants that make excellent cover crops include cowpea, sweet potato, lablab bean, and velvet bean. Cover cropping and green manure are techniques that are more commonly used in field crop production; however, there are some uses in the garden. Rainy season soil protection – Many gardeners do not grow vegetables during the rainy season because they are focusing on field crop production. Typically gardens are left to over grow with weeds and grasses and then cleared and burned before the cold season vegetable production begins. The act of clearing and burning greatly reduces the fertility of garden soil over time. Planting a cover crop in the garden area after the first few rains can help suppress persistent weeds and grasses, and can be used for composting material or turned into the soil as green manure. Cold season crop rotation – If the garden is large enough and not every bed needs to be used for production, it is a good idea to use the giver phase of the crop rotation cycle for cover cropping and green manure. Maintain cover crops through the growing season in the selected beds and let them die when halting production before the hot season. Leave the dry organic matter on the soil surface through the hot season, and then compost it or work it directly into the soil at the beginning of the rainy season.Intercropping and Companion Planting
There are countless types and varieties of vegetables that families can grow in permagardens. The list below provides some basic information for some of the most common vegetables and their companions, antagonists, and recommended intercropping combinations and schemes. Below that is a table with even more common vegetables, with their companions and antagonists. CABBAGE Family: Brassicaceae Other members include: cauliflower, kale, collards, broccoli, Brussels sprouts, kohlrabi, horseradish, mustard greens, rutabaga, turnip, Chinese cabbage, radish, watercress Companions: Beet, onion, bean, potato, garlic, carrot, peppermint, Antagonists: Tomato, pole bean Intercropping Suggestions: Cabbage and Onions – Cabbage and onions grow well together- Start cabbage and onions in nursery on the same date.
- 20-30 days later transplant cabbage at 40cm triangular spacing
- 10-25 days later (40-55 days from seeding) transplant onions in diagonal lines between cabbage at 10cm spacing.
- NOTE: Traditional onion cultivation requires stopping watering cycles to allow onions to dry in the soil before harvest. Cabbage heads must be harvested before onions are fully mature to allow for this process. Alternatively you can encourage out-of-ground drying for a quicker harvest, and to free up growing space.
Standard Intercropping Scheme – Carrots can be intercropped with a variety of vegetables with non-competitive root and leaf structures. Planting 2-3 lines of carrot between pepper, eggplant, okra, or hibiscus planted at 40cm triangular spacing is a common way to intercrop with carrot.
EGGPLANT Family: Solanaceae Other Members Include: Pepper, tomato, tomatillo, nightshade, potato, and tobacco. Companions: bean, onion, potato Intercropping Suggestions:Standard Intercropping Scheme – When planting eggplant at 40cm triangular spacing, it is possible to intercrop with a wide variety of other non-competitive root crops and low-level vegetables such as carrots, radishes, turnips, beets, and lettuce.
LETTUCE Family: Asteraceae Other Members Include: Endive, chicory, artichoke, sunflower, Jerusalem artichoke Companions: Carrot, radish, cucumber, onion, garlic, strawberry Planting Suggestions:- Tight Spacing – Planting lettuce at 10cm triangular spacing will yield small heads. The benefit of this spacing system is that the heads are harvested before the leaves have a chance to turn bitter. This system can be particularly useful if growing lettuce during the hot season when lettuce tends to turn bitter and bolt before a head forms.
- Medium Spacing – Planting lettuce at 20cm triangular spacing will yield medium sized heads. This spacing offers a nice balance between the benefits of the tight and wide spacing.
- Wide Spacing – Planting lettuce at 30cm triangular spacing will yield large heads. If growing lettuce in the hot season it tends to turn bitter and bolt before reaching a mature size. This system also does not maximize use of garden space while the lettuce is maturing.
- The Triple Harvest Scheme – It’s possible to find a profitable balance between the tight spacing and medium spacing by transplanting lettuce on 10cm row spacing. Once the lettuce has grown to the point that it is beginning to overcrowd, harvest the lettuce by pulling out every other head of lettuce in staggered rows. The lettuce remaining in the bed should now be at 20cm triangular spacing. Leave these heads in the bed until they are beginning to overcrowd and then harvest them by cutting the head of lettuce at the base, leaving 3-4 of the lower leaves remaining. A second head will grow back. Leaves from these heads need to be tasted daily to monitor for leaf bitterness. As soon as the leaves show signs of bitterness, harvest the entire bed by removing the plants.
- Standard Intercropping Scheme – Lettuce works well when intercropped with any taller growing vegetables that will provide shade. For any vegetables that are planted at standard 40cm spacing, 2-3 lines of lettuce can be planted between diagonal rows at 10-20cm triangular spacing.
- Lettuce and Cucumber – Place a cucumber trellis (see section on vegetable support) in the center of the garden bed. Transplant lettuce at 10cm line spacing throughout the entire bed. Direct seed cucumber in two rows at 50cm spacing. As the cucumber starts to grow, make sure that it begins to climb the trellis, freeing space for the lettuce. As the lettuce starts to crowd into each other, pull out every other head in staggered rows. The end result should be lettuce planted at 20cm triangular spacing. When those heads are mature, cut them at the base instead of pulling the whole head out. Wait for heads to reform and then pull them for a third harvest. At this point the cucumber should be covering the trellis and producing fruit.
Standard Intercropping Scheme – When planting okra at 40cm triangular spacing, it is possible to intercrop with a wide variety of other non-competitive root crops and low level vegetables such as carrots, radishes, turnips, beets, lettuce, and cabbage.
Okra as a wind break and shade provider – When growing vegetables that require small amounts of shade and are susceptible to wind damage (such as lettuce and carrot), okra (like corn) can be grown in 1 row at 40cm spacing along the edge of the bed to provide shade and function as a wind break.
BULB ONION Family: Amaryllidaceae Other Members Include: Leek, shallot, green onion (bunching onion), Egyptian walking onion, garlic, chives, and garlic chives Companions: Beet, strawberry, tomato, lettuce, leek, cabbage, eggplant Antagonists: Pea, bean Intercropping Suggestions:Intercropping for small-scale production – Onion has a compact bulb and a narrow profile leaf structure that makes it ideal for intercropping with a wide variety of crops. Typical intercrops with onions include lettuce and onion: lettuce, carrot, and onion; onion and cabbage; and onion and tomato or onion and eggplant. However, when onions are of proper size to harvest, they are typically left in the ground as watering is slowly reduced to nothing to allow them to dry and cure before harvest. Because of this practice it can be extremely difficult to intercrop onions with any long cycle plants. Only lettuce has a short enough cycle to ensure there will be no harvesting conflicts at the end of the season.
Onion and Lettuce – Onion and lettuce work extremely well as an intercrop. There are a variety of patterns that can be followed. One that works is planting lettuce in rows at 10cm within-row and 15cm between-row spacing, and then planting a row of onions between each row of lettuce at 10cm within-row spacing. The lettuce is on a short enough cycle that it can be harvested before the onions are mature. Often times there will be enough time for a second round of lettuce to be transplanted and harvested before the onions are mature.
SWEET PEPPER Family: Solanaceae Other Members Include: Eggplant, tomato, tomatillo, nightshade, potato, and tobacco. Companions: Basil, okra. Intercropping Suggestions:Standard Intercropping Scheme: When planting green pepper at 40cm triangular spacing, it is possible to intercrop with a wide variety of other non-competitive root crops and low level vegetables such as carrots, radishes, turnips, beets, and lettuce.
HOT PEPPER Family: Solanaceae Other Members Include: Eggplant, tomato, tomatillo, nightshade, potato, and tobacco. Companions: Basil, okra. Intercropping Suggestions:Standard Intercropping Scheme – When planting hot pepper at 40cm triangular spacing, it is possible to intercrop with a wide variety of other non-competitive root crops and low-level vegetables such as carrots, radishes, turnips, beets, and lettuce.
TOMATO Family: Solanaceae Other Members Include: Eggplant, pepper, tomatillo, nightshade, potato, and tobacco. Companions: Chive, onion, carrot, garlic, parsley, marigold Antagonists: Kohlrabi, potato, fennel, cabbage Intercropping Suggestions:Tomato and lettuce – Because tomato tends to vine in irregular patterns and needs to be staked, caged, or trellised, it can be a difficult crop to fit into an intercropping scheme. However, lettuce can be intercropped with tomato because the growth time of lettuce is short enough to harvest before it becomes overcrowded by the tomato. Transplant tomato at 40cm triangular spacing. Transplant lettuce in rows between the rows of tomato at 10cm spacing. When the lettuce starts crowding, harvest every other head in staggered rows leaving the lettuce in a 20cm triangular pattern. Harvest lettuce a second time when they begin to re-crowd. At this point the tomato should be reaching full height. Do not re-transplant lettuce.
List of Companion & Antagonist Crops
| Crop | Companions | Antagonists | Remarks |
| Spinach | Beans, Lettuce, Peas, Strawberries | Potato | Beans and Peas provide shade for spinach |
| Leaf Lettuce | Mint, Beans, Beets, Carrots, Maize, Marigold, Onions, Peas, Radish, Strawberries | Parsley | Mint repels slugs, which feed on lettuce |
| Kale, Swiss Chard, Collard | Beets, Carrots, Marigold, Radish, Turnips | – | |
| Tomato | Beans, Basil, Carrots, Spinach, Broccoli, Cauliflower, Celery, Marigold, Peppers, Melons | Cabbage, Kale, Maize, Peas, Potatoes, Rosemary, Broccoli, Cauliflower, Dill | Growing basil 25 cm from tomatoes increases tomato yields. Marigolds repel hornworms and nematodes. |
| Eggplant | Beans, Peppers, Potato | ||
| Carrot | Beans, Garlic, Lettuce, Onion, Parsley, Peas, Rosemary, Dill, Tomato | Dill, Parsnip | |
| Radish | Cabbage, Maize, Cucumber, Eggplant, Lettuce | Radish can be used as a trap crop against some beetles and aphids | |
| Turnip | Peas | ||
| Onion, Leek, Garlic | Beets, Cabbage, Carrots, Lettuce, Rosemary, Strawberry, Tomato, and each other | Beans, Peas | Repels aphids, carrot fly, and other pests |
| Celery | Bush beans, Cabbage, Dill, Leeks, Tomatoes | Potato, Parsnip | |
| Beets | Broccoli, Cabbage, Cauliflower, Collards, Garlic, Onion, Lettuce, Sage | Pole and Runner Beans | Beans and beets compete with each other. Beet leaves add magnesium when composted. |
| Cabbage | Beets, Bush beans, Celery, Mint, Onion, Potato, Oregano, Rosemary, Dill, Sage | Pole and Runner beans, Peppers, Strawberry, Tomato | Celery, onion and herbs keep pests away. Rosemary repels cabbage fly. |
| Broccoli, Cauliflower | Basil, Bush beans, Cucumber, Garlic, Lettuce, Marigold, Mint, Onion, Potato, Radish, Rosemary, Dill, Sage, Thyme | Mustard, Oregano, Strawberry, Tomato | Rosemary repels cabbage fly. Dill attracts wasps for pest control |
| Sweet Pepper, Hot Pepper | Basil, Onions, Spinach, Tomato | Beans, Cabbage, Kale | |
| Squash, Zucchini, Watermelon | Flowering plants (for pollination) | Sweet Potato | |
| Peas | Beans, Cabbage, Carrots, Celery, Corn, Cucumber, Lettuce, Potato, Sage | Onions, Leeks, Garlic | |
| Beans | Beets, Cabbage, Cauliflower, Kale, Cucumber, Celery, Swiss chard, Spinach, Maize, Eggplant, Peas, Potatoes | Onion, Leeks, Garlic, Peppers | Maize is a natural trellis and/or shelter beans and beans provide nitrogen for the maize. |
| Groundnut | Beets, Cabbage, Carrots, Celery, Maize, Cucumber, Eggplant, Lettuce, Marigold, Pea, Potato, Radish, Rosemary, Strawberry | Basil, Onion | |
| Pumpkin | Beans, Maize, Radish | Potato | Maize, Beans and Pumpkin are an age-old companion group, called The 3 Sisters |
| African Yams | Beans, Oregano, Basil, Dill, Marigolds | ||
| Cassava | Beans | ||
| Irish Potato | Beans, Cabbage, Corn, Eggplant | Celery, Cucumber, Pumpkin, Rosemary, Strawberries, Tomato | Cucumber and tomato attract pests that can attack potatoes |
| Sweet Potato | Beets, Okra, Dill, Thyme | Squash, Zucchini, Watermelon | |
| Maize | Beans, Cucumbers, Peas, Potatoes, Pumpkin, Squash, Zucchini | Tomato | Tomato worm and corn earworm are attracted by both plants. |
References
- Information in this chapter and the compost information in the following chapter was adapted from the United States Peace Corps Senegal Agroforestry Training Manual and the TOPS Permagarden Training Program.
Regarding the optimization of agroforestry, I’d recommend usage of the equations for evapotranspiration (Penmann-Monteith) or the approximation (Blaney-Criddle) to ensure the optimal usage of water and to more concretely plan watering – especially in order to minimize salinisation and ground water rising/depletion of the agricultural soil.
I’d also recommed starting future projects in Sudan – a country plagued by unsustainable land use, intense monoculture, salinisation, degradation and desertification. A large portion of the population lives under the poverty line and struggles with food security. The main crops are sorghum and millet as staples, but the crops are failing, at a much lower yield than previously. However, Sudan already has an enormous Gum arabic industry, whose trees (Acacia senegal) are N-fixing, stabilizing and deeply rooted. This means they are more than ready and in need of sustainable agriculture – and already have a big money industry that could improve from this.
A few initiatives have already been taken, but none planned or executed well enough. A large part of the farming is small scale family farming of 1-10 feddans. This country has been torn apart by war and conflict, and could therefore greatly benefit from the work of TREES.