
Deprecated: array_key_exists(): Using array_key_exists() on objects is deprecated. Use isset() or property_exists() instead in /nas/content/live/trees4future/wp-content/plugins/ht-knowledge-base/php/ht-knowledge-base-category-ordering.php on line 58
Deprecated: array_key_exists(): Using array_key_exists() on objects is deprecated. Use isset() or property_exists() instead in /nas/content/live/trees4future/wp-content/plugins/ht-knowledge-base/php/ht-knowledge-base-category-ordering.php on line 60
Warning: Parameter 2 to qtranxf_postsFilter() expected to be a reference, value given in /nas/content/live/trees4future/wp-includes/class-wp-hook.php on line 324
Deprecated: array_key_exists(): Using array_key_exists() on objects is deprecated. Use isset() or property_exists() instead in /nas/content/live/trees4future/wp-content/plugins/ht-knowledge-base/php/ht-knowledge-base-category-ordering.php on line 58
Deprecated: array_key_exists(): Using array_key_exists() on objects is deprecated. Use isset() or property_exists() instead in /nas/content/live/trees4future/wp-content/plugins/ht-knowledge-base/php/ht-knowledge-base-category-ordering.php on line 60
Chapter 5: Seedling Propagation
When to Start Your Nursery
After you have identified the trees you want to plant in your Forest Garden, and developed your Forest Garden design, it is time to establish your tree nursery. It is important to remember that you want to plant your tree seedlings in your Forest Garden at the beginning of the main rainy season. This will ensure the seedlings have plenty of moisture through the (hopefully extensive) rainy season to allow them to fully take root in preparation for the forthcoming dry season. With that in mind, you will want to start your nursery several months before the start of the rainy season. The specific amount of time depends on the germination and growth characteristics of the species you are planting, but for most fast-growing agroforestry trees, 12 to 15 weeks will usually suffice.Selecting a Site and Planning Your Nursery
Things to Consider When Selecting your Nursery Site
Before establishing your nursery there are a number of things you need to consider. You will need to provide daily care to the seedlings in your nursery. The seedlings need plenty of water, sunlight (but not too much), good soil, and protection from animals (especially goats) that will want to eat them. You also need enough space to raise them, which depends on how many seedlings you would like to grow. Below are a list of things you must consider when selecting a nursery site:Water quantity and quality is extremely important. If you do not have enough, or if it is too saline, your seedlings will either be stunted or will die. As your nursery requires water every day, and sometimes twice a day when seedlings are very young, the water source should be close to the nursery. It also must be a reliable water source, certain to provide enough water throughout the year. As you will be raising your seedlings in the months leading up to the rainy season, it is the typically the driest part of the year when the water is needed. We have seen too many nurseries fail for lack of water. If water is a particular challenge in your area, try to find a site with a backup water source in case the primary source runs dry. Do not forget to consider the distance that your water source is from your nursery. Pulling water is difficult enough. If you also have to carry that water over a long distance, you will be less likely to water your nursery each and every day. The closer the water source is to the nursery, the better off the trees will be and the more successful your Forest Garden will be.
Typically a nursery requires about ten liters of water for every square meter of nursery beds. Using a watering can is highly encouraged, not only due to ease of watering, but also to capture some of the organic matter that might be found in the water source.
In general, both bareroot nursery beds and seed sack beds will require soil of higher quality than local conditions normally provide (refer to the soil types, amendments, compost & mulch article). As you will often need to carry soil (whether it is sand, topsoil, forest soil, or compost) to the site, be sure that these materials are relatively accessible.
Nurseries require daily care, so consider how accessible the nursery is to work in. The nursery must be watered twice a day early on, and close attention must be paid to pests, weeds, and adverse weather conditions. So be sure it is not too far to prevent you from visiting it each and every day. The ideal location is within your family’s compound, or immediately outside. A common alternative to having the nursery in a family compound, especially if it is a group nursery, is to place it in a community or family garden, which receives similar attention to a nursery. This helps to ensure that the nursery site is well monitored as well, mitigating damage from goats and other animals.
Also be sure, if there is a chance you are not able to visit your nursery every day, that someone else—a family member or neighbor—will be available to care for it while you are away. Even one missed day can stunt or even kill your seedlings.
Proper protection is one of the most important factors to consider when starting a nursery. The site must be protected from pests, animals, and wandering children. We have seen too many nurseries beds destroyed in only a few minutes when wandering goats have found their way in. We don’t want this to happen to you. The best forms of protection are dead fences made of thorny branches, or living fence hedges. Although more expensive, wire fences also serve the purpose well. Your nursery also must be protected from wind and sun. Wind will dry out your soils, requiring more frequent irrigation, and it can stunt or kill your seedlings. Siting your nursery in your family compound, or surrounded by a living fence, can provide the needed wind protection. Seedlings need sunlight to develop properly, but too much will damage the young plants. To minimize sun, it is important to build shading structures over your beds. This can be done with wood and grass or palm fronds, discussed in more detail below.
Do not site your nursery in a place where water collects. Too much water will waterlog your seedlings or lead to increased risk of fungal attack. It is best to have a slight slope of about 1% to prevent water from collecting around your beds.
The size of your nursery is primarily influenced by the number of trees you want to grow, and by the amount of space each seedling requires. To determine the number, make calculations based on your Forest Garden design, factoring in each species, the planting systems or agroforestry technologies used, and the spacing requirements. The space required by each seedling is determined by the species, and whether you raise them in bareroot beds or tree sacks (also called poly bags or pots). Most agroforestry seedlings do well in 8 to 10 cm diameter sacks, where fruits and timber trees, especially as they often require more time in the nursery, may be better with 10 to 12 cm sacks. As bareroot seedlings can be sown more closely together in beds, they normally require less space than those sown in sacks. The table below shows the approximate number of seedlings that can be raised per meter, depending on the method or sack size.
Approximate Number of Seedlings per Square Meter
| Method and Size of Tree Sack | Seedlings in 1m2 |
| Small sacks (8cm in diameter when filled) | ~150 |
| Medium sacks (10cm in diameter when filled) | ~100 |
| Large sacks (12cm in diameter when filled) | ~65 |
| Bareroot beds (10 rows/meter with a spacing of 5cm between seeds within a row) | ~200 |
Building Your Nursery
Now that you have identified your nursery site, it is time to begin establishing your beds. The following tools and materials will help you to do so. Not all of the materials are necessary. A short description of the materials is provided below the list.Tools and Materials
- Seeds: Read the chapter on Seeds to learn more about sourcing your seed.
- Topsoil, forest soil, sand, and compost: Usually can be found somewhere around the community, if not on your family’s compound. If you do not have compost, you can use dried manure or humus-rich forest soil.
- Spade: Usually farmers own or can borrow some sort of digging tool for collecting dirt and digging holes. If a spade is not available, any other digging tool will work.
- Wood for building the shading structures: Narrow poles 5cm in diameter work fine. You need them to run the perimeters of your bed, with four somewhat sturdy poles 1-1.5m long to hold them up on each bed.
- Rope, twine, or nails: Rope is mainly for delineating beds and building the shading structure. Small pieces of rope can sometimes be found and tied together to make pieces large enough. Lining beds is a one-time quick activity; you can borrow a rope if needed. Rope can also be used in place of nails to join the wood for the shade structures over the beds.
- Shading material: You will need to cover your shade structures with shading material. Palm fronds or grasses work just fine, though you may need to tie them down. Do not use grasses that have gone to seed, unless you really enjoy weeding your seedling beds.
- Watering can: If not available, there are alternatives. Uses an old large tomato can with small holes poked into the bottom and pour the water through this sieve onto the plants. Or use small plastic bottles like bleach bottles or oil bottles and prepare them by poking small holes in the bottoms and cutting off the top while keeping the handle attached. To use: dip, it into water and hold over the nursery. If a large nursery is desired tit is best to invest in some watering cans.
- Water
- Hoe (not essential): Most families own some sort of weeding tool, whether it is a hoe or not. The tool is used for digging and turning over soil, breaking up chunks of dirt, and leveling the surface.
- Wheelbarrow (not essential): For carrying soil and seedlings. If you don’t have a wheelbarrow, buckets or any other carrying/hauling device will work.
Bed Size and Working Space
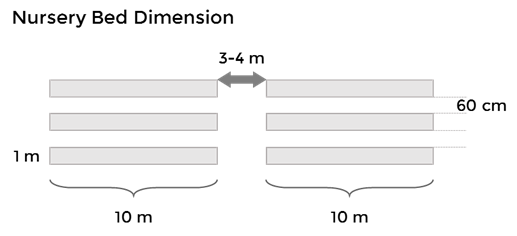
 The width of each bed within the nursery should be about 1m. This width allows for easier watering and weeding. If the beds are too wide, it can be difficult to reach all the way to the center. The length of a nursery bed varies based on the size and shape of the nursery site, as well as the number of seedlings you are raising. Leave between 60cm to 1m between nursery beds to allow for room to walk, work and carry tools and materials between them.
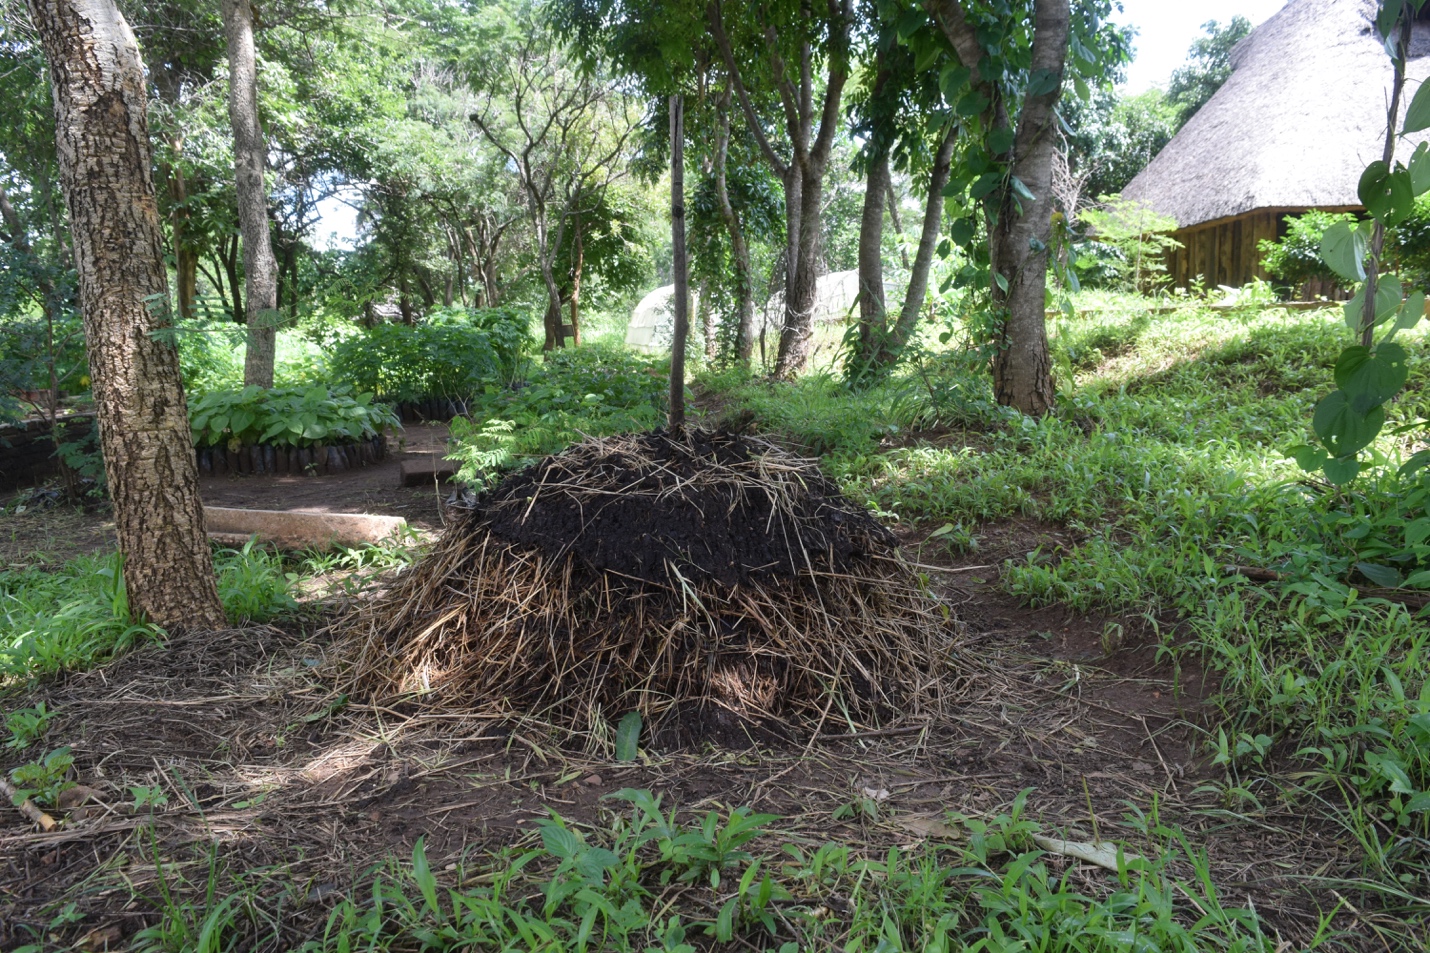
 Other factors that influence the size of your nursery include a place for soil dumping and mixing, and space for packing soil into pots. It is important to have space to work freely, so plan accordingly. It is also a good idea to leave space for compost piles, which can provide the amendments needed for healthy growing medium.
After an appropriate nursery site is determined that meets all of the criteria, and the tools and materials are collected, it is time to start preparing your nursery beds before sowing the seeds. There are two basic methods for producing your seedlings: tree sacks or bareroot. The method you use will determine the next steps. It is likely that you will use a combination of the two methods in your nursery, depending on the species you raise.
Other factors that influence the size of your nursery include a place for soil dumping and mixing, and space for packing soil into pots. It is important to have space to work freely, so plan accordingly. It is also a good idea to leave space for compost piles, which can provide the amendments needed for healthy growing medium.
After an appropriate nursery site is determined that meets all of the criteria, and the tools and materials are collected, it is time to start preparing your nursery beds before sowing the seeds. There are two basic methods for producing your seedlings: tree sacks or bareroot. The method you use will determine the next steps. It is likely that you will use a combination of the two methods in your nursery, depending on the species you raise.
Nursery Methods
Bareroot Beds & Double Digging
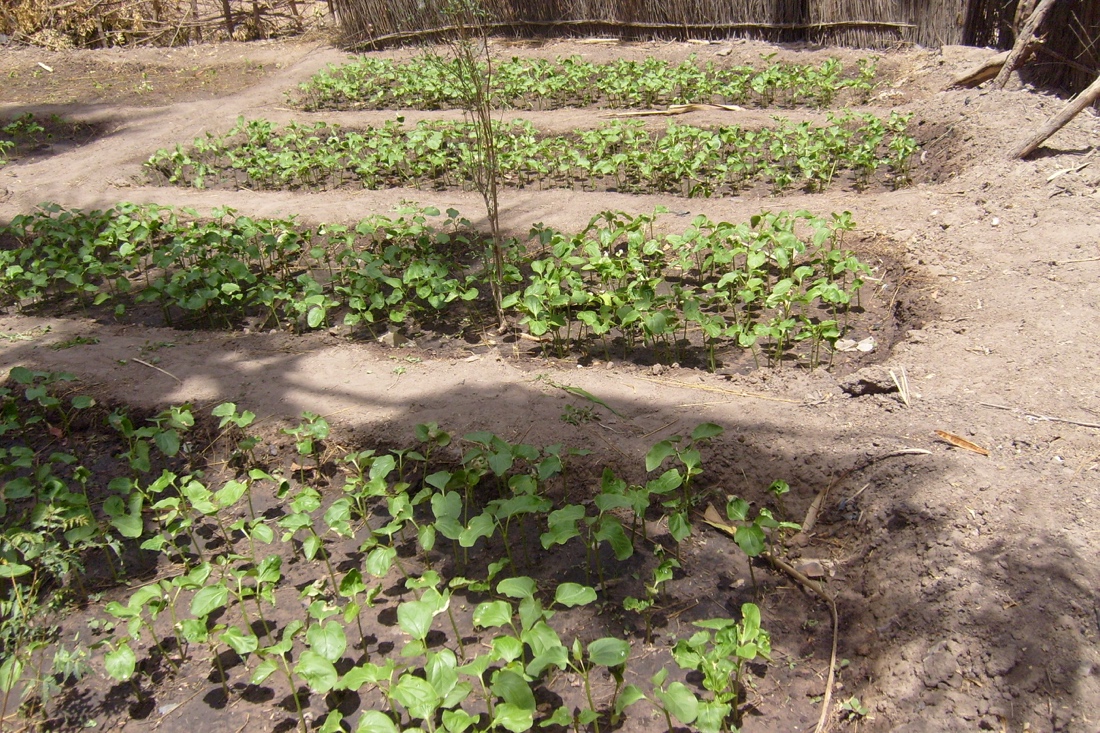
What are bareroot beds? Bareroot beds mean raising seedlings directly in a bed of soil. Once the seedlings are ready to transplant they are dug up and transplanted ‘bareroot’. The advantage of bare-root beds is that they do not require tree sacks, which cost money, and they require less space than tree sacks. The disadvantages of bareroot seedlings is that it is labor intensive to double dig the beds, they are at greater risk of drying out during transplanting, and they are more prone to stunting or dying once planted due to greater root disturbance when removing and transplanting them. Many agroforestry, fruit, and timber tree species can be planted in bareroot nurseries. Though tree sacks are often more successful, probably due to less root disturbance when planting. Trees with a deep taproot—as opposed to shallow, more fibrous root systems—tend to respond better to bareroot propagation since there will be less root binding in the beds, thus less disturbance when removed. Papayas, though, are notorious for responding poorly to bareroot propagation. Even trees such as citrus, which spend a long time in the nursery, may be raised in bareroot. For any tree raised in a bareroot bed, it is critical to keep the roots moist after removed from the beds or they will easily dry out and die. This is best accomplished by dumping a mud slurry over the roots immediately after removing them from the beds, then wrapping them in banana leaves to transport and plant them. Do not remove more than you will plant in a short period of time, place them in shade where possible, and take some water with you to pour over them if they start to dry out, and after planting them. Pictures of direct seed and bare root beds: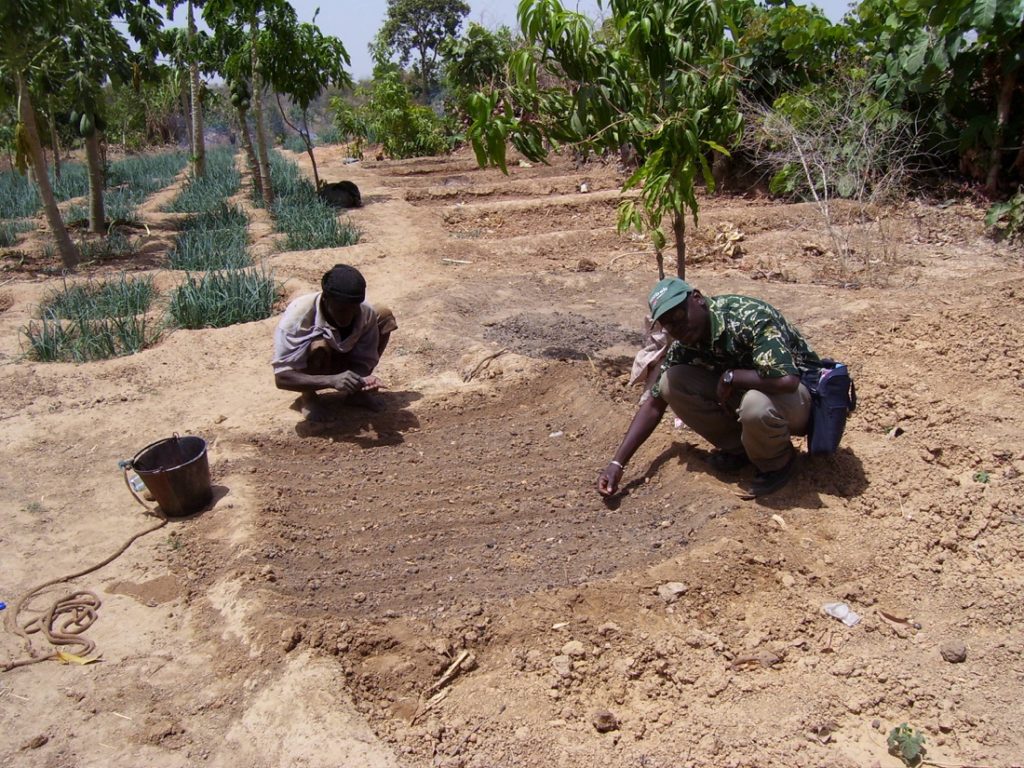
 What is double digging?
Peace Corps Senegal demonstrating double digging:
It is best to double dig and amend your beds before sowing seeds. This will ensure proper aeration and healthy root growth. The purpose of double digging is to loosen the soil and add soil amendments within it.
Before double digging your beds, gather the following tools and materials:
What is double digging?
Peace Corps Senegal demonstrating double digging:
It is best to double dig and amend your beds before sowing seeds. This will ensure proper aeration and healthy root growth. The purpose of double digging is to loosen the soil and add soil amendments within it.
Before double digging your beds, gather the following tools and materials:
- A spade and, if available, a digging tool
- 4 shovels full of Compost or Manure per square meter
- 1 shovel full of Charcoal Powder per square meter
- 1 shovel full of plastic-free Wood Ash per square meter
- Start by marking the corners where you want your nursery bed to lie. The bed should be one meter wide. The length depends on the size of your site but should be no more than 10 meters long so that you can move from one side of the bed to the other easily.
- Remove the cover vegetation and transfer it to an area that is out of the way (alternatively, add it to your nursery’s compost pile).
- Start at one side of the bed and mark an area about 2 shovel widths (25 cm) down the length of the bed. Using a shovel, pickaxe, or digging tool, remove the topsoil from the first section you marked off, down to the depth of the hardpan (or about 25 cm where there is little to no topsoil). Place the topsoil you dig out at the end of the bed.
- Dig the next 25 cm of subsoil below the topsoil you just removed. Do not remove this subsoil, but loosen it, breaking up the larger pieces of dirt. It makes the process much easier to have a partner with you to alternate digging out topsoil then loosening the subsoil.
- Move down to the next 50 cm section that you marked off. This time, instead of putting the soil to the side as you remove it, shovel it to the first section that you dug out and add the topsoil to fill that hole.
- While you fill, place 2 shovels of manure or compost, and a half shovel each of wood ash and charcoal powder on top and mix it all in well to amend the soil.
- Then loosen the subsoil from the second section you just dug out. Continue this process of moving the topsoil, amending it, then loosening the subsoil along the entire length of the bed. When you reach the end of the bed and have loosened the final section of subsoil, place the topsoil that you dug out from the first section to fill in the last section, then add and mix the amendments. When you’ve worked the entire bed in this fashion, you’ve double dug your bed.
Tree Sacks
Tree sacks (also called polybags or pots) are generally thin plastic containers that are used to grow seedlings in tree nurseries. There are many types and shapes of tree sacks. They are most often made from polyethylene, but can also be made from materials you find around your community, including used plastic bags, empty chips/snack bags, or even banana leaves formed into bags. The polyethylene sacks come in various diameters. Smaller sizes (8-10cm) are fine for most agroforestry species, where larger sacks (up to 20cm) are better for more valuable fruit or timber trees. The larger sizes are necessary for grafted seedlings, for which more time is needed in the nursery. It is cheapest to buy roles of polyethylene and cut the sacks to size (usually about 15cm), but if that is not available, you can purchase bundles of pre-made tree sacks. Fruit species like cashew, avocado, papaya, guava, pineapple, pomegranate, cola, and many timber species are usually sown in tree sacks. Though tree sacks are more expensive, and they are heavier to transport than bareroot, they do offer an important advantage: since the roots are surrounded by soil and housed in a protective sack, the risk of roots being damaged or exposed to the elements when transporting them to the planting sites is greatly reduced. Preparing potting soil for tree sacks The growing medium you use for filling the sacks is important to the health and development of your seedlings. Review the Soils section for more information on mixing the most appropriate soils. In many places, a good mix that would provide a loamy soil is 3 parts topsoil to 1 part humus, compost, or dried manure, to 1 part sand. It is important to ensure that the mixture will contain sufficient nutrients to support the development of seedlings, while having proper drainage.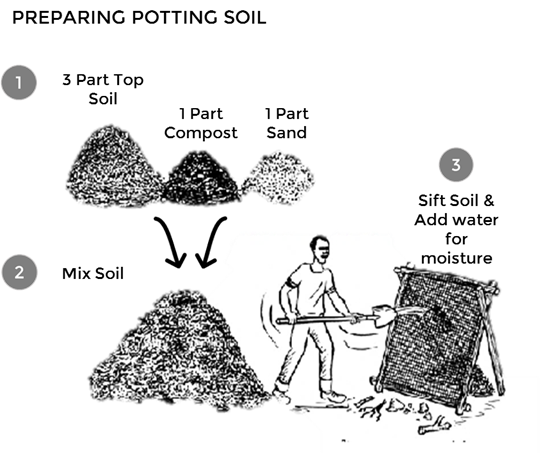 To mix the medium and fill the sacks you need:
- Topsoil, sand, and compost/humus/dried manure
- Buckets or a wheelbarrow to carry materials
- A screen to sift them (about .5 cm)
- A shovel to mix them
- A watering can to moisten the mixture
- Tree sacks to be filled
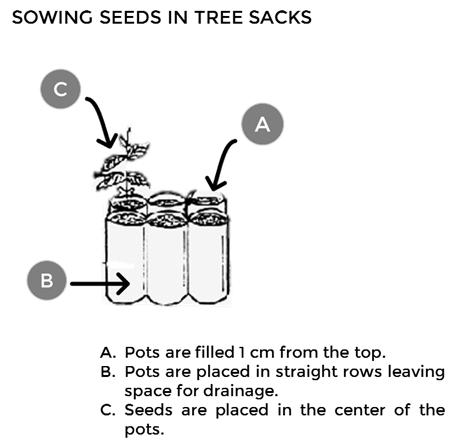
- Delineate your nursery bed(s), one meter wide. You can set a stake in each of the four corners and pull tightly around them to form a rectangular barrier to keep the sacks in straight lines. Or you can pre-dig a shallow rectangular hole a few centimeters deep to place the filled sacks into.
- Bring three wheelbarrows (or buckets) of topsoil, one of sand, and one of humus, compost, or dried manure to the site where you will mix them. You may need more or less, depending on the number of sacks you need to fill, but be sure the proportions are consistent.
- Sift the materials into one pile and mix them until you have a consistent blend throughout.
- Water the mixture, and continue to mix until it is uniformly moist, but not muddy.
- Fill one sack at a time. Make sure that you pack down each sack as you fill it up. Pinch the bottom or hold it to the ground to keep the soil in and tap it against the ground to compact the soil. You want to avoid air pockets and ensure the soil is firmly packed in, but not too tight to prevent water and air from circulating as the seedling grows. The sack should be able to stand upright without sagging over when done.
- As you fill the sacks, place them in the prepared bed. Make sure that each sack is pressed tightly against the other, so that the nursery is as compact as possible.
Building Your Shade Structures
When seedlings are very young, hot, direct sunlight over the course of the entire day is too much for them and can lead to excessive wilting or mortality. To protect them from the sun, you can easily build shade structures with some wood poles, nails or rope to fasten them, and grass or palm fronds to provide the shade. You can do this after the beds are prepared and tree sacks are filled and placed in the beds. Toward the end of their time in the nursery, you will gradually remove the shading over the seedlings—during a process called hardening off (described below)—to prepare them for harsher conditions when outplanted. To build the shading structures you will need at least four poles (about 5cm in diameter) that frame the perimeter of each of your nursery beds, then at least four poles to support the frame. If you do not have poles long enough to run the length of your beds, you can attach additional poles together. So for instance, if you have a 3 meter x 1 meter bed, you would need two 3 meter poles and two 1 meter poles to frame the perimeter, then four 1-1.5 meter poles placed vertically at each corner of the bed to support the frame. If you have an 8 meter x 1 meter bed, you could use four 4 meter poles to run the lengths, then the two 1 meter poles for the width of the frame, and six 1-1.5 meter poles for support (1 at each corner, then 1 halfway down each length to support the longer poles). When you have all of the poles you need, dig holes for the support poles, then stick them securely into the ground upright. After those are in place, join the frame poles to each other and to the support poles using nails or rope. When the structure is built, gather a number of small, 1 meter sticks (1-2cm in diameter is fine for these) that can be place across the width of the beds, spaced about 30 to 50 cm apart, fastened to the poles down the length with string or twine. When that is complete, place a thin layer of grass, palm fronds length-wise across the frame to provide about 60% shade, allowing about 40% of sunlight to pass through.Seed Pretreatment Methods
The hard seed coats of many tree species prevent water from penetrating through, allowing the seeds to remain dormant. Dormancy is a state in which seeds are prevented from germinating immediately, often giving the seed a chance to be dispersed, or waiting until environmental conditions are appropriate for them to germinate. This is advantageous in nature because it increases the chances of the seeds’ dispersal and survival. In your nursery, however, you want seeds to germinate at the same time. You can encourage rapid, uniform germination by pretreating your seeds. The purpose of pretreatment is to break down or open the hard seed coat so that water can penetrate and induce germination. The seeds will generally swell when germination is induced. In many species that grow in moist, tropical forests, dormancy is not a problem. Environmental conditions are generally suitable for germination as soon as the seeds are dispersed from the tree, so seeds will likely germinate in a matter of days or weeks and would not benefit from dormancy. In the drier tropics, on the other hand, seed coat dormancy is common due to harsher conditions, and some form of pretreatment is necessary to obtain rapid and uniform germination.Soaking
For the species that do benefit from pretreatment, there are various methods you can use, depending on the type of seed. For seeds that have a soft coat they may only need to be soaked in water for a period of time.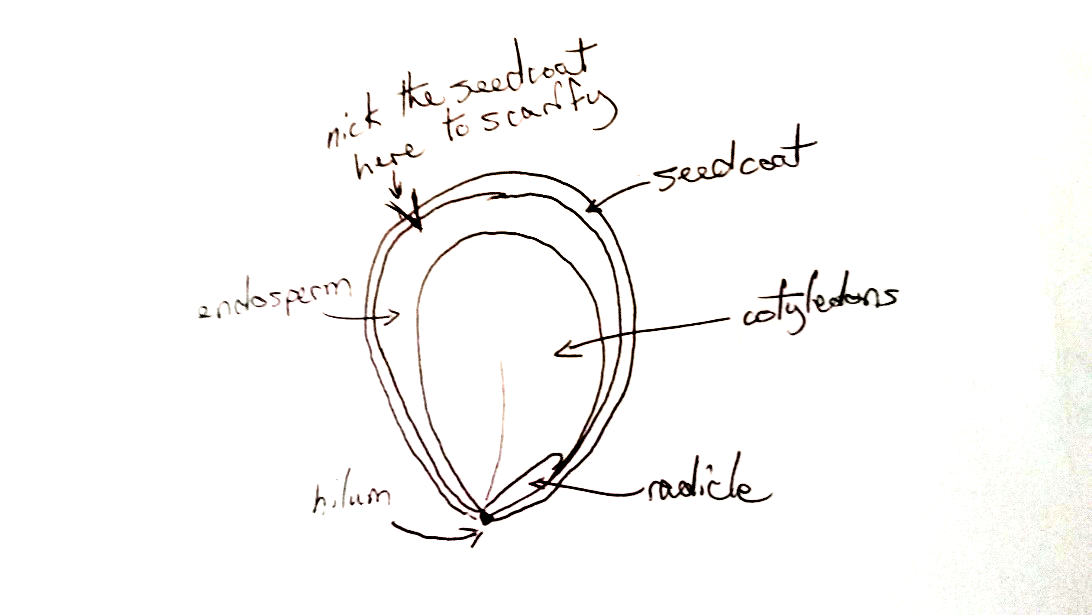
Scarification
For harder seed coats, it is necessary to scratch or break the seed coat to allow water to penetrate. This method, called scarification, can be accomplished by nicking the edge of the seed coat with a pair of fingernail clippers. Be sure when you scarify seeds, however, that you do not damage the hilum side, which you can see as a point, dot, or intrusion on the seed, as this is where the root (radicle) and first leaves (cotyledons) emerge from the seed (see diagram above).Boiling (combined with scarification/soaking)
For species with very hard seed coats, you may need to bring water to a boil, remove it from the heat, place the seeds in the water, and allow them to soak for a period of time. Before sowing seeds in your nursery, be sure you know which pretreatment method, if any, is applicable to the species you are sowing and pretreat them accordingly to ensure rapid, uniform germination.Seed Sowing
Keep in mind that not every seed you sow will germinate and grow into a healthy seedling. Some seeds will simply not germinate, and others may suffer from stunting, pest attack, disease, and mortality in the nursery, and should not be outplanted. So remember to always purchase or collect more seed for sowing than the number of trees you expect to outplant from your nursery. The additional number of seeds to sow depends on the species as well as the viability, or germination rate, of the seed.Sowing Seeds in Tree Sacks
Number of seeds per sack It is a good rule of thumb, however, to sow two seeds in each tree sack for smaller seeds. If they both germinate, you can transplant one of the seedlings to a seed sack where neither seed germinated. For larger seeds, particularly fruits (e.g. mango, avocado, cashew), sow only one per sack, and re-sow those that do not germinate. As some of the seedlings may die in the nursery after germination, it is also a good idea to sow 5 to 10% more seeds or sacks than you hope to outplant to account for this loss.- Use your finger or a stick to push two holes in each sack, or to create a shallow trenches that run straight lines across the width of bare root beds. The depth of the holes or trenches should be about twice the width of the seed you are sowing.
- Create all the holes first, then sow the seeds in each hole without covering them up. This way you will know where you have already sown.
- When they are all sown in sacks cover the seeds with soil, to cover twice the width of the seed, and gently tamp the soil to remove any air pockets.
- After sowing all the seeds, water them with about 5 litres of water per square meter.
Sowing Seeds in Bareroot Beds
Make small trenches with your finger or a stick about 10 cm apart, and plant the small seeds about 5 cm apart within the trenches. For seeds larger than 1 cm in diameter, space them with a distance of about 3 times their diameter. When they are all sown evenly down the trenches in the bareroot bed cover the seeds with soil, to cover twice the width of the seed, and gently tamp the soil to remove any air pockets. After sowing the seeds, cover the beds with dry grass or other light, organic material to prevent evaporation as well as to keep birds from eating the seeds. Avoid using dry grasses that have gone to seed, as they will increase your nursery’s weeding requirements. Water the bed with about 5 liters of water per square meter before finishing.Caring for Your Seedlings in the Nursery
It is impossible to overemphasize the importance of nursery care. The seedlings in your nursery require daily attention, and even twice-daily attention in the initial weeks after sowing your seeds. So be sure that you or someone in your family or group will be available every day to provide the care and attention needed. The primary care, beyond general protection, involves regular watering and weeding. As the seedlings grow, you will also need to thin them as needed, then harden them off to prepare them for outplanting.Watering
Keep the following important considerations in mind to keep your beds watered:- Water nursery beds with approximately 5 litres per square meter
- If a watering can is not available, be sure that all water is being poured slowly with the vessel close to the soil surface. If watering is not careful, soil will erode and seeds or roots can become exposed. You can also review alternatives to watering cans in the ‘Tools’ section above.
- Watering should be done in the morning before 10h00 and/or evening after 17h00.
- In the first two weeks, water the seedlings twice per day: in the morning and evening as watering in the middle of the day will lead to higher evaporation and water loss.
- It is not necessary to water immediately following a rain event where the soil has been left moist
- Sufficient watering will keep the seeds and seedlings moist at all times, but not so much that the water sits in the sacks and waterlogs the seedlings
- If the soil surface begins to show signs of a green color change (suggesting moss or algal growth), reduce the quantity of water per event
- If the leaves on the seedlings show signs of wilting (suggesting too little water) even shortly after watering, increase the amount of water given each day
Weeding
Weeds will compete with seedlings for sunlight, water, and nutrients, which can stunt their growth. Keep in mind the following to keep your beds free of weeds.- Tree nurseries should be weeded at least once a week
- Do not weed tree nurseries in the first week after your trees have germinated – the seedlings’ roots will be too weak
- Be careful not to mistake the seedlings for weeds, as they can look similar when very young
- Remove grasses and weeds from around your nursery beds, and keep them clear during the entire nursery season as their seeds can easily spread onto your beds, requiring more time to keep them weeded.
Thinning
When more than one seedling grows in a sack, seedlings should be thinned down to one seedling in each sack as they will compete for moisture, nutrients, and sunlight. Follow the steps below for thinning:- Thinning should be done in the shade to reduce heat stress on the seedlings.
- Thin to one tree per sack when seedlings are 10 cm tall, or about a month after seeding
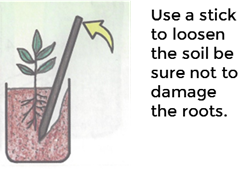
- Use a twig to prepare transplanting holes in the dirt of empty tree sacks (those where no seedlings germintated) before thinning.
- Gently remove the weaker looking seedlings, (shorter, thinner) trying to keep the roots intact
- It helps to insert a small twig or piece of metal wire into the soil at the base of the seedling you are removing
- Rotate the twig or wire in a circle while grabbing the base of the seedling stem and very gently pulling it upward
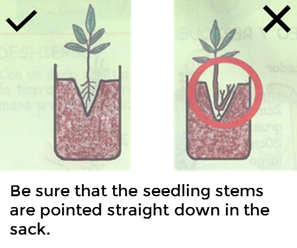
- Plant the healthiest of the removed seedlings into the prepared empty tree sacks in your nursery. Be sure that the seedling stems are pointed straight down in the sack.
- Gently repack disturbed soil in the tree sacks to remove air pockets
- After replanting, water the seedlings until lightly moist
Hardening Off
In the last month in the nursery, gradually remove shade from the seedlings and water to condition the seedlings for what will likely be harsher conditions once transplanted.- Approximately one month from the start of the rainy season, remove the shading materials from over the nursery beds gradually, for one hour in the morning and one hour in the afternoon. After 3 or 4 days, reduce shade by another couple of hours. Keep doing this, and after 2 to 3 weeks, seedlings will tolerate full sunlight with a minimum of shock.
- The time between watering periods should also be gradually extended by 2 to 3 days. The number of waterless days is progressively extended until seedlings are capable of surviving a week or more without water.
- In water reduction, take care to avoid wilting. If it occurs, apply water until wilting stops, then begin reducing the amount of water again, but more slowly than before.
Species Pretreatment and Nursery Information
| SPECIES | SEED PREPARATION | NURSERY PERIOD | DAYS TO GERMINATE | # PER POT | USES |
| Acacia abyssinica | Scarify | 18-24 wks | 6 – 30 days | 2 | Fodder, light shade, living fence |
| Acacia albida | Scarify | 10-14 wks | 6 – 30 days | 2 | Fodder, intercropping |
| Acacia ataxacantha | Soaked in hot water | 10-14 wks | 3-15 days | 2 | Living fence, fodder |
| Acacia holosceria | Boil water, remove from heat, then soak 12 hrs | 10-14 wks | 7 – 25 days | 2 | Windbreak, border planting |
| Acacia laeta | Scarify | 10-14 wks | 4 – 15 days | 2 | Living fence, fodder |
| Acacia mellifera | Scarify | 8-10 wks | 4 – 15 days | 2 | Living fence, fodder |
| Acacia nilotica | Scarify | 14-18 wks | 5 – 18 days | 2 | Living fence, fodder, fuelwood |
| Acacia polycantha | Boil water, remove from heat, then soak 12 hrs | 10-14 wks | 10 – 21 days | 2 | Living fence, fodder, fuelwood |
| Acacia senegal | Scarify | 14-18 wks | 7 – 21 days | 2 | Living fence, intercropping |
| Acacia seyal | Boil water, remove from heat, then soak 12 hrs | 8-10 wks | 5 – 20 days | 2 | Fuelwood, fodder |
| Acacia sieberiana | Boil water, remove from heat, then soak 12 hrs | 10-14 wks | 5 – 20 days | 2 | Fuelwood, windbreak |
| Acacia tortillis | Boil water, remove from heat, then soak 12 hrs | 14-18 wks | 5 – 15 days | 2 | Fodder, fuelwood |
| Adansonia digitata | Boil water, remove from heat, then soak 12 hrs | 12-16 wks | 14 – 28 days | 2 | Fodder, fruit |
| Albizia lebbek | Boil water, remove from heat, then soak 12 hrs | 15-18 wks | 3 – 14 days | 2 | Fuelwood, windbreak |
| Anacardium ocidentale | 24 hr cold soak | 6-8 wks | 12 – 30 days | 1 | Fruit, windbreak |
| Annona spp. | Scarify | 12 wks | 21 – 45 days | 2 | Shade, windbreak |
| Azadirachta indica | None | 6-8 mos | 7 – 21 days | 2 | Fruit |
| Balanites aegyptiaca | 24 hr cold soak | 18-24 wks | 7 – 15 days | 2 | Fruit, living fence |
| Bauhinia rufescens | Boil water, remove from heat, then soak 12 hrs | 20-24 wks | 17 – 42 days | 2 | Living fence, windbreak, fodder |
| Borassus aethiopium | None | direct seed | 20 – 40 days | 1 | Fruit, border planting, timber |
| Bougainvilla spectablis | Soak cutting 24 hrs | 6 mos | cuttings | 1 | Living fence, ornamental |
| Cajanus cajan | None | 10-14 wks | 5 – 10 days | 2 | Fodder, intercropping |
| Calliandra calothyrsus | Boil water, remove from heat, then soak 12 hrs | 12 – 16 wks | 12 – 24 days | ||
| Carica papaya | 24 hr cold soak | 6-8 wks | 15 – 21 days | 2 | Fruit |
| Cassia siamea | Scarify | 10-12 wks | 15 – 20 days | 2 | Windbreak, shade, ornamental |
| Cassia sieberiana | Boil water, remove from heat, then soak 12 hrs | 10-14 wks | 7 – 20 days | 2 | Ornamental, timber |
| Casuarina equisetifolia | None but ants attack | 4 mos + | 5 – 22 days | bareroot | Windbreak, fuelwood, timber |
| Citrus spp. | None | 4 mos + | 15 – 30 days | 2 | Fruit |
| Chamaecytisus proliferus | 24 hr soak | 8 – 12 wks | 8 – 15 days | 2 | Fodder |
| Cola cordifolia | None | many mos | 21 – 35 days | 2 | Fruit |
| Daniella oliveri | Boil water, remove from heat, then soak 12 hrs | 6-8 wks | 10 – 26 days | 1 | Fodder, fuelwood |
| Delonix regia | Scarify | 12-18 wks | 12 – 20 days | 2 | Ornamental |
| Detarium senegalense | Scarify | 20-24 wks | 8 – 15 days | 1 | Fruit, ornamental |
| Dialium guinese | Boil water, remove from heat, then soak 12 hrs | 1 yr | 15 – 24 days | 1 | Fruit, timber |
| Dovyalis abyssinica | None | 6 mos + or Bareroot | 14 – 28 days | 2 | Living fence, fruit |
| Euphorbia balsimifera | Cuttings | N/A | 7 – 81 days | 1 | Living fence |
| Gliricidia sepium | None | 8-12 wks | 9 – 15 days | 2 | Living fence, fuelwood |
| Gmelina arborae | 24 hr soak | 12-14 wks | 7 – 30 days | 2 | Ornamental, timber |
| Grevillea robusta | None | 12 – 18 wk | 12 – 24 days | 2 | Living fence, timber |
| Jatropha curcas | None (plant white tip down) | 10-12 wks | 7 – 14 days | 2 | Living fence, border planting |
| Khaya senegalensis | None | 12 – 24 mo | 7 – 18 days | 2 | Shade, ornament, timber |
| Leucaena leucocephala | Boil water, remove from heat, then soak 12 hrs | 12-16 wks | 7 – 21 days | 2 | Intercropping, fence, windbreak |
| Manguifera indica | Remove hull | 4-6 wks | 7 – 21 days | 1 | Fruit |
| Moringa oleifera | None | 10-12 wks | 5 – 12 days | 2 | Food |
| Parkia biglobosa | Boil water, remove from heat, then soak 12 hrs | 10-14 wks | 7 – 15 days | 2 | Fruit |
| Parkinsonia aculeata | Boil water, remove from heat, then soak 12 hrs | 8-10 wks | 2 – 10 days | 2 | Windbreak, living fence, ornament |
| Prosopis juliflora | Boil water, remove from heat, then soak 12 hrs | 12-14 wks | 5 – 10 days | 2 | Windbreak, livefence, fuelwood |
| Psidium guajava | 24 hr soak | 7-8 mos | 7 – 16 days | 2 | Fruit |
| Sesbania bispinosa | Soak 24 hrs | 8-10 wks | 5 – 10 days | 2 | Fodder |
| Sesbania sesban | Soak 24 hrs | 10-14 wks | 3 – 7 days | 2 | Fodder, fuelwood |
| Tamarindus indica | Boil water, remove from heat, then soak 12 hrs | 20-24 hrs | 7 – 10 days | 2 | Ornamental, fruit |
| Ziziphus mauritiana | Crack, remove, soak stone | 12-18 wks | 7 – 45 days | 2 | Living fence, fruit |
References
- For more on these topics, see the Peace Corps Senegal Agroforestry Training Manual and the TOPS Permagarden Technical Manual.
- This section adapted from FAO Training: Soil Texture “The dry crushing test” as well as ftp://ftp.fao.org/fi/cdrom/fao_training/FAO_Training/General/x6706e/x6706e06.htm, http://www.fao.org/docrep/u8480e/U8480E0b.htm, and ftp://ftp.fao.org/agl/agll/farmspi/FARMESA_SWC1.pdf
- http://agroforestry.net/component/content/article?id=145:overstory-125-direct-seedinghttp://agroforestry.net/component/content/article?id=145:overstory-125-direct-seeding
- This section adapted from http://agroforestry.net/component/content/article?id=145:overstory-125-direct-seeding