
Deprecated: array_key_exists(): Using array_key_exists() on objects is deprecated. Use isset() or property_exists() instead in /nas/content/live/trees4future/wp-content/plugins/ht-knowledge-base/php/ht-knowledge-base-category-ordering.php on line 58
Deprecated: array_key_exists(): Using array_key_exists() on objects is deprecated. Use isset() or property_exists() instead in /nas/content/live/trees4future/wp-content/plugins/ht-knowledge-base/php/ht-knowledge-base-category-ordering.php on line 60
Click here to download the corresponding chapter from the Technical Manual
Chapter 8: Agroforestry Technologies
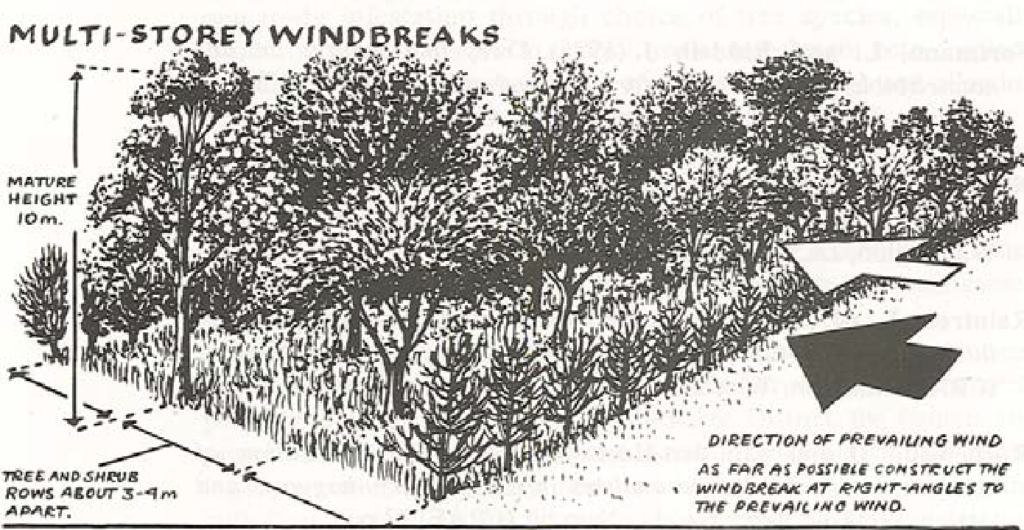
Windbreaks
In arid zones, the dry, hot climate conditions coupled with minimal water availability are often intensified by strong winds. Winds can dry out soils and damage crops, leading to stunted plants and reduced yields. Living conditions and agricultural production can be improved by planting trees and shrubs as windbreaks to reduce wind velocity and provide shade. Windbreaks are barriers of trees or shrubs planted to slow the movement of wind at crop level and divert the force of the wind to higher altitudes. They frequently provide direct benefits to agricultural crops, resulting in higher yields, and provide shelter to livestock, grazing lands, and farms. Reasons for Planting a Windbreak: Primary reasons for planting windbreaks around Forest Gardens include:- To minimize damage to vegetables and crops
- To protect vegetables and fruit trees while they are flowering (because fruits and vegetables develop from the flowers, you can increase production by protecting the flowers from heavy winds)
- To minimize soil erosion
- To minimize the amount of moisture the winds evaporate from soils
Windbreaks Design Considerations
The species composition of trees and shrubs used in windbreaks vary greatly around the world, but the basic design of windbreaks stays the same. There tends to be a time of the year, often during the dry season, when strong winds cause the most damage. It is those strongest winds which must be addressed first. To reduce wind velocity, windbreaks should be planted perpendicular to the strongest winds. It may be necessary to plant windbreaks on multiple sides of fields because the wind often changes direction during the year. Desirable characteristics of windbreak species include:- Fast-growing
- Drought-resistant
- Ability to withstand strong winds
- Deep spreading root system to for stability
- Trees with small open crowns reducing wind speed without stopping it entirely

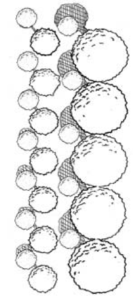
 Top View
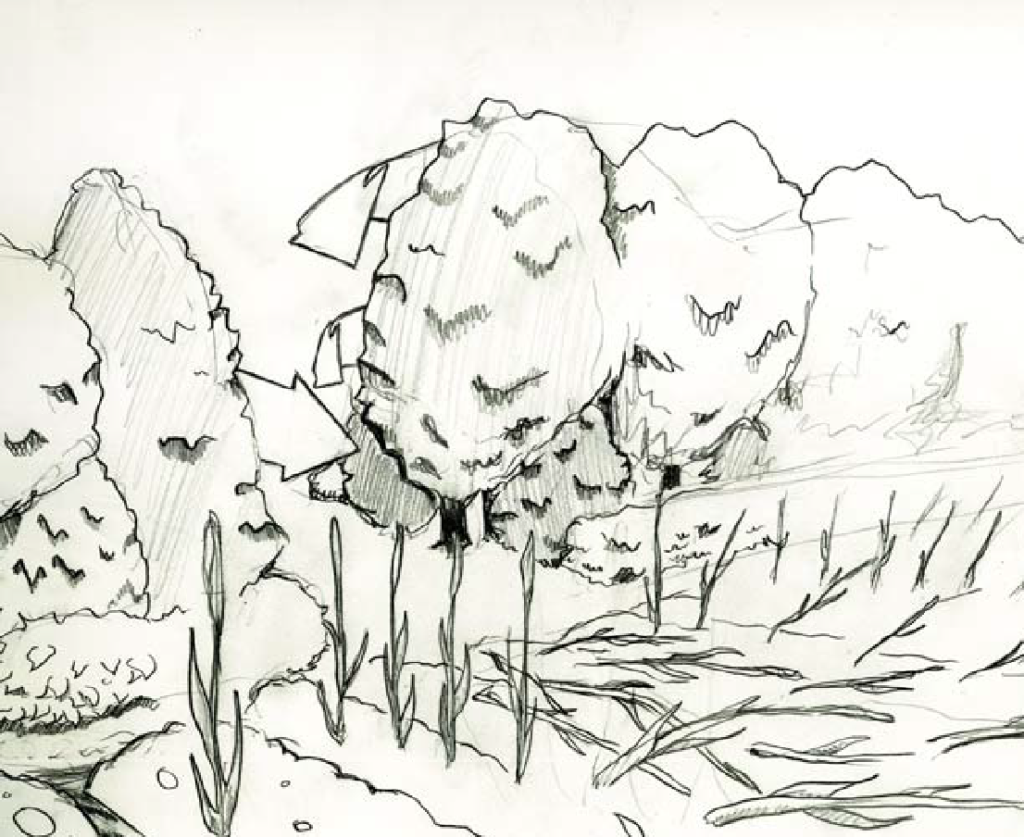
 Poor design causes wind to funnel and damage crops.
Managing your Windbreak
The effectiveness and longevity of a windbreak depends on its maintenance, and the maintenance practices depend on the species selected for your windbreak. As the trees and shrubs mature, they change in size and shape. To maintain the composition of the windbreak—to ensure desired permeability and density—pruning, thinning, replanting of gaps, and in some cases plant removal, are generally required. A windbreak’s lifespan is generally determined by the species selected. For permanent windbreaks, rows will eventually need to be replaced, keeping in mind that shrubs often have shorter lifespans than larger trees. It will be necessary as the trees and shrubs age in a windbreak, to fell and replant rows, planting new rows parallel to the old ones. When the new row has matured, the old one should be removed. An important thing to keep in mind when planting any trees is that livestock can and will eat them. We have seen too many tree planting initiatives end as goat feed, so be sure to always protect your trees! If you are not able to keep livestock from grazing near your newly planted windbreak, then be sure to protect them by creating dead fence barrier of dry, thorny tree branches. In places where open grazing is the norm, we advise creating a barrier of trees—called a living fence or green wall—around the entire Forest Garden site.Some Useful Species for Windbreaks
- Acacia nilotica
- Albizia lebbeck
- Casuarina equisetifolia
- Faidherbia (acacia) albida
- Grevillea robusta
- Gliricidia sepium
- Leucaena leucocephala
- Parkinsonia aculeata
- Sesbania sesban
Living Fences and Green Walls
It is extremely important to protect Forest Gardens from unwanted intruders, which most often come in the form of grazing livestock that love to make meals from the trees, shrubs, and plants you would rather keep for your family or the market. Building a ‘dead’ fence of wooden posts, beams, and/or barbed wire around the Forest Garden will do the trick, but the materials for these fences can be extremely costly. Also, remember that with the Forest Garden approach we are trying to maximize the utility and benefits of every bit of land. We aim for every system or technique to serve multiple functions. A dead fence can provide protection from four-legged bandits, but it does not prevent strong winds from damaging your crops, nor does it help to reduce soil erosion or provide useful secondary products. A more long-term, effective, and affordable solution that serves multiple functions is the living fence, which provides both protection and production. A living fence is an animal-proof barrier composed of trees and shrubs that are densely planted around the perimeter of a field. Not only do living fences reduce the need (and cost) for standard fencing, but the trees and shrubs utilized in living fences can produce tangible benefits such as food, fuelwood, fodder, and other raw materials. Living fences are a commonly-used agroforestry technology, generally composed of one to two rows of trees and shrubs. Trees for the Future has developed a modification of living fences that are proving extremely effective and productive, called a green wall, which is an enhanced living fence technology consisting of three rows of trees and shrubs. Some of the reasons why we encourage families to surround their Forest Gardens with living fences and green walls are:- To mark boundary lines between farms or next to roads.
- To separate or segment fields used for distinct purposes
- To protect and keep animals from intruding or straying
- To protect Forest Gardens from animal damage or theft
- To reduce erosion and wind damage
- To eliminate the cost of building and maintaining dead fences
- To produce useful products within border space that would otherwise be unproductive
- To mitigate damage from termites, carpenter ants and dry rot, which are a continuous headache in maintaining dead wooden fences and posts.
Reasons for Planting a Living Fence
Beyond protecting the Forest Garden site, there are numerous other uses and products that living fences and green walls provide: Fuelwood – As a general rule, fuelwood or charcoal is the primary cooking fuel in developing communities. A living fence post can be trimmed periodically and the branches used as fuel. A convenient source of fuelwood near the home, such as a living fence, is especially beneficial in areas where wood is scarce. Extra fuelwood may be sold or bartered. Fertilizer – A living fence can provides fertilizer in several ways. First, leaves that fall naturally from the tree, as well as leaves and small branches cut away when the tree is harvested for fuel, can be (1) composted, (2) mixed with the soil as green fertilizer, or (3) left on the ground as leaf litter mulch. Second, the deep roots of trees mine important mineral nutrients from deep in the soil, storing them in leaves and branches which can fall or be placed onto or mixed into soil. As these leaves and stems decompose, such minerals are released into the soil as green fertilizer, becoming available to the shallower root zones of annual crops. Third, leguminous trees (which are commonly selected for living fences) add significant amounts of nitrogen to the soil, reducing the need for costly commercial fertilizers. Finally, pruning of trees results in partial die back of roots, releasing additional nutrients directly into the soil. Fodder – The leaves of most tree and shrub species selected for living fences provide highly nutritious fodder for livestock. The suitability of leaves as feed varies not only from species to species but also with age. Food – Leaves, flowers, fruits and seeds of many living fence species can provide nutritious foods for people. Examples of foods that can be produced by living fences include moringa leaves, cactus flowers, mulberries, leaves and roots of cassava, pigeon peas, Ziziphus fruit, and kei apples. Fiber – A few living fence plants, such as the sisal plant and some bamboo species yield branches or leaves that can be processed into useful fiber for cloth or rope, or used directly for tying. Timber – Although families generally do not cut down their living fences to produce timber, the straight, solid branches from some common living fence species, including casuarina and grevillea can be harvested when needed for tool handles, trellises, and light construction. Medicine – Some living fence plant species are also selected for their medicinal value. The seeds of jatropha produce a medicinal oil, and gliricidia produces a natural pesticide in the bark which makes an effective rat poison. Windbreaks – In some areas windbreaks are extremely useful in protecting against soil and yield damage caused by winds. Where desirable, living fences can be designed to protect Forest Gardens against wind damage and livestock. When adapting living fences for windbreak purposes, select relevant species for the middle and inner row while retaining the protective and thorny outer row of the green wall. Families who establish living fences and green walls see a major savings in not having to purchase costly materials to construct or repair their dead fences. However, this is not to say that establishing and maintaining a living fence is not labor intensive. Farmers face the greatest difficulties during the first few years when establishing a new living fence. Replanting is often necessary to fill in gaps where the previous year’s seedlings did not survive. Farmers must also be sure to begin pruning the trees when the seedlings are in the nursery, and there is always pruning work to be done to maintain the fence. However, once the living fence is established, farmers can develop their Forest Gardens inside the safety and security offered by the permanent protection, and they can enjoy the many products from their living fence.Desirable characteristics of trees used in living fences
- Tolerant of minor « injuries »: living fences are susceptible to frequent injuries from pruning or browsing animals and should tolerate them well.
- Fast growing: to provide benefits for which they are planted as soon as possible.
- Compatible with crops: avoid species that have adverse effects on other tree species or crops they are associated with.
- Production: select trees with useful products like fodder, green manure, & fuelwood
- Protection: they should have stiff branches, thorns, spines, nettles, or irritating latex to keep animals out.
- Vegetative propagation: ensures fast establishment while reducing the chance of spreading to pasture and cultivated areas.
Living Fence Design Considerations
Thorny species (acacia sp., parkinsonia, ziziphus, etc.) tend to work best in living fences, though many people also use non-thorny species.- Thorny species: Spacing among trees in a row for thorny species should be 20-50 cm apart.
- Non-thorny species: Cuttings of euphorbia, jatropha and other non-thorny species—particularly useful for the center row of a green wall—should be planted very close together (10-20cm). For non-thorny species in the outer and inner rows — 40 to 50 cm spacing tends to prove effective.
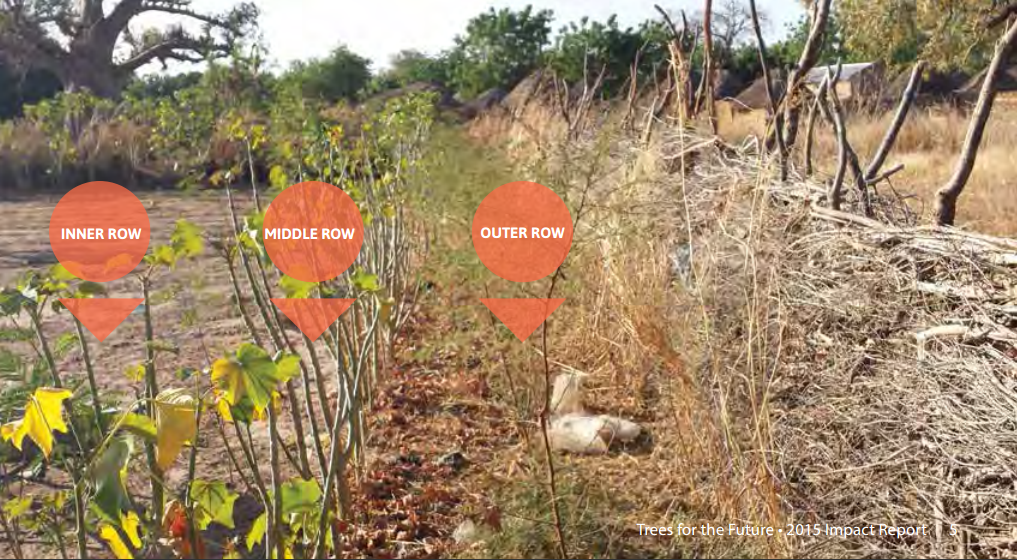 Outer Row
The outer-most row of trees is comprised of thorny trees planted very close together to form a thick hedge that even goats cannot penetrate. We frequently use Ziziphus mauritiana (the jujube tree) and Dovyalis (the Kai apple) because both thorny species have a valuable vitamin-C rich fruit that can be sold at market or consumed by the family.
Suggested species: Ziziphus, Dovyalis, Faidherbia albida, Acacia sp.
Middle Row
The middle row tends to consist of fast-growing but sturdy trees that give the Green Wall some structural integrity. This structure is required to support the many thorny branches that are eventually woven among each other. We frequently use trees such as Moringa oleifera and Jatropha curcas to provide this line of structural support.
Suggested species: Jatropha curcas, Euphorbia, Leucaena, Moringa oleifera
Inner Row
Farmers often choose a variety of trees to plant on the inner lining of the Green Wall that surrounds their field. While we recommend planting tall, fast-growing trees such as Leucaena leucocephala, Cassia sepium and Gliricidia sepium to form a multi-purpose windbreak, farmers in areas better protected from fierce winds will often opt to plant rows of protein-rich, nitrogen fixing pigeon peas so that they can harvest dozens of pounds of pigeon peas from their Green Wall twice a year.
Suggested Species: Leucaena leucocephala, Grevillea spp., Gliricidia sepium, Cassia siamea, Cajanus cajan, Calliandra, Sesbania
Outer Row
The outer-most row of trees is comprised of thorny trees planted very close together to form a thick hedge that even goats cannot penetrate. We frequently use Ziziphus mauritiana (the jujube tree) and Dovyalis (the Kai apple) because both thorny species have a valuable vitamin-C rich fruit that can be sold at market or consumed by the family.
Suggested species: Ziziphus, Dovyalis, Faidherbia albida, Acacia sp.
Middle Row
The middle row tends to consist of fast-growing but sturdy trees that give the Green Wall some structural integrity. This structure is required to support the many thorny branches that are eventually woven among each other. We frequently use trees such as Moringa oleifera and Jatropha curcas to provide this line of structural support.
Suggested species: Jatropha curcas, Euphorbia, Leucaena, Moringa oleifera
Inner Row
Farmers often choose a variety of trees to plant on the inner lining of the Green Wall that surrounds their field. While we recommend planting tall, fast-growing trees such as Leucaena leucocephala, Cassia sepium and Gliricidia sepium to form a multi-purpose windbreak, farmers in areas better protected from fierce winds will often opt to plant rows of protein-rich, nitrogen fixing pigeon peas so that they can harvest dozens of pounds of pigeon peas from their Green Wall twice a year.
Suggested Species: Leucaena leucocephala, Grevillea spp., Gliricidia sepium, Cassia siamea, Cajanus cajan, Calliandra, Sesbania
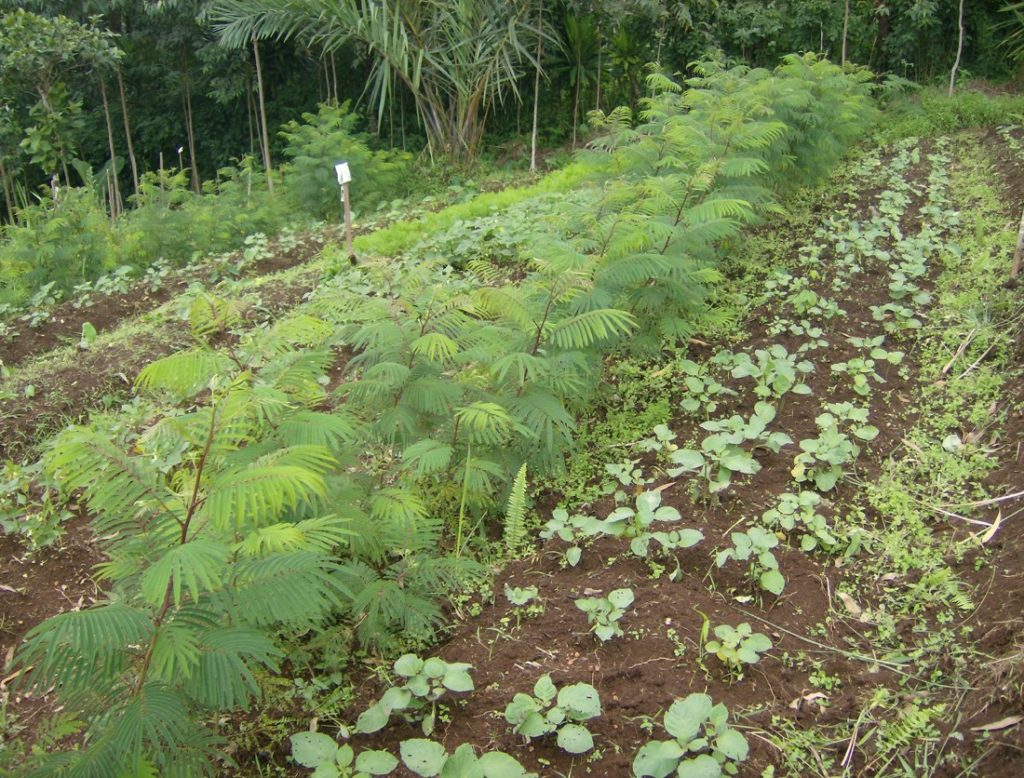
Alley Cropping
In addition to protecting your site, the first phase of the Forest Garden Approach involves stabilizing and revitalizing soils to ensure that the more lucrative trees and crops you plant in the diversification phase will be raised in healthy, fertile soils. Particularly necessary for degraded sites that suffer from intensive and continuous planting of monoculture systems, alley cropping helps to: stabilize erosive top soils with networks of fibrous root systems that hold soils in place; reduce the speed of runoff, encouraging water to penetrate into the soils rather than across the surface; and increase soil fertility through fixing nitrogen into the soils and providing an abundance of nutrient-rich leaves and stems as green fertilizer, which recycles soil nutrients while also improving soil aeration, and reducing soil temperature. Alley cropping refers to the planting of multiple sets of single or double rows of trees or shrubs within which crops can be grown. Though timber and fruit trees are often selected for use in alley cropping systems, TREES encourages the use of fast-growing, multi-purpose agroforestry trees for Forest Gardens to provide for greater soil stability, water availability, and soil fertility for the diverse trees and crops that are grown within the alleys. The alley trees are pruned periodically during the growing season to provide biomass and to prevent shading of the growing crops. Many farmers in developing countries do not have access to commercial fertilizer, and if they do, the fertilizers tend to be very expensive. For them, there’s good news: you can grow fertilizer on trees.Benefits of Alley Cropping
The multiple benefits of alley cropping include:- Reduced erosion from wind and water
- Reduced runoff and increased groundwater recharge
- Enhanced soil fertility through nitrogen-fixation and increased soil organic matter
- Reduced soil moisture loss due to evaporation from wind
- Enhanced habitat for biodiversity
- Production of useful agroforestry tree products, e.g. fuelwood and poles
- Protection from pests due to reducing crop visibility, diffusing pest targets due to plant diversity, interfering with pest movement, and creating habitat more favorable to beneficial insects.
Desirable characteristics of trees used in alley cropping
- Produces an abundance of leaf litter, preferably producing the most leaves prior to the cropping season
- Nitrogen-fixing
- Able to grow back quickly after pruning, coppicing, or pollarding
- Fast growing – to provide benefits for which they are planted as soon as possible.
- Resistant to drought
- Able to grow in degraded, nutrient-poor soils
- Compatible with food crops – avoid species that have adverse effects on other tree species or crops with which they are associated
- Deep taproot with minimal lateral root growth – the trees’ roots should grow deep into the soil rather than horizontally to reduce competition at the root zones of crops planted in the alleys
- Multi-purpose – select trees with useful products like fodder, green manure, & fuelwood
Alley Cropping Design Considerations
On flat land, the rows of trees should be planted in the east-to-west direction, NOT north-to-south. Planting east-to-west, following the pattern of the sun as it moves across the sky, the sun is able to shine across the rows throughout the day. However, if the land is sloped, the alleys should be planted following the contours (see the Contour Planting section below), as it is more beneficial to manage erosion of topsoils than to follow the pattern of the sun. In this case, alley trees are pruned back heavily during the cropping season to minimize competition for sunlight.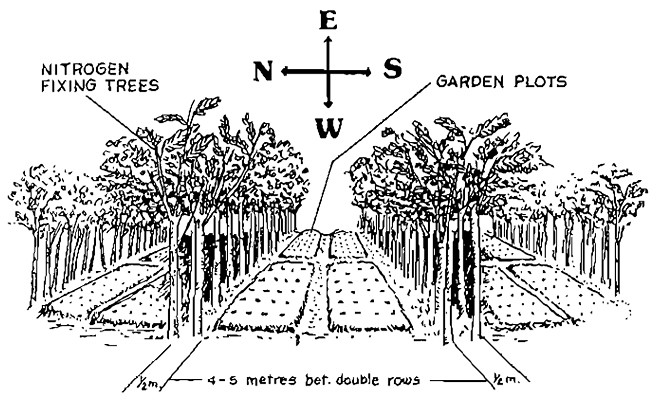 In our experience we have found it highly effective to plant a double row, as close as 20 cm apart, with the trees about that same distance apart between the two rows. As with living fences, the rows are staggered to reduce root binding between the trees. However, depending on the number of trees that have been raised for planting, it is better to spread those trees across single rows with spacing between trees as much as a meter apart. In this way, farmers can begin to cover their fields with agroforestry trees. Then more trees can be raised and planted to increase the density of the rows in the following planting season.
Spacing between rows of trees is highly variable, ranging from 4 to 20 meters, depending on the farmer’s preferences and the slope of the land. TREES recommends closer spacing between rows for sloping land as the alleys are also very effective in controlling erosion. Spacing of 4-5 meters between rows, though labor-intensive, will produce large quantities of wood and quickly revitalize degraded soils with the massive amount of leaf fall (Nair,1993).
In our experience we have found it highly effective to plant a double row, as close as 20 cm apart, with the trees about that same distance apart between the two rows. As with living fences, the rows are staggered to reduce root binding between the trees. However, depending on the number of trees that have been raised for planting, it is better to spread those trees across single rows with spacing between trees as much as a meter apart. In this way, farmers can begin to cover their fields with agroforestry trees. Then more trees can be raised and planted to increase the density of the rows in the following planting season.
Spacing between rows of trees is highly variable, ranging from 4 to 20 meters, depending on the farmer’s preferences and the slope of the land. TREES recommends closer spacing between rows for sloping land as the alleys are also very effective in controlling erosion. Spacing of 4-5 meters between rows, though labor-intensive, will produce large quantities of wood and quickly revitalize degraded soils with the massive amount of leaf fall (Nair,1993).
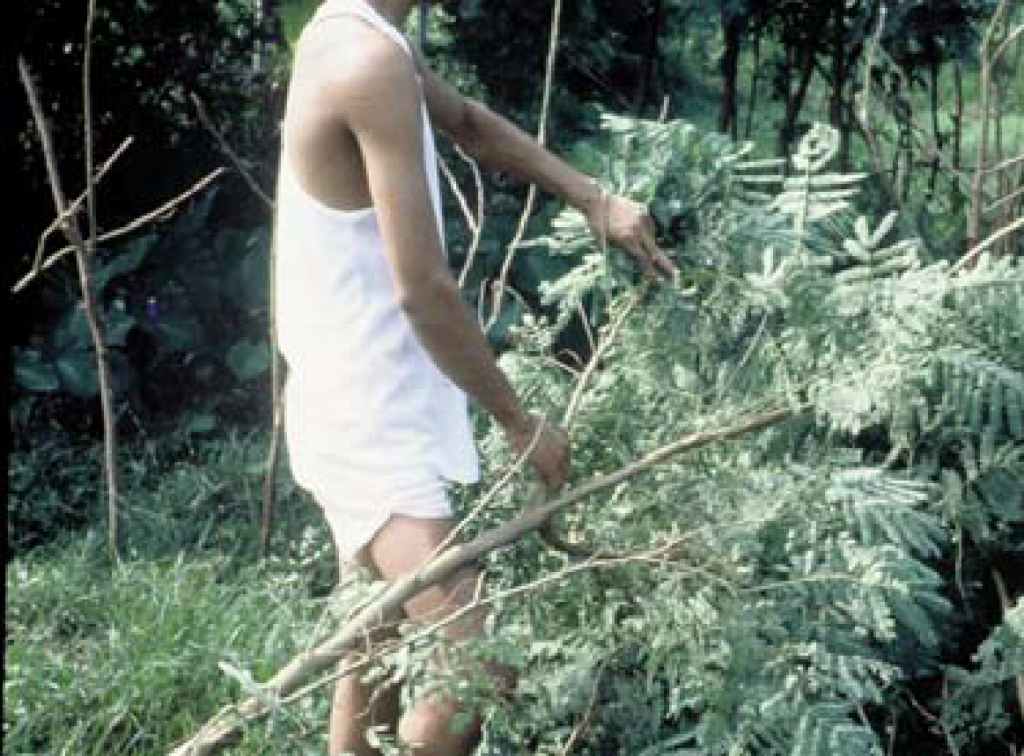
Management of Alley Cropping Trees
Throughout the growing season, on a rotational system of 3-4 weeks, the branches and branchlets of these trees are chopped and the leaves dropped around the crops growing between the tree rows (see pictures below). These leaves decompose quickly, adding large amounts of organic matter & nutrients to the soil. Particularly on degraded soils, this leads to considerable, sustainable increases in crop yields. Farmers in our program have seen their yields improved by three times only one year after the system was started. As the growing season comes to an end farmers can allow the trees to grow tall, since they will not be competing with crops for sunlight (see pictures below). By the beginning of the next cropping season, the trees may be 3-4 meters tall and should be cut back. The entire trees above the height of 50cm to 1m above the ground can be harvested. The wood can be used for fuelwood or construction, and the leaves should be plowed back into the soil or dropped on top as green fertilizer.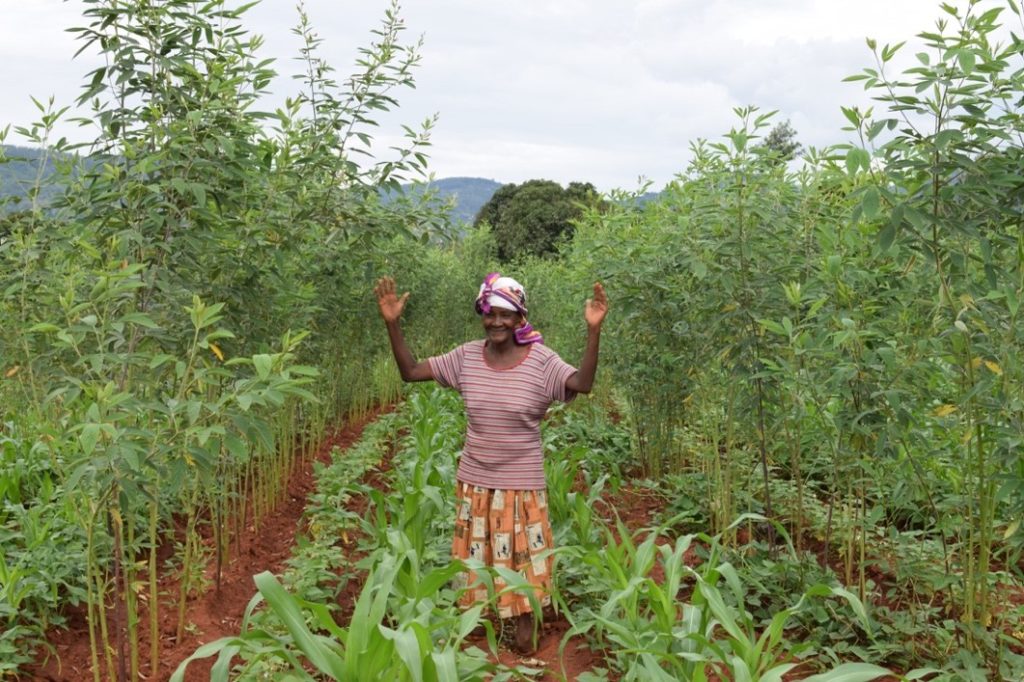
Some Useful Species for Alley Cropping
- Cajanus cajan
- Calliandra calothyrsus
- Chamaecytisus proliferus
- Faidherbia albida
- Leucaena leucocephala
- Sesbania sesban
- Tephrosia candida
Contour Planting
We hope we have made it clear by now that soil stability and fertility is key to sustaining agricultural productivity. Where Forest Gardens are being established on barren, degraded hillsides, particularly on slopes that exceed 5% (i.e. a one meter vertical climb or drop over 20 meters), soil erosion is a major challenge. During rains, runoff moves quickly across land if it is not slowed by vegetation or other barriers and allowed to filter into the soil. As it moves down the hillside it carries topsoil—along with any nutrients—away with it. Families can significantly reduce these problems through contour planting. Contour planting refers to vegetative barriers planted on the contours of hillsides and slopes to stabilize soils and increase soil moisture and fertility. Contours are level lines that cross a slope at a constant elevation. Contours may curve from side to side to stay level, but the lines never move upslope or downslope. Once the contour lines are plotted across a hillside or slope, vegetative barriers or living contour barriers of trees, shrubs, and grasses can be planted along the contours to control soil erosion. It is best to dig a trench along the contour lines, packing the soil from the trench firmly into a berm on the uphill slope, then planting the berm with trees, shrubs, and grasses. Once established, any runoff flowing down the slope will be slowed down by the berms, and the soil particles being carried by the water will settle behind them. The water then has a chance to seep into the soil rather than rushing further down the hill face, taking more and more topsoil with it. Over time, the soil deposits will continue to build up behind the berms while the vegetation spreads over and stabilizes them, eventually decreasing the gradient of the slope and forming a terrace.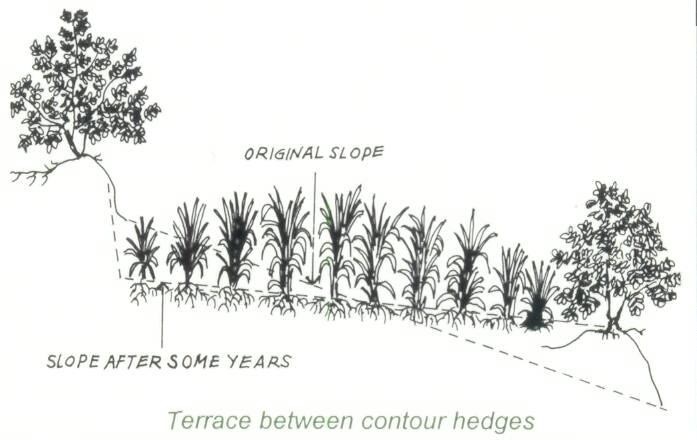 Before proceeding with contour planting it is extremely important that the family lays out contour lines accurately. If the contour lines are not level, the runoff can gather and run along the sloping vegetative barrier, potentially causing more erosion than if the barrier was never planted to begin with. If the land on a given hillside is owned by more than one family, it is best for all landowners on the hill to work collectively to develop contours across the entire hillside.
Similar to alley cropping systems, other crops can continue to be planted between the barriers. If the alleys between the contour strips are ploughed for cultivation in the early years of Forest Garden establishment, the ploughing should also be done following the contour lines (this is a good rule of thumb for all ploughing and planting on sloped land, regardless of the presence of contour vegetative strips). On any slopes greater the 60%, annual crops should not be cultivated. It is far too difficult to keep soils stable when ploughing such steep land, so stick to only planting tree crops and perennials on steep slopes, your soils will thank you (by providing increased, sustainable yields!)
Before proceeding with contour planting it is extremely important that the family lays out contour lines accurately. If the contour lines are not level, the runoff can gather and run along the sloping vegetative barrier, potentially causing more erosion than if the barrier was never planted to begin with. If the land on a given hillside is owned by more than one family, it is best for all landowners on the hill to work collectively to develop contours across the entire hillside.
Similar to alley cropping systems, other crops can continue to be planted between the barriers. If the alleys between the contour strips are ploughed for cultivation in the early years of Forest Garden establishment, the ploughing should also be done following the contour lines (this is a good rule of thumb for all ploughing and planting on sloped land, regardless of the presence of contour vegetative strips). On any slopes greater the 60%, annual crops should not be cultivated. It is far too difficult to keep soils stable when ploughing such steep land, so stick to only planting tree crops and perennials on steep slopes, your soils will thank you (by providing increased, sustainable yields!)
Building an A-frame
So how do we find the contour lines using locally-available materials? We’re glad you asked. The following steps will guide you through the steps of building and using an A-frame. Materials Needed to Construct an A-frame:- Two 1.5 to 2 meter sticks or poles about 3 to 5 cm in diameter (can be wood, bamboo, plastic, or any other light-weight, sturdy material)
- One 1 to 1.5 meter stick of the same material
- Three nails, or 2 meters of twine/string for binding the wood together
- One 1.5 meter piece of twine/string for the level
- One round rock, about 5 cm in diameter
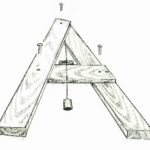 Making the A-frame – Join the three poles securely together, with the two longer poles bound together on one end with a nail or string, and the shorter pole bound across the two to form an ‘A’. Tie a piece of string to the top of the A-frame, then tie the rock to the other end of the string. The rock must be heavy enough that it will not be blown by the wind. The rock should hang down about 15 to 20 cm below the crossbar.
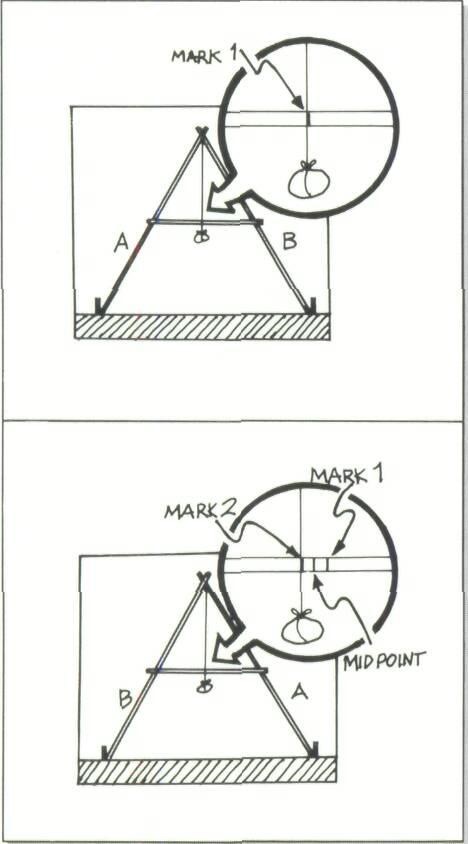
Calibrating the A-frame – To find the center ‘level’ line on the A-frame crossbar, place the A-frame on nearly level ground. Mark the spots where the legs (A and B) touch the ground. Mark the crossbar where the weighted string passes it (« mark 1 »).
Turn the A-frame so that leg A is exactly where leg B was, and leg B is exactly where leg A was. Mark the crossbar where the string falls now (« mark 2 »). If the two marks are the same, they are the midpoint. If they are different, the midpoint is halfway between them.
Check the midpoint by moving one leg until the string hangs at the midpoint. Mark the positions of legs A and B with stakes in the ground. Reverse legs A and B. If the string hangs at the midpoint again, the A-frame is level and the midpoint is accurate. Mark the midpoint clearly on the A-frame.
Making the A-frame – Join the three poles securely together, with the two longer poles bound together on one end with a nail or string, and the shorter pole bound across the two to form an ‘A’. Tie a piece of string to the top of the A-frame, then tie the rock to the other end of the string. The rock must be heavy enough that it will not be blown by the wind. The rock should hang down about 15 to 20 cm below the crossbar.
Calibrating the A-frame – To find the center ‘level’ line on the A-frame crossbar, place the A-frame on nearly level ground. Mark the spots where the legs (A and B) touch the ground. Mark the crossbar where the weighted string passes it (« mark 1 »).
Turn the A-frame so that leg A is exactly where leg B was, and leg B is exactly where leg A was. Mark the crossbar where the string falls now (« mark 2 »). If the two marks are the same, they are the midpoint. If they are different, the midpoint is halfway between them.
Check the midpoint by moving one leg until the string hangs at the midpoint. Mark the positions of legs A and B with stakes in the ground. Reverse legs A and B. If the string hangs at the midpoint again, the A-frame is level and the midpoint is accurate. Mark the midpoint clearly on the A-frame.
Marking and planting along contours
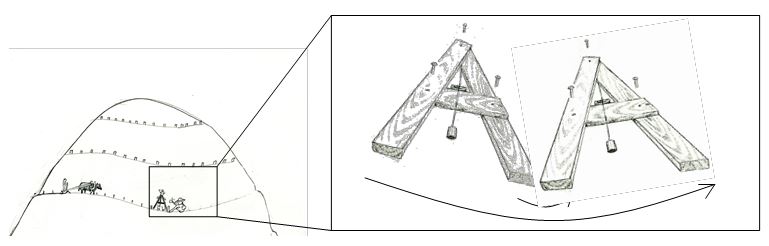 Step 1) Find and Mark the Contours: Find the contour using an A-frame and markers (e.g. wood stakes). Start creating contour lines at the top of the hill, using the A-frame to delineate a level line that meanders across the hillside. Placing leg A of the A-frame on the ground where you want to establish the first row, and mark the leg with a marking stake. Adjust the other leg until the string hangs across the center line, showing that it is level, then mark leg B. Next, pivot leg A around, keeping leg B firmly in place at that second mark. Readjust leg A until the string shows it is level and mark the third point. Continue this same process across the hillside or slope. Then follow the same steps to delineate the next line down, which should be parallel to the one you just completed. Continue this process down to the bottom of the hill.
Step 2) Prepare the Lines: Using your markers as a guide, dig one channel about 50 cm wide and 50 cm deep along the contour to create a swale. Place the soil on the uphill slope to form a berm and pack the soil firmly. Plant seeds or seedlings on the mounds at the start of the rainy season. (see earthworks section for more information on berms and swales).
Step 3) Plant the Vegetation:
Step 1) Find and Mark the Contours: Find the contour using an A-frame and markers (e.g. wood stakes). Start creating contour lines at the top of the hill, using the A-frame to delineate a level line that meanders across the hillside. Placing leg A of the A-frame on the ground where you want to establish the first row, and mark the leg with a marking stake. Adjust the other leg until the string hangs across the center line, showing that it is level, then mark leg B. Next, pivot leg A around, keeping leg B firmly in place at that second mark. Readjust leg A until the string shows it is level and mark the third point. Continue this same process across the hillside or slope. Then follow the same steps to delineate the next line down, which should be parallel to the one you just completed. Continue this process down to the bottom of the hill.
Step 2) Prepare the Lines: Using your markers as a guide, dig one channel about 50 cm wide and 50 cm deep along the contour to create a swale. Place the soil on the uphill slope to form a berm and pack the soil firmly. Plant seeds or seedlings on the mounds at the start of the rainy season. (see earthworks section for more information on berms and swales).
Step 3) Plant the Vegetation:  Sow pretreated seeds of fast-growing, nitrogen fixing trees heavily along the mounds (plant seeds in 2 rows, with 10cm spacing within rows and 20cm between rows). Cover the seeds lightly yet firmly with soil. If planting seedlings or cuttings along the channels, spacing should be 20cm within and between rows. Grasses can also be planted to further stabilize the mounds.
Step 4) Protect the Vegetation: The first year is critical for success. Extremely heavy rains, animals, and farmers themselves can damage the structures. Be sure to keep animals from grazing on the land, and remove weeds from near the seedlings to reduce competition.
Sow pretreated seeds of fast-growing, nitrogen fixing trees heavily along the mounds (plant seeds in 2 rows, with 10cm spacing within rows and 20cm between rows). Cover the seeds lightly yet firmly with soil. If planting seedlings or cuttings along the channels, spacing should be 20cm within and between rows. Grasses can also be planted to further stabilize the mounds.
Step 4) Protect the Vegetation: The first year is critical for success. Extremely heavy rains, animals, and farmers themselves can damage the structures. Be sure to keep animals from grazing on the land, and remove weeds from near the seedlings to reduce competition.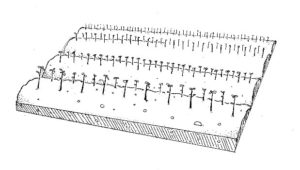 Step 5) Diversify: Beginning in the 2nd year, diversify the strips and the alleys in between with short-, medium- and long-term crops.
Distance Between Contour Rows
To provide maximum protection, the rows should be properly spaced. The vertical drop between contour rows (NOT the distance between rows) should be about 2 meters. Hillsides with a gentle slope will have long distances between rows (though it is best to limit this to 10 meters between rows), while those on steeper mountainsides will be closer together. If a family does not have the time or labor available to establish contours as directed, encourage them to establish three to begin with, and divide the field into quarters. The family can always add more contour rows over time. Grasses commonly planted are: Pennisetum purpureiim (napier grass), Pannicum maximum (guinea grass), and Vetivera zizanoides (vetiver grass). Some grasses, like napier, grow tall and fast in the wet season and might shade crops or compete for water and nutrients. Therefore plant only as much as will be cut and carried for forage.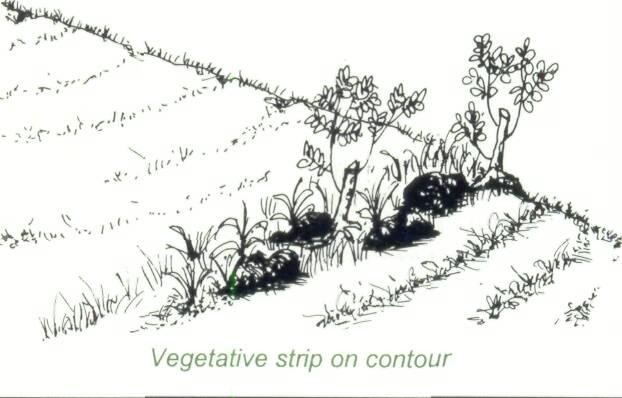
Desirable Characteristics of Trees Used for Contour Planting
- Adapted to local climate and soils
- Can be direct-seeded or planted from cuttings
- Produces an abundance of leaf litter, preferably producing the most leaves prior to the cropping season
- Nitrogen-fixing
- Able to grow back quickly after pruning, coppicing, or pollarding
- Fast growing – to provide benefits for which they are planted as soon as possible.
- Resistant to drought
- Able to grow in degraded, nutrient-poor soils
- Compatible with crops – avoid species that have adverse effects on other tree species or crops they are associated with.
- Deep taproot with minimal lateral root growth – the trees’ roots should grow deep into the soil rather than horizontally to reduce competition at the root zones of crops planted in the alleys
- Multi-purpose – select trees with useful products like fodder, green manure, & fuelwood
- Grasses such as Pennisetum purpureiim (napier grass), Pannicum maximum (guinea grass), and Vetivera zizanoides (vetiver grass). Some grasses, like napier, grow tall and fast in the rainy season and might shade crops or compete for water and nutrients. They might also compete with trees and shrubs planted on the berms. Therefore plant only as much as will be cut and carried for forage.
Some Useful Species for Contour Planting
- Cajanus cajan
- Calliandra calothyrsus
- Chamaecytisus proliferus
- Faidherbia albida
- Leucaena leucocephala
- Sesbania sesban
- Tephrosia candida
Dispersed Planting
It is common in many places for farmers to leave some of the trees on their farms when they cultivate a new area. Some very effective land-restoration techniques such as Farmer Managed Natural Regeneration (FMNR) encourage farmers to allow seedlings that germinate naturally on their farms to grow, managing them as needed. Often on the Forest Garden sites we see, there are few to no trees at the start. We encourage farmers to leave the trees that are there, unless the benefits they provide are outweighed by other trees that can be planted to provide even more benefits. On sites with limited existing tree cover, as we know with our goal in the protection and revitalization phase of the Forest Garden Approach, we want to increase tree cover and soil fertility. We do this by establishing living fences, windbreaks, contour plantings, and alley cropping systems. Even with all these groupings of trees, however, there are likely to still be large areas of land without trees. In these open spaces, we want to disperse the planting of trees so that these ‘empty’ spaces can benefit from increased nitrogen and green fertilizer that these agroforestry trees provide. Later on in the Forest Garden Approach, during the optimization phase, families will review their sites and may decide to fill in remaining open spaces with more agroforestry trees, or with timber, fruit, or other species of dispersed trees or plants. Farmers can select many species for dispersed planting. In the first phase of the project, TREES recommends multi-purpose, fast-growing agroforestry trees with the same characteristics as alley cropping trees. Spacing between dispersed trees varies considerably, dependent on the amount of ‘open’ space after alleys and living fences have been planted. A good rule of thumb is to have a dispersed tree for every 50 to 100 square meters, so spaced in a grid-like pattern about every seven to ten meters. Management practices of dispersed trees are similar to those of the trees in alley cropping systems – the thicker branches can be coppiced at the beginning of the cropping season and used for fuelwood and poles, while the leaves, stems and branchlets can by ‘chopped and dropped’ as green fertilizer throughout the cropping season. As other Forest Garden trees and plants are gradually planted and mature, families may decide to continue with the same management practices. If they are found to be competing for space, nutrients, or sunlight with other, more valuable crops, they can cut the trees out of the Forest Garden entirely. However, if the tree will produce good timber or other desirable products or services, they can be left to grow with little to no regular management. In most cases, depending on placement, surrounding vegetation, and species, families will decide how to manage each tree on an individual basis.Firebreaks, Fuelbreaks, and Greenbreaks
Fires are a common threat, particularly in dryland regions where they can cause significant damage to trees, crops, and other vegetation, not to mention buildings, animals and humans. In fire-prone areas, it is always better to expect fires and take the steps to prevent them rather than to address them on a reactionary basis. Fires are often human-induced. Slash-and-burn agriculture and setting pasture fires are common practice in many places, where farmers and pastoralists cut the existing vegetation on a piece of land and burn it to convert the land to agriculture or stimulate fresh fodder growth. Though ash from fires does fertilize crops or forage in the short run, it burns away much of the organic matter and nitrogen while killing seedlings and beneficial microorganisms that would otherwise provide longer-term benefits to soil. These fires are also notorious for getting out of control and burning more vegetation than anticipated. Fires are also commonly started by apiculturalists who are careless with the smoke they use for bee hives, negligent cigarette smokers flicking their butts or matches in dry areas, or herders whose campfires unintentionally spark wildfires. The majority of fire incidents can be prevented by either refraining from or being much more diligent with such activities. Where fires are particularly problematic, we recommend educating your community about fire prevention, and encouraging community leaders to hold accountable those who carelessly start fires. Fire prevention is not foolproof, however, and measures should also be taken to help suppress fires once they start and prevent them from burning crops and trees, particularly seedlings and wildlings. During the dry season it is good practice to regularly clear weeds and tall grasses from around young trees. This vegetation is a fuel hazard and will feed any potential fires. Imperata cylindrica is a common grass that proliferates where there is little other vegetation, particularly on degraded, deforested or post-fire lands. Imperata is a significant fuel hazard and should be cleared or pressed flat to the ground regularly around tree planting and agricultural sites to reduce the risk of fire.Firebreaks
Firebreaks around larger, fire-prone planting sites should also be considered. A firebreak can be made by clearing a 4 meter strip of vegetation around the planting site, leaving a space of 12 meters, then clearing another 4 meter strip on the outside. The 12 meter strip in between the 4 meter clearings should then be carefully control-burned. By removing this vegetation, fires will likely subside for lack of fuel once they reach the firebreak. In spite of the potential benefits of firebreaks for fire suppression, they are problematic as well as they require existing vegetation to be removed, taking valuable land out of productivity and exposing soils to further degradation. Where possible we recommend the use of multipurpose fuelbreaks or greenbreaks that provide fire protection as well as useful products like food, fodder, timber and fuelwood.Fuelbreak
A fuelbreak is a wide strip of land around a protected area where dense, existing vegetation is thinned or replaced by other trees. When mature, fuelbreaks will minimize flammable undergrowth, thereby reducing the speed and force of fires headed into protected areas. Trees in a fuelbreak should be pruned regularly to around three meters from the ground and any dead or dry vegetation should be removed. The shade from the trees will help to suppress much of the undergrowth. Fuelbreaks are not likely to stop a fire, but should allow landowners more time to suppress it (Skinner, 2000; Imperata grasslands). Recommended Fuelbreak Species: Acacia auriculiformis, Acacia mangium, Albizia lebbeck Calliandra calothyrsus, Gmelina arborea, Leucaena leucocephala, Macadamia hildebrandii, Schima wallichii, Syzygium cumini, and Vitex pubescens.Greenbreak
A greenbreak refers to a wide strip of densely-planted trees that are specifically chosen for their high moisture content and lack of flammable biomass they produce. When mature, the dense canopy of a greenbreak will help to minimize fire-prone undergrowth while the trees’ fire-resistant leaves and trunks will deter fires from spreading past them. Succulent, shade-tolerant crops (e.g. banana, papaya, and root crops) can also be planted under greenbreaks to create a green barrier that will further suppress impending fires. In all cases, flammable weeds, grasses and dry vegetation should be removed regularly. The recommended width of fuelbreaks varies broadly depending on the fire risk conditions, slope, and amount of flammable vegetation in them. Generally speaking, the width of fuelbreaks should be between 12 and 35 meters: the greater the slope and existence of flammable vegetation, the greater the width (Plana, et al). Where fire-retardant trees and crops are used in a greenbreak, three to four rows of densely planted trees should suffice. Trees selected for greenbreaks should be fire-resistant with dense, easy to establish canopies that retain succulent, green foliage throughout the year without dropping flammable leaves. See the list below for recommended fuelbreak and greenbreak species. (Imperata Grasslands)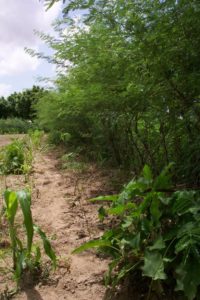 Newly planted row of Leucaena leucocephala trees planted inside the protection of a thorny living fence.
Recommended Greenbreak Species:
Anacardium occidentale
Ficus elastica
Mangifera indica
Newly planted row of Leucaena leucocephala trees planted inside the protection of a thorny living fence.
Recommended Greenbreak Species:
Anacardium occidentale
Ficus elastica
Mangifera indica
Limitations to Agroforestry Technologies
Keep in mind that every system or technology selected for inclusion in Forest Gardens, as with any land-use option, has its limitations. The following are general limitations to agroforestry technologies—which can be extended to Forest Gardening as well—that families should be aware of before deciding to utilize them. They:- Require a more intensive management system, including specialized equipment for the tree management and additional managerial skills and training to manage multiple crops on a given site
- Remove land from annual crop production and may not provide a financial return from the trees for several years
- Requires a marketing infrastructure if tree products are selected that are not present in the local area
- Trees may be an obstacle to crop cultivation if not carefully planned and designed
- Trees compete with companion crops for sun, moisture and nutrients
- Companion crops may compete with trees for moisture and nutrients
- For more information on wind breaks, go to http://www.fao.org/docrep/t0122e/t0122e0a.htmhttp://www.fao.org/docrep/t0122e/t0122e0a.htm
- For more information on alley cropping, go to http://www.agroforestry.net/overstory-back-issues/337-overstory-261-alley-cropping
- For more information on contour planting, see : http://www.worldagroforestry.org/Units/Library/Books/Book%2082/imperata%20grassland/html/4.1_soil.htm?n=20 For more information on firebreaks, fuelbreaks and greenbreaks, see:
- Friday, Kathleen S., M. Elmo Drilling, and Dennis Garrity. (1999) Imperata grassland rehabilitation using Agroforestry and Assisted Natural Regeneration. International Centre for Research in Agroforestry, Southeast Asian Regional Research Programme, Bogor, Indonesia.
- Plana, E, Rufi Cerdan, and Castellnou, M. (2005) Chapter 39: Developing Firebreaks; Found in: Mansourian, S.,Vallauri,D., Dudley,N., eds. (in cooperation with WWF International). 2005. Forest Restoration in Landscapes: Beyond Planting Trees, Springer, New York.
- Agee, J. Bahro, B., Finney, M., Omi, P., Sapsis, D., Skinner, C., van Wagtendonk, J., Weatherspoon, C. (2000) The Use of Shaded Fuelbreaks in Landscape Fire Management. Forest Ecology and Management, 127: 55-66.