
Deprecated: array_key_exists(): Using array_key_exists() on objects is deprecated. Use isset() or property_exists() instead in /nas/content/live/trees4future/wp-content/plugins/ht-knowledge-base/php/ht-knowledge-base-category-ordering.php on line 58
Deprecated: array_key_exists(): Using array_key_exists() on objects is deprecated. Use isset() or property_exists() instead in /nas/content/live/trees4future/wp-content/plugins/ht-knowledge-base/php/ht-knowledge-base-category-ordering.php on line 60
Warning: Parameter 2 to qtranxf_postsFilter() expected to be a reference, value given in /nas/content/live/trees4future/wp-includes/class-wp-hook.php on line 324
Deprecated: array_key_exists(): Using array_key_exists() on objects is deprecated. Use isset() or property_exists() instead in /nas/content/live/trees4future/wp-content/plugins/ht-knowledge-base/php/ht-knowledge-base-category-ordering.php on line 58
Deprecated: array_key_exists(): Using array_key_exists() on objects is deprecated. Use isset() or property_exists() instead in /nas/content/live/trees4future/wp-content/plugins/ht-knowledge-base/php/ht-knowledge-base-category-ordering.php on line 60
Click here to download the corresponding chapter from the Technical Manual
Chapter 6: Fruit Trees
What is grafting?
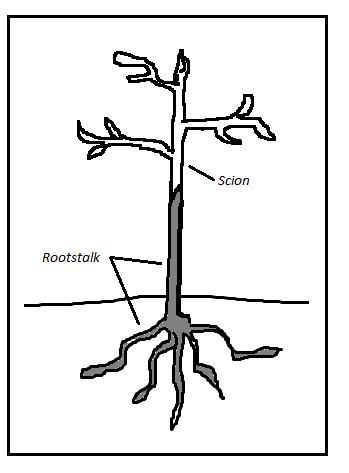
Grafting is a method of asexual propagation in which a stem or bud (the scion or budwood material) from one variety of a plant is joined to a seedling (the rootstock) of another variety of a compatible species, and the two grow together to become one plant. It allows the characteristics of both plants to be replicated in an adult tree. Usually the scion or budwood and rootstock are chosen for their specific qualities, i.e. a certain variety of citrus rootstock may be chosen because it is resistant to drought and therefore adapted to dryer climates, while the selection of the scion of a certain variety will determine the time of harvest, quality of fruit, or size of fruit.Benefits of Grafting
- Faster Fruit Production: grafted fruit trees produce fruit 2-4 years after grafting. Fruit trees that are not grafted typically bear fruit much later, sometimes 7-10 years after they are established.
- Control of Fruit Quality and Quantity: grafted fruit trees bare the same quality and quantity of fruit from which the cutting (scion) was taken.
- Repair of Cambium Damage: trees that have been damaged by rodents or other pests, in cases where the bark and cambium layers have been removed around the circumference of a tree, can be repaired through grafting.
- Increased Tolerance to Climatic Extremes: the root stock of some plants may be better situated for local soil conditions while the growth from a grafted scion is better suited for improved productivity. Grafting provides a means to meet the conditions of both.
- To Maintain or Secure Heirloom or Favored Varieties of Fruits: the seeds of many fruit trees will not produce the same quality of fruit as that from which the seed was taken. Grafting provides a means to reproduce or maintain a desirable variety of fruit.
- Simple Means to Replace Adult Trees With An Improved Variety: replacing one cultivar with another, through topworking, can be performed more easily through grafting efforts rather than replanting each tree.
- Resistance to Disease: it is possible to graft disease-resistant varieties to non-resistant varieties.
- Diversifying Production: through grafting, farmers can diversify their Forest Gardens with different varieties of fruit that produce different qualities and at different times, to take advantage of market conditions.
Disadvantages of Grafting
- Grafted plants require more time, care, and maintenance in the nursery than non-grafted trees, and
- The life span of the grafted tree is generally shorter than un-grafted trees.
Benefits for Fruit Trees
Although many tree species can be grafted, fruit trees are among the most common, since grafted fruit trees yield fruit considerably faster than non-grafted trees. The best fruit species for grafting will depend on the type of fruit you want to produce. The most profitable or desirable products will normally determine which species to graft. Grafted trees improve Forest Gardens by producing a greater quantity of high-quality fruit to consume and sell. Farmers who master grafting techniques can also sell the grafted seedlings that they do not plant in their Forest Gardens. There are many different grafting techniques. The technique you use is often determined by the species that you are grafting, the time of year, the maturity level of the rootstock, and in some cases your comfort or skill level in one technique over another. With mangos, for example, we encourage a technique called the tongue and groove (or side) graft, and for citrus we recommend “T” budding, chip budding, or side grafting. For Ziziphus mauritiana and cashew trees we recommend topgrafting. There are many other grafting techniques as well. The methods discussed in this manual are relatively easy, have high success rates even for beginners, and are generally easy to teach.How Does Grafting Work?
Grafting takes place when two previously unattached trees are connected through a binding process that involves the alignment of their cambium layers. The cambium layer is located just beneath the bark of tree and is responsible for transporting nutrients between the roots and leaves. In a successful graft, the cambium layers between the upper portion of a young tree branch (the scion) and the lower portion of a tree (the rootstock) are aligned with each other so that nutrients can flow between them. The scion and the rootstock are then bound together to ensure the cambium layers are held intact. A successful union between the scion and rootstock will be noticeable if the scion begins sprouting new growth (shoots and leaves). Depending on the grafting technique performed, the graft can take 2-3 weeks or several months before showing signs of growth. If the graft was a success, the binding material used to tie the scion and the rootstock together can be removed.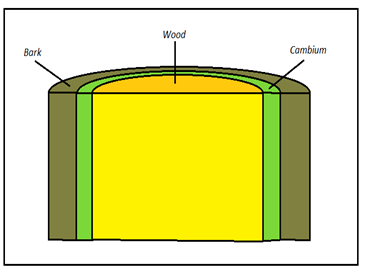
Ensuring Graft Compatibility
Not every rootstock and scion are compatible with one another. The majority of trees will not form a successful graft with another tree unless they are genetically similar to one another. For example, an apple tree cannot be grafted to an orange tree because they are not closely related. However, one variety of apple tree is likely to graft to another variety of apple tree because they carry similar genes. Before grafting, be sure the rootstalk and scion from the trees you have in mind are compatible with one another. Typically, plants of the same genus and species can be grafted despite being of a different variety. In short: graft mango to mango, avocado to avocado, apple to apple, etc.The Five Stages of Grafting
 There are five basic steps for performing a graft:
- Sourcing the scion and the rootstock
- Preparing the scion and the rootstock for grafting
- Grafting the scion and the root stock
- Waiting for the graft to take and for the scion sprout new growth
- Removing the wrapping and maintaining the grafted tree
Scion, budwood, and Rootstock Selection
Selecting a Source Tree for the Scion or Budwood
The scion or budwood is the source of all of the branches and the top growth that will come after the graft union is made. Characteristics of the adult tree determined by the scion or budwood include the following: type and quality of fruit produced, time of year fruit will ripen, vigor of top growth, and the top growth’s resistance to disease and insect attacks. The difference between a scion and budwood is the grafting technique for which it is selected. Grafting uses a scion which is usually a stem about 10 – 12 cm long. Budding is a form of grafting where a single bud, or eye, is attached to the rootstock seedling instead of using a whole stem. The most important aspect of the scion or budwood source tree is that it be the desired variety. The tree should also be completely disease free and should be an adult (producing fruit).Budwood selection
Look for a young vertical shoot about pencil width. One thing to look for is that often citrus tends to grow oval or « winged » branches which are more difficult to bud; look for a round branch which will be a lot easier to bud. For budding, the lateral buds (the buds at the sides of the branch not at the end of the branch) are important. Look for lateral buds which are yellowish in color and ready to push (grow) but not yet pushing. This may be difficult to find. If your source tree is not irrigated and you come too late, during the rainy season when the trees are growing, the buds may have already pushed; likewise, if you come too early, during the dry season, the buds may be dormant. Observe the tree regularly and collect the budwood at the correct time of year when the buds are swelling naturally, usually right before the rainy season, when it first gets humid. Budwood can usually be found at any time during the year if adequate searching is done.Scion selection
Select a stem in which the terminal bud is swollen but not yet sprouting, particularly with mangoes. If it is already sprouting, after the graft is performed it will continue to sprout before the union of the cambium takes place. The graft point is unable to take up nutrients and will die because all the energy is going into the growth of the sprout. The scion should be somewhat lignified (green tender wood). If the scion is not lignified, it will dry out and wilt before the union of the cambium layers takes place. The scion should be equal in diameter to the rootstock stem or smaller but never larger, and is usually a stem about 10 – 12 cm long. Avoid scions with weakly developed terminal buds. Terminal buds should be rounded, not angular. Use scions which are already swollen naturally. Don’t collect scions between November and February; this is the time flowers develop.Selecting the Rootstock
The rootstock determines the bottom growth which includes the following characteristics of the adult tree: the form of root growth, the root’s resistance to diseases, insect attacks, drought and other environmental conditions, and vigor of the tree. Your rootstock should be graft-compatible with the tree you want to replicate. It is also good practice to source the rootstock from an area similar to where you want to transplant the grafted tree to be sure it is well-suited to that environment. If you are collecting your rootstock from a tree nursery for grafting, select a healthy, vigorous seedling produced from seed collected from vigorous trees adapted to the local environment. Choose seedlings that have diameters of 1 cm or more halfway up of their stems. You can also dig up seedlings from a field or forest if you find the species you would like to graft, or graft directly onto a young tree that is already growing in a desirable location.Grafting Techniques
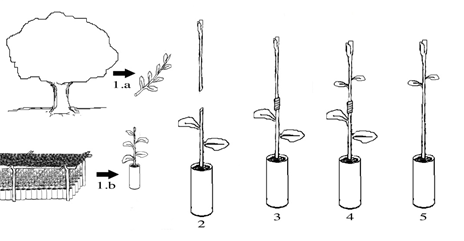
There are many types of grafting methods. This manual will cover a handful of commonly used grafting techniques: bud grafting (including T-budding and chip budding techniques), side grafting, and topworking. Bud grafting is a type of graft where a single bud is attached to the rootstock, instead of using a full scion. The grafting method you chose will depend on your skill level, resources, and the time of year you want to graft.Tools and Materials
The following tools and materials are needed to perform a graft. You should always use a narrow, very sharp blade for making cuts. Always clean the blade with alcohol before making cuts, to avoid the spread of pathogens that could infect your grafted trees.- Grafting knife: if you do not have a sharp grafting knife, a utility knife with a sharp blade will work. A sharp knife makes a clean wound that heals better, limits damage, and reduces exposure to pests and diseases. For the same reason it is important to keep grafting knives clean.
- Grafting tape: if not available, thin plastic (about 3-5 cm in width) will work, e.g. strips of plastic cut from material used to make tree sacks
- Grafting compound: beeswax can be used as a grafting compound. It isn’t necessary, but it does help to protect the graft union as it sets, if available
- Alcohol: used to clean the grafting knife before making any cuts, to prevent spread of disease
- Scion or budwood: see ‘Selecting the scion or budwood’ section above
- Rootstock: see ‘Selecting the rootstock’ section above
Bud Grafting
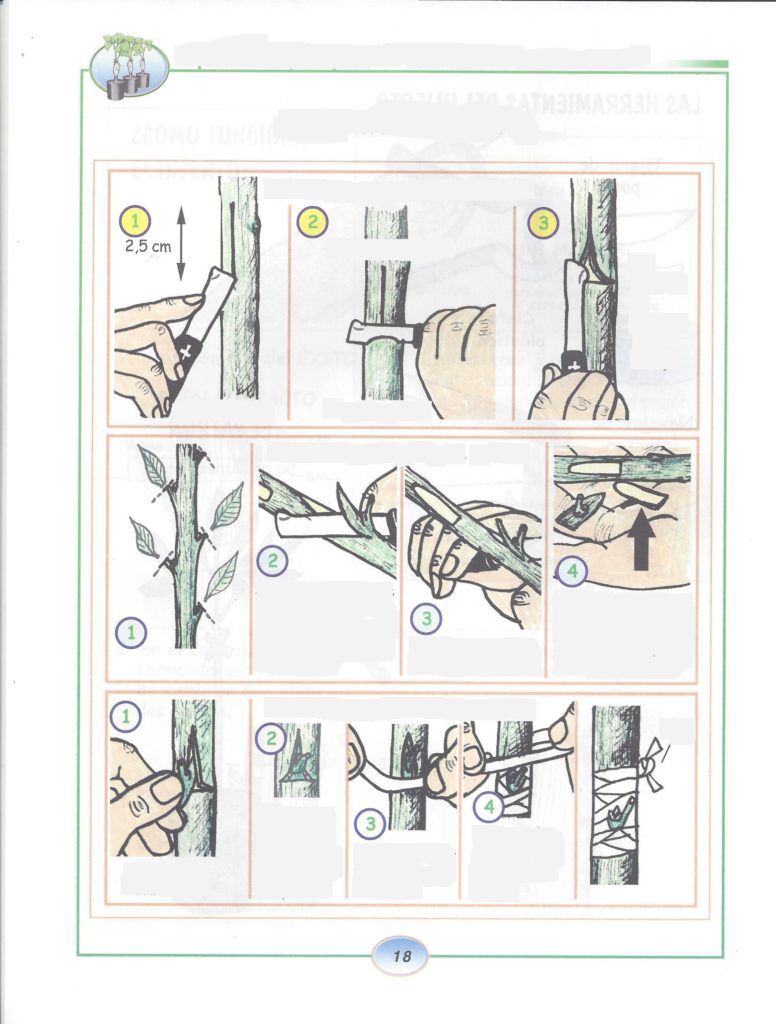
Bud grafting is the process of taking a bud from the desired scion and attaching it to a suitable rootstock. Because a bud is much smaller than a scion used for the side grafting method, the bud graft method is used for the harder wood species like citrus. However the bud method can be effectively performed on mangos as well. This method is also much faster to perform than the side grafting method but because of its size it offers less surface area to match up all the layers. Furthermore in case of budwood, the aligning and wrapping rules for bud grafts are essentially the same as for the side graft, described below. Preparing the budwood: If the buds are dormant or not swollen at all the budwood should be prepared five to seven days in advance. To prepare the branch, cut off all the leaves and cut off the terminal bud. Be sure to tag the branch that you are preparing because upon return five days later it may be difficult to find. By doing this preparation you are inducing the lateral buds to swell and start to push. If the buds are swollen already the budwood should only be prepared two to three days in advance and the terminal bud should not be removed. If the buds are swollen or already pushing no preparation is needed.“T” budding
- Prepare the rootstock
- Select a flat area about 30-50cm above the soil surface. After cleaning your knife, cut off all the leaves, thorns, or branches around the grafting site. Make an incision about 4-5cm long and 3-4cm across in the shape of a “T.”
- Carefully open up the “T” by spreading the bark apart with your knife. If the bark does not want to slide off the woody part, the tree needs to be better irrigated and some compost or manure should be added to the soil.
- Collecting the budwood
- Now collect the bud from the budwood. Starting 1-2cm below the bud, in one smooth motion cut into the budwood and upward. Cut until it is about 3-5cm above the bud. Never handle the bud by the back side – either use the leaf stem or the tail tip.
- Form and protect the union
- Gently insert the bud into the “T” incision. Be sure that the bud itself is in the center of the “T” part.
- Cut off the “tail” of the bud. Make sure it is even with the horizontal incision and there is a snug fit.
- Starting below the bud site, tie some grafting tape or thin plastic wrap. Wrap the site as tight as possible. Do not cover the bud itself. Make sure to cover the whole wound except for the bud. The bud can be left uncovered, or take another plastic strip and wrap loosely over the bud and tie.
- Post-graft maintenance
- Come back a week after grafting. Uncover the bud (if covered) but leave the “T” wrapped. If the bud is still green but not taken, bend the rootstock stem away from the direction of the bud about 10-15cm above the bud site.
- When the bud sprouts, cut off the rootstock stem 20cm above the bud site and unwrap the rest of the plastic wrap. Tie the bud (scion) to the rootstock to encourage straight growth and to protect it from breaking. When 20-30cm of new growth occurs, cut the rootstock off flush above the bud point.
Chip budding
- Prepare the rootstock
- Make a 45 degree angle incision about ¼ through the stock
- About 2.5 cm (1 inch) above the first cut, make a second cut going downward and inward until it connects the first cut
- Collect the budwood
- Remove the bud from the budwood similar to the cut you made on the rootstock
- Make the lower cut about 0.6 cm (1/4 inch) below the bud
- Make a second cut about 1.3 cm (1/2 inch) above the bud coming downward behind the bud and connecting with the first cut, permitting the removal of the bud piece (or chip)
- Form and protect the union
- Gently insert the bud piece flush with the incision in the rootstock.
- Starting below the bud union, tie some grafting tape or thin plastic wrap. Wrap the site as tight as possible. Do not cover the bud itself. Make sure to cover the whole wound except for the bud. The bud can be left uncovered, or take another plastic strip and wrap loosely over the bud and tie.
- Post-graft maintenance
- Come back a week after grafting. Uncover the bud (if covered) but leave the surrounding cut wrapped. If the bud is still green but not taken, bend the rootstock stem away from the direction of the bud about 10-15cm above the bud site.
- When the bud sprouts, cut off the rootstock stem 20cm above the bud site and unwrap the rest of the plastic wrap. Tie the bud (scion) to the rootstock to encourage straight growth and to protect it from breaking. When 20-30cm of new growth occurs, cut the rootstock off flush above the bud point.
Scion Grafting
Side or whip grafting
AGFO – Peace Corps Senegal: Mango Grafting (1 of 4) PeaceCorpsSenegal The side graft is a useful, relatively simple graft that is commonly used on mango seedlings and other young seedlings with thin stems. A commonly used technique for the side tongue graft is to create a whip and tongue between the rootstock and scion to increase the integrity of the union and the surface area where the cambium layer aligns. Step 1. First prepare the scion by removing all leaves at the apex or top of the scion branch. The scion will stay on the tree for approximately a month, allowing the buds to swell. After the scion is removed from the tree with a clean, sharp knife, it is ready to be prepared for attaching it to the rootstock.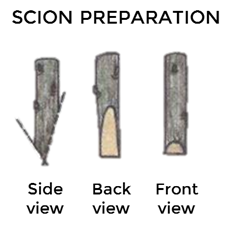
- Pick a flat part of the scion, between the nodes, approximately 5-10 cm below the scion apex. This is where your first cut will be made.
- Using steady pressure, begin by making a cut 3-5 cm long from shallow to deep. Turn the scion over and make a smaller cut (approx. 1 cm) to form a wedge that will fit into the rootstock.
- Set the scion aside.
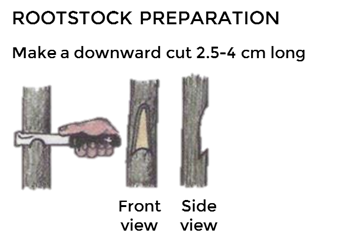
- Remove all leaves from the intended rootstock seedling or plant.
- Choose a spot on the rootstock that is semi-lignified and at roughly knee height. While it isn’t crucial that both the scion and the rootstock are the same diameter at the point of the graft, the closer in size they are the better chance the graft has of taking.
- Make your first cut deep and at a 40-degree angle. This is where scion will fit into so try to make the cut identical to the shorter cut on your scion.
- Next move your knife 3-5 cm above your 1st cut and with steady pressure make a cut, shallow to deep. The end of the 2nd cut should match up with the end of the 1st cut.
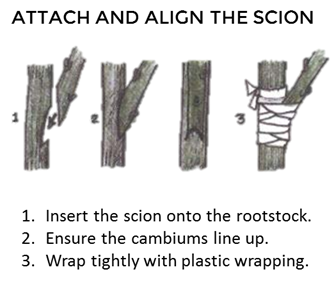
- Place the scion into the cuts on the rootstock, making sure to match up the cambium layers. If your rootstock is larger than your scion, the graft is still possible. Simply line up the scion to one side of the rootstock cambium. This is also your chance to make any touch up cuts to either the rootstock or the scion to make them fit together better. To ensure that the scion does take, there should be no gaps between the scion and the rootstock, so it is very important to make touch up cuts where needed.
- When you are confident that the cambiums are matched as best as possible, you can begin wrapping the graft with clear-plastic strips. Using clear plastic is important because it allows you to look at the graft while it is still wrapped. Begin the wrap below the graft, making sure to wrap tightly, leaving no gaps. Then continue up the graft, wrapping tightly and overlapping each plastic layer. Having an airtight seal is very important because the graft is very vulnerable to pests, diseases, desiccation, as well as rotting from standing water. Once you reach the apex of the scion, wrap loosely but be sure to keep the airtight seal. As the scion takes and begins to grow, the buds on the apex will begin to grow and will need some room. After you have wrapped passed the apex, wrap tightly again and tie off the plastic.
- Lastly, remove all but a few leaves above the graft and cut the terminal bud on the rootstock. Leaving a few leaves will allow the rootstock to pump up much-needed nutrients and water to accelerate the grafting process, while removing the terminal bud will trick the plant into sending growth hormones to open new buds. The entire stem above the graft will be removed in a few weeks when the graft has taken, but for now it’s serving a purpose.
- To make sure you did a good job, the next morning revisit your graft and check for moisture droplets inside the plastic. If you have moisture condensation within the plastic that means your seal is effective and you won’t have to rewrap the scion. If there is no water however, take the plastic off and try again.
- The graft will require a few weeks to take so check it once every week or two. You will know if the graft took by the sprouting of buds on the apex of the scion. Healthy scions will also remain green; whereas bad scions will have turned black and dead looking. If a graft is unsuccessful, further attempts can be made to graft the same rootstock.
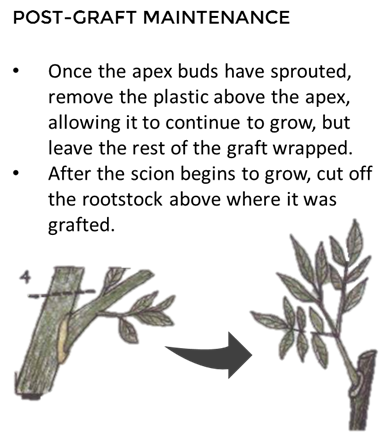
- Once the buds on the apex have sprouted (4-5 weeks), remove the plastic above the apex, allowing it to continue to grow, but leave the rest of the graft wrapped. The scion is still in a weak state at this point and needs the support of the wrapping.
- When the scion is producing green leaves (not purple) the wrapping can be removed and the rootstock stem above the scion cut off. Grafting compound can be added where available.
Topworking or cleft grafting
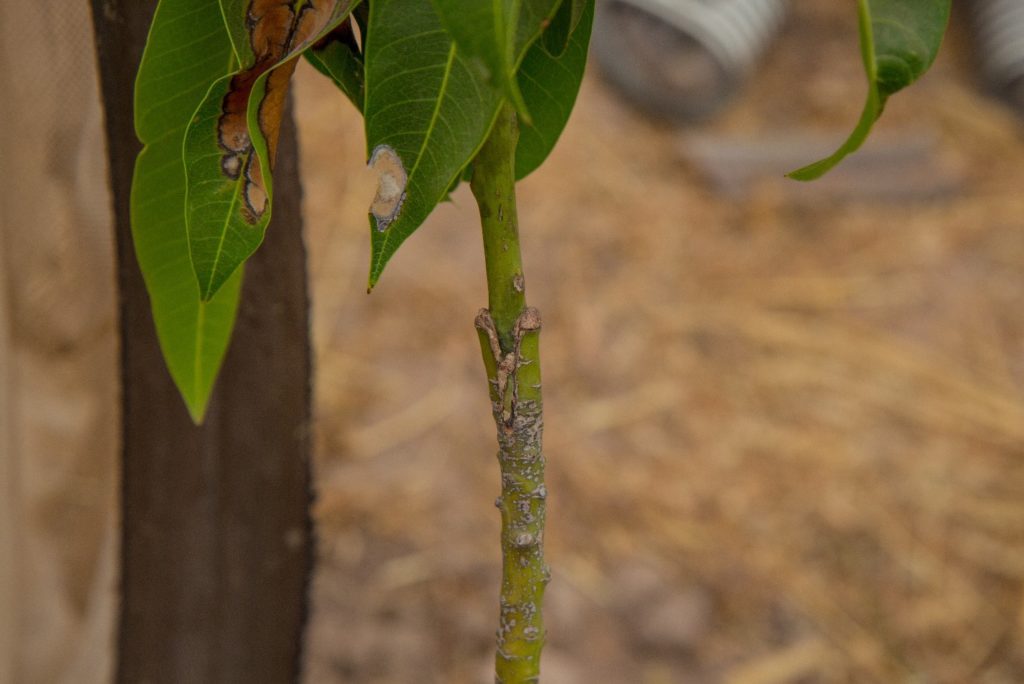 A successful top graft on a young seedling.
Topworking is used on mature plants which are to be changed to a different cultivar. This method should be limited to stock branches about 2.5 to 10cm in diameter and to species with fairly straight-grained wood that will split evenly. Cleft grafting can be done any time during the dormant season (dry season), but the chances for a good union are best if the work is done just before the active growth has initiated (just before raining season) and buds of the stock are beginning to swell. In making the cleft graft for top working the proper placement of the scions is very important. (See figure below). The scions should be made from one year-old wood. The scion is made by cutting a long, gradually tapering wedge. Preparing the stock it is important to split the stub deeply (even split). Two scions are inserted in the stub, one at each end of the split. The scions must be carefully placed so the cambium layers match. Add grafting compound where available when the grafts are set to protect the graft unions.
A successful top graft on a young seedling.
Topworking is used on mature plants which are to be changed to a different cultivar. This method should be limited to stock branches about 2.5 to 10cm in diameter and to species with fairly straight-grained wood that will split evenly. Cleft grafting can be done any time during the dormant season (dry season), but the chances for a good union are best if the work is done just before the active growth has initiated (just before raining season) and buds of the stock are beginning to swell. In making the cleft graft for top working the proper placement of the scions is very important. (See figure below). The scions should be made from one year-old wood. The scion is made by cutting a long, gradually tapering wedge. Preparing the stock it is important to split the stub deeply (even split). Two scions are inserted in the stub, one at each end of the split. The scions must be carefully placed so the cambium layers match. Add grafting compound where available when the grafts are set to protect the graft unions.
 REFERENCES
- Avocado – http://bpi.da.gov.ph/index.php/production-guide/45-avocado
- Morton, J. 1987. Pineapple. P. 18-28. In: Fruits of Warm Climates. “Papaya.” Purdue. 24 Feb. 2011. https://www.hort.purdue.edu/newcrop/morton/papaya_ars.html
- Peace Corps Senegal. Fruit Tree Manual. Dakar: 1993.