
Deprecated: array_key_exists(): Using array_key_exists() on objects is deprecated. Use isset() or property_exists() instead in /nas/content/live/trees4future/wp-content/plugins/ht-knowledge-base/php/ht-knowledge-base-category-ordering.php on line 58
Deprecated: array_key_exists(): Using array_key_exists() on objects is deprecated. Use isset() or property_exists() instead in /nas/content/live/trees4future/wp-content/plugins/ht-knowledge-base/php/ht-knowledge-base-category-ordering.php on line 60
Forest Garden Dream Field
What is the Dream Field Tool?
The Forest Garden dream field activity is a guided visualization exercise in which farmers are asked to imagine the Forest Garden they would like to grow. As the facilitator, you help members envision how their Forest Garden will meet the needs of their land and their families, and ultimately provide greater security for their future. The dream field exercise:- Motivates: By helping farmers create a powerful mental picture of their future Forest Garden, the possibilities and security it could create for their families, and seeding the idea that they can get there — the dream field activity creates commitment towards this long-term goal.
- Opens up possibilities: the questions used as part of the guided visualization – for example, can you feed your family all year long with food from your Forest Garden – can open farmers up to options they had not considered possible before being introduced to the Forest Garden farming model.
- Sets expectations: helps members anticipate and understand that it takes time to grow a Forest Garden, and they may not see many changes before the 2 year mark.
When do I use the Dream Field Tool?
The dream field activity should be included in the very first training module you facilitate with the farmer group (Module 0). The activity can also be revisited later in the training if the group is struggling with confidence and motivation. Review the tips section to see how you can adapt the tool if using it for a second or third time with the same group.How do I use the Dream Field Tool?
Focusing on steps versus outcomes Studies show that mental rehearsal (imagining doing the steps that lead to a goal) is more effective at improving goal achievement than positive imagery (detailed image of a positive outcome). The latter is better at helping reduce anxiety and boost confidence. As outlined in the introduction, assess the level of confidence, competence, and anxiety or stress about the process that the farmer group is starting out with. For a group feeling:- Uncertain and anxious: spend more time on creating a specific, positive image of the Forest Garden with questions like – what does it look like, what do you see, how do you feel, who else is there, how is your family feeling, what is your family doing.
- Confident: spend more time on how they created the Forest Garden they are imagining with questions like – what all did you do to create the Forest Garden, what got in your way, how did you overcome it, who all helped.
- Increases its activity when we are in a state of relaxed concentration. In other words, we are feeling stress-free both mentally and physically; we are contemplating a topic but not focusing on it; we are open to new thoughts as they emerge.
- Is more active when we take a first person perspective, that is imagine the scene as-if we were actually there and experiencing it for ourselves.
- Cultural songs, dances, and other traditions: cultures around the world have traditions that can help relax our minds and bodies, while simultaneously creating a deeper sense of community. Identifying a song or dance that resonates with the group can be a great way to get them to relax and will create a playfulness conducive to the visualization exercise.
- Deep breathing: invite members to take in deep breaths, imagining that stressful thoughts and concerns are leaving their body with each exhale. As they breath-in and breath-out, participants should gradually and progressively relax their muscles, starting with their toes all the way to their neck, shoulders and forehead. They can tense each muscle (depending on comfort) with their inhale and relax it with the exhale.
- Simple drawings.
- Bringing magazines with relevant images (trees, plants, farming scenes) that farmers can use to cut-out, paste, and create their dream field.
- Advantages: farmers can take their dream field home, share it with their families, and work with them to further build out shared goals for their Forest Garden. In addition, inviting them to put it up in their houses can serve as a reminder of what they are building, and an initial goal-benchmark to compare against as they make progress.
- Disadvantages: primary disadvantage is the time it might take to do this. Depending on the time available to you for the initial session, the overall expectations of the group, and urgency of other topics on the agenda – you can determine the feasibility of spending time on capturing the visualization.
Prior to the session identify a culturally appropriate song and dance. It should resonate with the group, be easy to do, and relaxing for the participants. In addition, practice the visualization technique you plan to use so you feel confident in guiding participants through it.
Here are sample instructions – At this time let us form groups of three. You can go sit or stand with your group members, but stay with the larger group for now. Next I will walk us through a few exercises that will help us relax and get creative as we prepare to visualize and picture what our dream Forest Garden looks like.
Use the techniques described in the ‘Visualization Techniques’ section (above) at this time.
As you transition from deep breathing to the visualization, you can use the following sample script that walks you through the stages in the visualization process. Make sure to use a slow, calming tone and pace of voice. Provide plenty of pauses after each question to give participants room to picture their dream field.
i. Setting the scene: let’s keep our eyes closed. Imagine a morning on a beautiful day a few years from now. You are walking into your rich and thriving Forest Garden. Breathe in the fragrance of the plants and trees you are growing. Start to notice what’s around you, how does the soil feel beneath your feet.
ii. Focusing on outcomes: what all do you see? What plants, trees, or crops are growing? How do you feel? What do you smell? What do you hear? Are others there? What are they doing? Are there animals or livestock?
iii. Focusing on steps: as you hold the image of this dream field in your mind, what steps do you see yourself taking to make this a reality? What all did you do to make this dream a reality? What’s the biggest obstacle you faced? Now let’s go back to that image, the picture of the thriving Forest Garden – how did you overcome these obstacles to accomplish this? Who helped you? What helped you persevere?
iv. Closing: continue to hold this image in your mind, make a note of what all feels important to you. Now let’s take another deep breath and open our eyes.
At this time invite members to find a spot with their assigned small groups. Members should take turns sharing their dream field with others, what obstacles they identified, and how they imagined overcoming them.
Ask the farmers to think through the following factors and see if they want to add to or further build-out their dream field:
- Variety of plants and crops: Would you grow one item? Would you grow many?
- Type of plants and crops:
- Would you choose items that would make you money?
- Would you choose items that would feed your family?
- Would you choose items that would protect or support the soil on your land?
- Would you grow trees? Why?
- Would you grow garden crops? Why?
- Would you grow field crops? Why?
- Animals: Would you incorporate animals? Why? How?
- Yearlong food and income:
- Can you feed your family all year-long with the food products from your design? (not from buying food with garden product sales revenue)
- Will your design produce food harvests high in vitamins and nutrients?
- How often throughout the year would your crops be planted and cultivated?
- How many times would you harvest from your design each year?
- Soil and land protection:
- When cultivating your design on the same piece of land year after year, does the quality of the land improve or degrade?
- Is it easy to protect your design? What can destroy your designed field? How would you protect your designed field?
Timeline: What is the work timeline for your design?
Time permitting, pick from one of the options identified earlier and ask farmers to record or capture their dreamfields. Next invite 3-5 farmers to share their fields with the large group, including what crops, plants, and trees they included, and other insights they had as they worked through the exercise.
Storytelling
What is Storytelling?
Stories are a powerful learning tool. When used effectively stories can:- Further cooperation and trust within a group by highlighting shared challenges.
- Help farmers better understand and remember key information.
- Shift strongly held beliefs and behaviors.
When do I use Storytelling?
Stories are a highly adaptable tool. Here are just some scenarios in which you can use stories to improve group learning:- Illustrate how the Forest Garden can solve a key challenge for the farmers.
- Inspire commitment by asking farmers to share Forest Garden success stories.
How do I use Storytelling?
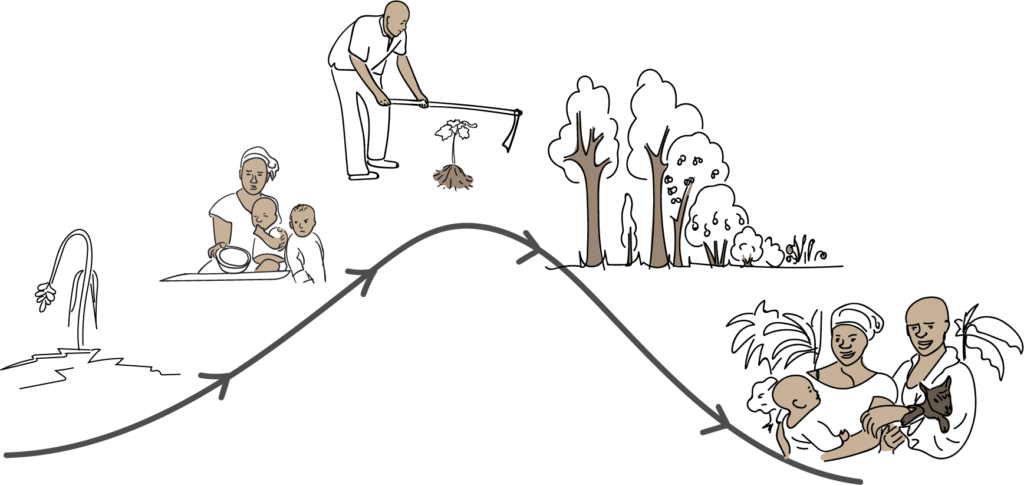
Constructing your story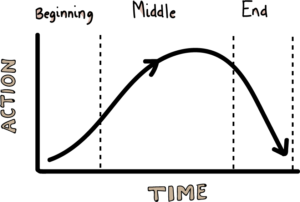 A story is built with a series of events and elements outlined below. In addition, a story has a rhythm and a structure – a beginning, middle, and end. With the middle typically being longer than the beginning and the end. The action, or pace of the story, builds to a climax as characters struggle with and ultimately resolve a crisis by creating a path to a ‘big’ aspirational goal.
Relatable characters. When setting the stage for your story, introduce your participants to characters that evoke empathy and understanding. In a story designed for learning, participants should be able to identify with the main characters – so learners can see themselves applying the lessons illustrated in the narrative.
Including both men and women as primary actors can help engage a broader audience as the story unfolds.
A ‘big’ goal. A story revolves around a goal that gets our attention. Think of a relevant shared goal, and then look at the big underlying challenge it relates to. For example, a story on good nutrition could choose to focus on one balanced meal. Instead, introducing the opportunity to provide good food to one’s family through drought and flood is a much more compelling and aspirational goal.
An obstacle. Once you have set the stage with the characters, you introduce an obstacle through a twist or unexpected problem. An obstacle instantly connects us to the challenge at hand, and keeps us wanting to know more.
A story is built with a series of events and elements outlined below. In addition, a story has a rhythm and a structure – a beginning, middle, and end. With the middle typically being longer than the beginning and the end. The action, or pace of the story, builds to a climax as characters struggle with and ultimately resolve a crisis by creating a path to a ‘big’ aspirational goal.
Relatable characters. When setting the stage for your story, introduce your participants to characters that evoke empathy and understanding. In a story designed for learning, participants should be able to identify with the main characters – so learners can see themselves applying the lessons illustrated in the narrative.
Including both men and women as primary actors can help engage a broader audience as the story unfolds.
A ‘big’ goal. A story revolves around a goal that gets our attention. Think of a relevant shared goal, and then look at the big underlying challenge it relates to. For example, a story on good nutrition could choose to focus on one balanced meal. Instead, introducing the opportunity to provide good food to one’s family through drought and flood is a much more compelling and aspirational goal.
An obstacle. Once you have set the stage with the characters, you introduce an obstacle through a twist or unexpected problem. An obstacle instantly connects us to the challenge at hand, and keeps us wanting to know more.
 Climax and a path to resolution. Next, the characters struggle with the obstacle as the problem builds up to a climax, but ultimately resolve it by finding a way to overcome the problem and achieve the big goal. We remember emotions more clearly than information – highlight the joy and hopefulness that comes with the close of the story for a good ending.
As the storyteller you can make some choices here. In a story designed to:
Climax and a path to resolution. Next, the characters struggle with the obstacle as the problem builds up to a climax, but ultimately resolve it by finding a way to overcome the problem and achieve the big goal. We remember emotions more clearly than information – highlight the joy and hopefulness that comes with the close of the story for a good ending.
As the storyteller you can make some choices here. In a story designed to:
- Shift behavior or challenge attitude it’s best to focus on one big idea and limit details.
- Teach a new way of doing something, you will want to weave in important information related to the topic.
- When the story is short, is being used as a quick illustration, or transition to-or-from a topic – and the goal is to keep the group moving through a sequence – you can narrate the story yourself.
- When the goal is to introduce a new concept, help the group reflect on and absorb the narrative, and change underlying behavior – invite members of your farmer group to playact the story. We recommend this method of delivery since it empowers farmers to own the learning process. Your story should be written as dialogues between characters for this method of delivery.
- Make sure the delivery is effective and does not distract from the main content of the story.
- Get feedback and test the story: does it get the point across? Is it appropriate for the culture? Could changes in length, language and delivery make it better?
Tips for using the Storytelling tool
The most common mistake when using stories is taking too long to get to the ‘hook’ or twist that engages the listener. Try writing out your story and then cut out details to see if the story still works. Only add back what is absolutely needed for the story to work.Learn-and-Teach

What is Learn-and-Teach?
Learn-and-teach is a training technique that helps farmers better recall what they learned during the Forest Garden training sessions and apply it in their farming practices. In its simplest form it involves three steps: (1) an expert, someone with previous knowledge or experience of the skill, teaches a group member a farming technique, (2) the group member practices what they learned, (3) and in-turn teaches the technique to another group member. Learn-and-teach leverages two principles of effective learning transfer:- We learn by doing. We are more likely to retain and transfer new skills to our life when the process of learning involves doing the task as opposed to listening or reading about it.
- Active learning is more effective. Methods that require us to mentally organize, make sense of, and share what we learned result in better recall of materials. One recent study found that with two groups of learners – one expecting a test and the other expecting to teach a skill – the group expecting to teach had better recall of the materials.
When do I use Learn-and-Teach?
Learn-and-teach can be used any time farmers are mastering an unfamiliar farming or gardening technique that they will get a chance to practice during the session. Learn-and-teach allows the facilitator to make better use of time for activities that are:- Sequential: a skill that involves mastering a sequence of steps (e.g., steps involved in outplanting fruit seedlings) or
- Parallel: a skill that involves key variations depending on the subject at hand (e.g., best practices in planting various vegetable types).
How do I use Learn-and-Teach?
Understand group pairing As the facilitator you must determine what will be the most effective group setup and pairing for the learn-and-teach activity. For each pairing you need to have at least one person who has previous experience or knowledge of the task at hand (expert).
- One-to-many: one person teaches a group a skillset and then each learner gets a chance to practice what they learned. This is the default pairing when you have only a few people who have experience or knowledge of the task at hand. It is often used as the first step in the learn-and-teach process.
- One-to-one: members teach each other a skill in a one-to-one pairing and then practice what they learned. This pairing allows for every member of the group to experience both teaching and practicing a skill. This works especially well in situations where you can pair group members and each has something they can teach the other.
- Many-to-many: a sub-group teaches a skill to a larger group, and then volunteers from the larger group practice or demonstrate what they learned. This pairing minimizes the time needed for both the teaching and practicing aspects of the activity. The downside is that not every member of the group will get a chance to teach and practice the skill.
- For the first step, the facilitator works directly with the large group and uses open ended questions to help them learn about proper spacing, depth, and preparation of holes for the seedlings.
Step 2 of the sequence using learn-and-teach:
- As the large group practices digging holes, the facilitator takes 5 members to the nursery and teaches them how to properly extract seedlings (learn-and-teach, one-to-many pairing), using questions to facilitate understanding around technique variations for different types of fruit trees.
- These 5 members practice and extract one seedling each.
- Next, these 5 members bring a new group of 5 members and work one-on-one with them (learn-and-teach, one-to-one pairing) to transfer what they learned. The new group practices and extracts one seedling each.
- This learn-and-teach cascade continues till every member in the group has had a chance to extract a fruit seedling.
Step 3 of the sequence:
- The members who get done extracting seedlings move on to the third and final step of planting these. With farmers supporting each other through extraction of the seedlings, the facilitator is available to provide support to those ready to plant.
- Do not assume you are the only one who has expertise on the topic. Before you set-up the exercise ask farmers to share what they know so you can truly leverage the experts from the group.
- Do not underestimate the ability learners have to teach themselves a new skill, especially when given access to relevant information. To the extent possible use open ended questions to spark thinking before you provide answers even as you play the role of a teacher.
- For tasks where you are starting out as the teacher or expert, shift to farmers teaching each other once you have completed an initial demonstration.
- Prepare for the sessions by identifying which members will be starting the teaching process before the the activity begins.
- Walk these group members through a list of key questions that can serve as a guide when they are helping others learn the skill.
- Provide an opportunity for them to ask for additional information or support so they feel confident in their roles.
- Participate in the teaching sessions being facilitated by others. You can circulate between sub-groups if needed. If you think a group is missing an important aspect of the technique being taught, watch for a natural opening in the conversation to directly share the relevant information. You can also use the ‘what if’ feedback technique to spark a conversation that will help the group discover how to do do the task effectively.
Action Planning
What is Action Planning?
Action Planning is an activity that helps farmers take ownership of their learning, identify personalized goals that fit their needs, and create a timeline or list based plan for the exact steps they will take to apply and implement their Forest Garden training. The primary benefit of an action plan is identifying a sequence of actions that will help farmers achieve their Forest Garden goal. In addition, a thoughtfully conducted action planning exercise can help farmers:- Assess their level of confidence in implementing what they learned during a training session.
- Anticipate obstacles and challenges they might face when applying their learning to their own Forest Garden.
- Identify ideas and options to overcome these challenges, including helping one another as a community.
When do I use Action Planning?
Action planning should be used at junctures when farmers are about to plan and implement a series of actions over a period of time. Successfully planting green walls, setting up a perennial vegetable garden, identifying and planting fruit trees are examples of activities that typically happen over a span of several months and require a specific activity sequence in order for the end goal to be met.How do I use Action Planning?
Adapting action plans At the most basic level an action plan is a list of actions that will be taken to achieve a goal. You can adapt this tool and add details (when a task will be done, who will do it, what resources are needed, etc.) or adapt it to a visual format to make the tool more useful to your audience. Here are some samples you can adapt and use: Sequential. This is best used when working with groups that have a basic level of literacy. Activities should be listed in sequential order in the first (what or task) column.| What | When | Who | Challenges | Resources and support |
| Prepare potting medium | ||||
| Level ground and clear bushes to create room for a nursery | Will need more help to move the extra soil | Partnering with neighbour to help one another | ||
| Build a tree nursery site | ||||
| Prepare seeds | Lead farmer will bring seeds | |||
| Sow seeds | ||||
| Water, weed, and thin seedlings |
 Calendar. This is an adaption of the Calendar Tool. You can use both words, and symbols or drawings when working with this tool. It is best used for long term planning (e.g., 4 month plan to prepare and outplant tree seedlings), as opposed to mapping out the details of a task (e.g., treating seeds, preparing nursery beds, and planting seeds). When starting out with the Forest Garden training, we recommend planning for only 3-5 months at a time. This makes sure that farmers do not feel overwhelmed and can focus on the immediate task at hand.
Facilitating insight and action
Calendar. This is an adaption of the Calendar Tool. You can use both words, and symbols or drawings when working with this tool. It is best used for long term planning (e.g., 4 month plan to prepare and outplant tree seedlings), as opposed to mapping out the details of a task (e.g., treating seeds, preparing nursery beds, and planting seeds). When starting out with the Forest Garden training, we recommend planning for only 3-5 months at a time. This makes sure that farmers do not feel overwhelmed and can focus on the immediate task at hand.
Facilitating insight and action
Based on your understanding of the group’s capabilities and level of confidence, identify the Action Plan type that will be a good fit. Create or hand draw a sample that focuses on the specific activity you will be using it for (e.g., establishing a tree nursery.)
Focus your instructions on the specific goal you want the group members to achieve. Here is a sample of what you could say – “Let us take the next 30 minutes to plan how we are going to establish our own [insert task] (e.g. tree nurseries). I will ask all of you to discuss these questions in small groups. Please make sure each member gets a chance to share their answers, and provide support to one-another when thinking through challenges and obstacles.”
Divide the large group into sub-groups of 3-4, and provide them with paper sheets and pencils/pens for each farmer.
Have the group discuss and complete their personal Action Plan:
- Initial Action Plan: Let’s take 5 minutes to complete/draw-out our Action Plan.
- Confidence: Select how you feel about creating your own [insert goal] (e.g., tree nursery):
- I don’t think I can do this
- I think I can do this but need more help
- I feel confident that I can do this
- Obstacles: What might get in the way of me doing this (obstacles, challenges, issues)?
- Options: What ideas and options could help me overcome these obstacles?
- Support: What kind of additional support, if any, might I need to do this? Could we help each other in providing this additional support?
- Complete Action Plans: Let’s take a few minutes to make adjustments and additions to our Action Plan based on our discussion.
Bring the large group together, and discuss each item in the checklist, documenting each new/unique response on a flipchart:
i. Confidence: how did your group generally feel about completing this task?
Record this for each group to get an overall idea of how confident members are feeling. You can record each option as a smiling, thinking, or sad face to keep it visual.
ii. Obstacles: what were some obstacles and challenges you identified in your groups?
Add new and unique responses to the flipchart. For responses that are repeated, add an ‘x’ next to the obstacle each time it is listed to identify the most common issues.
iii. Options: what ideas and solutions did you come up with to overcome the obstacles? What other options can we come up with?
iv. Support: In addition to the solutions we discussed, is there any additional support that would help you do this? Were you able to identify ways in which you could help each other get this support?
Where appropriate you can make a mental note of farmers who might need one-on-one follow-up support from either you or the lead farmer.
v. Action Plan: ask a few farmers to share their action plans with the larger group, and have the group celebrate the commitments they have built towards their goal in a culturally appropriate way at the end of the activity.
Rapid Participatory Assessment
What is Rapid Participatory Assessment?
A rapid participatory assessment allows you to quickly evaluate if the Forest Garden training is meeting its objectives. It is a simple, yet powerful set of tools that creates room for critical reflection and enables you and the farmer group to identify what is going well, where there is room for improvement, and collectively make adjustments. Fundamentally, the Forest Garden program is based on the following logic and assumptions. The Rapid Participatory Assessment tools allow you to test this framework with a light, dialogue centric approach.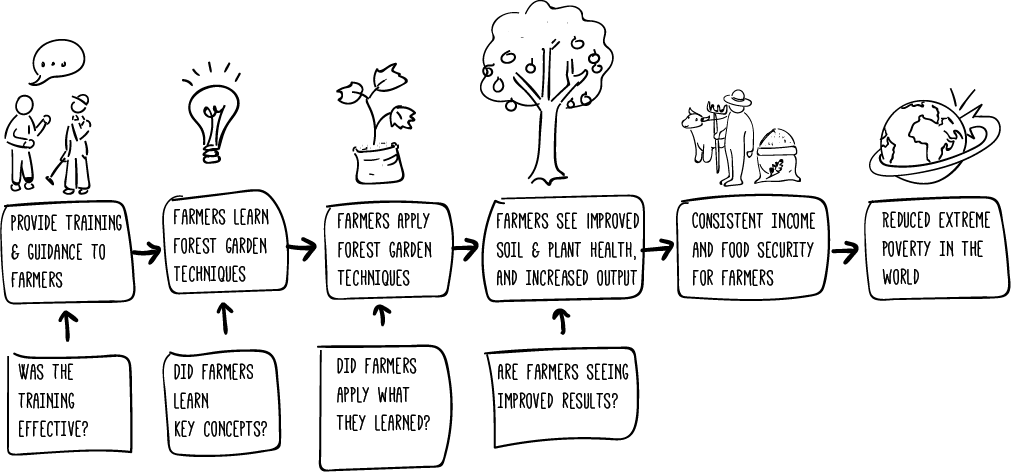 As shown in the graphic above, as the facilitator, you can do a rapid participatory assessment at four levels:
- Was the training effective
- Did the farmers learn key concepts
- Did the farmers apply what they learned
- Are farmers seeing improved results
When do I use Rapid Participatory Assessment?
As the facilitator, you can determine how you weave the assessments into your training sessions. For each level of assessment, keep the following recommendations in mind when determining the frequency and timing of conducting them:- Was the training effective: in conducting this assessment you need to provide enough time for participants to fully experience the Forest Garden training and its methodology. On the other hand, you do not want to wait too long and run training sessions that are not meeting the needs of the group. At a minimum, we recommend assessing training effectiveness after conducting two sessions with the group; and then re-assessing every 2-3 sessions.
- Did the farmers learn key concepts: research shows us that repetition boosts learning retention. Using a quick activity (like the Ball Toss discussed later) to capture learning is a great way to reiterate key concepts and solidify knowledge transfer for the group. You can use this single-question learning assessment to both close the day, and kick-off the following training session to maximize learning.
- Did the farmers apply what they learned: as part of the Forest Garden training, lead farmers are required to do an on-site visit for each member. These combined with one-on-one visits by the facilitator are the primary mechanism to assess the degree to which farmers are applying Forest Garden techniques on their own farms. In addition, you can weave in dialogue based assessment and reflection at key junctures like the start of a new year or end of a topic series.
- Are farmers seeing improved results: Since it takes approximately two years for farmers to start seeing improved results from their Forest Garden, we recommend assessing results and outcomes in year 3 & 4.
How do I use Rapid Participatory Assessment?
Method 1 – Ball Toss
The Ball Toss activity is a great way to assess learning and progress, especially when you have limited time during the session to commit towards assessment. To prepare for the activity:- Procure a small ball that will be easy to toss from person to person.
- Determine the assessment level (training effectiveness, learning, application, results) and the specific topic or training sessions you will focus on (e.g., nurseries, vegetable gardens, pruning etc.) Here are samples you can adapt for each assessment level:
- Was the training effective: For the Forest Garden training and support being provided to you – share one thing you like, and one thing you wish could be improved.
- Did the farmers learn key concepts: Share what we learned in the last Forest Garden session.
- Did the farmers apply what they learned: Share the Forest Garden techniques you are applying in your farms, and lessons you are learning.
- Are farmers seeing improved results: Share the successes and challenges you have experienced with your Forest Gardens so far.
Method 2: Structured Dialogue
The Structured Dialogue (covered in-depth in the article on Core Facilitation Skills – Enable Group Problem Solving) is especially well suited to assessing the first three assessment levels: effectiveness of training, learning and retention, and application of techniques. Please review the Structured Dialogue chapter to get a deeper understanding of the method and its underlying thinking and approach. Here are sample questions you can use to adapt the tool to conduct a Rapid Participatory Assessment:| Stages | Was the training effective? | Did farmers learn key concepts | Did farmers apply what they learned |
| Experience | What training methods did we use? What did we do together? What did you observe me doing? What materials did I provide? | What did we learn? What was critical in the information we covered? What all do you remember about the information we covered? | What are you doing differently in your fields? What techniques have you implemented? What are you seeing and observing? |
| Feel | How do you feel about the training? What did you like most? What did you struggle with? | How do you feel about what you are learning? What has surprised you? What has been hard? | What are you excited about? What are you struggling with? How do you feel about the steps you have taken? |
| Think | In what ways is the training meeting your needs? How could you get more value from it? | Of the things we learned, what can have most impact for you? Of the things you struggled with – what about it was hard? | What are you learning as you apply these techniques in your field? What impact will it have on you and your family? Of the things that are challenging – what is getting in the way? |
| Do | What are 1-2 things we can test during the next training sessions to make these more effective? | What is one thing you could try to improve your learning from these sessions? What could we try as a group? | What is the most common thing that is getting in our way? What are possible solutions? Which ones could we test and try? |
- Determine the assessment level (training effectiveness, learning, application) and the specific topic or training sessions you will focus on (e.g., nurseries, vegetable gardens, pruning etc.)
- Finalize the questions you will use for each stage in the Structured Dialogue (adapted from sample above).
- Set-up flip charts on the wall for each of the four Structured Dialogue stages.
- Provide instructions to the group, here is sample language you can adapt: “We are going to spend the next 30 minutes assessing how effectively we are applying the techniques we have learned for establishing vegetable gardens. I will ask a series of questions focused on the techniques we are applying and what we are observing, how we feel about our progress, evaluate what we think about how we are doing, and finally identify what we could be doing differently or better.”
- As you ask the questions, use keywords or short phrases to capture the responses the farmers provide to the questions.
- At the end, go around the room and have each person share what they will personally be doing differently based on their insights from the dialogue. Model accountability by sharing what you will be doing differently to provide better support in the current context.
- If the group agrees on collective actions or decisions, clearly call this out at the end. Outline what the action is, who all are accountable for it, what it is going to look like, and how or when it will happen.
Method 3: Checklists
For the last level of the assessment – evaluating improved results and outputs – a checklist of questions can provide a more complete picture of what is working and what needs improvement. The open ended rapid assessment techniques we discussed above (i.e., structured dialogue, ball toss) can miss components that are critical to the overall success of a Forest Garden.Using a checklist to assess the results farmers are seeing from their Forest Gardens can be an intense activity and can take more time than the other methods described here. Make sure you select components that have already been covered with the group and allow enough time to pass for the group to start seeing results from specific techniques (e.g., a minimum of two years for Green Walls, Windbreaks, Contour Planting, Fruit Trees).
You can adapt this checklist and pick components that are most relevant for the group at that specific point-in-time:
| Forest Garden components | Focus | Successes | Challenges | Possible solutions |
| Green Walls | Overall health, gaps and need of additional trees, pruning, shaping & harvesting | |||
| Soil Health | Changes, organic matter, beneficial insects, water retention, soil supplements | |||
| Water | Movement of water and soil through the field especially with heavy rains, use of contour planting, berms and swales | |||
| Wind | Movement of wind through the tree | |||
| Fire | Protection from fires in the dry season | |||
| Pests and disease | Protecting vegetables, trees, and crops from pests and diseases | |||
| Outside factors | Drought, flood, etc. | |||
| Food for consumption | Ability to meet family food needs from farm produce | |||
| Produce for sale | Ability to maximize profits by selling at higher prices, more consistent output throughout the year | |||
| Vegetable Gardens | Overall health, seeds, nurseries, transplanting, rotating soil givers and takers, plants to limit pests and disease, mulching | |||
| Animals | Incorporating and meeting needs of livestock from Forest Garden, cut-and-carry techniques, fodder management | |||
| Fruit and timber trees | Overall health and output, seed selection, nurseries, outplanting, pruning & harvesting, cuvettes | |||
| Variety and health of plants (guilds) | Overall plant health and output, variety of products, use of horizontal & vertical space |
i. Set up a flip chart for each component on the checklist, using words or symbols depending on the literacy level of the group.
ii. Create as many sub-groups as charts on the wall, for example create 4 subgroups if you are assessing four components. Assign 4-6 members per sub-group.
iii. At the start of the activity assign a chart (component) to each sub-group.
iv. Give the group 5-7 minutes to discuss successes, challenges, and possible solutions for their assigned topic. Ask them to add their insights to the chart with words or symbols.
v. At the end of the 7 minutes, rotate the sub-groups to the next chart or component. Repeat this till each group is back at their original chart.
vi. Ask each group to report out their insights, inviting members from the larger group to add to the dialogue for each topic being discussed.
vii. Help identify and call out any concrete actions or next steps identified by the group.
If you are conducting a Rapid Participatory Assessment for more than 5 components at the same time, utilize voting to identify overall successes and pain points.
i. Draw out the checklist on flipcharts, or on a wall or floor area.
ii. Provide members with 3 green and 3 red stickers each when working with flipcharts.
If stickers are not available, you can instruct members to draw checks and x’s- restricting themselves to no more than 3 of each. You can also use different colored leaves if working with a table made on the floor.
iii. Members are instructed to put the green dots (or their equivalent) in the successes column, and red ones in the challenges column. They can choose to spend all of their 3 dots on one component- to indicate intensity of their success or struggles – or distribute the dots across different components.
iv. Once members are done voting, the group should be able to clearly identify components working well and areas where members are struggling.
- Identify the area with the most green dots and conduct a Ball Toss to share success stories.
- Identify the area with the most red dots and conduct a Structured Dialogue to identify underlying issues and next steps for resolving the challenges.
Tips for using Rapid Participatory Assessment
- When discussing training effectiveness – stay impartial, receptive, and objective. It is natural to feel judged or reactive towards constructive feedback and comments that focus on you as the trainer and facilitator. Acknowledge the feedback, paraphrase, and reflect back what you heard. Resist the urge to justify or offer explanations, simply listening to what is being shared and allow the group the space to navigate the dialogue, as you would with any other topic.
- For more involved challenges you can follow this up with action planning to implement the ideas generated by the group.